background image

 All disabled zones are supplied with the proper voltage but cannot issue an alarm or fault condition. If we have disabled 
zones, then this is indicated with the indicators 'General disable' and the corresponding Disable LED zone  and the buzzer 
sounds once every minute.

Access  level 3:

These functions are implemented during the installation and need the technical code to be accessed. The technical code is 


"364"

, it is the same for all panels and cannot be changed. The functions that can be implemented   using the technical 

code are activation methods used for the relays and can be done only if the panel has not issued an alarm or fault condition. 

These methods of programming are:

Programming delay of the Extinguish output.

 If we want to program the delay of the extinguish output  we must enter the 

technical code 

( 364 )

 and then press the number key 

'5'

. The  'General fault' and 'General alarm' LEDs start to blink . The 

'

Alarm

'

 LED of zone 1 and zone 2 , 

'

Manual

'

 alarm and 

'

Abort

'

 show the way the extinguish output is programmed according 

to the next table:

The default setting of this delay is 30 sec. In this programming mode if the keys 

'1','2', '3' 

 and 

'4'


are pressed


, we can toggle 

the LEDs ON or OFF until we archive the desired behaviour  according to the table above. In order to exit this programming 

To restore the button to its previous position you must use the included black 
plastic key. Place the key in the respective hole, turn it at 90° and pull it until 
the button is restored.   

Cancel - extinguish deactivation: 

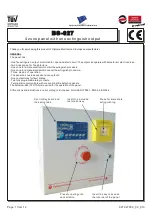
By pressing the red button (panic type) 

on  the  front  side  of  the  panel  (side  picture)  the  extinguish  output  is 
deactivated. 
To restore the button to its previous position, turn it anti-clockwise.

Access  level 2:

 Includes all the functions that the user can do and an 

access code is required

.

The code is

 "34"

, it is the same for all panels and cannot be changed. The 

functions that can be implemented using this code are the following:

Siren Silence:

 When an alarm is issued and we want to silence the sirens then  

we must enter the user code 

( 34 )

 and then the keys number 

'5' 

and

 '5'

. The 

sirens  are  silenced  but  the  internal  buzzer  continues  to  sound.  The  panel 
remains in normal operation. A new alarm from another zone will resound the 
sirens.

Panel Reset:

 When an alarm or fault condition has occurred and we want to 

reset the panel, we must press  the user code 

( 34 ) 

and then the keys number 

'5' 

and

 '6'

. The panel lights all LEDs in sequence and then enters normal operation.

Zone and Siren enable/disable:

 If we want to disable the operation of specific 

zones then we must enter the user code 

( 34 )

 and then the keys number 

'5' 

and


'4'

. The LEDs marked  'General disable'  start to blink,  and if a zone is disabled 

the corresponding 'Alarm' LED lights to indicate this. Using the keys 1, 2, 3, 4 we 
can enable or disable the respective zones. With the keys   

'5' 

and

 '6' 

we can 

enable  or  disable  the  sirens  of  the  panel.  The  disabled  zones  have  the 
respective indication led turned on. The panel resets automatically, if no button 
is  pressed  for  30  seconds. The  panel  conducts  an  automatic    RESET    and 
enters normal operation mode.

Page 3 from 

12

921627000_09_0

10

 LED Alarm zone 2

LED Alarm zone 1

No Delay

Delay 30 sec

Delay 60 sec

Delay 90 sec

LED On

LED Off

LED Off

LED On

LED Off

LED Off

LED Off

LED Off

 LED  Abort

LED Alarm Manual

LED Off

LED Off

LED Off

LED Off

LED On

LED Off

LED Off

LED On

Содержание BS-627

Страница 1: ... two independent siren outputs One contact relay for fault status Two fully programable relay contacts Terminals to communicate with conventional fire detection panels The batteryΑ 986 12V 7Ah is required for the operation of the panel All functions and indications are according to European Norms ΕΝ 12094 1 EN 54 2 EN 54 4 Press for immediate extinguishing Insert the key to access the internal of ...

Страница 2: ...have an ALARM condition The Fault LED lights in every FAULTcondition The Disable LED lights in every DISABLE condition The System LED lights when occurred a problem in the central possessor unit System fault The next indication LED groups are the ZONE and ALARM These indicators light when the corresponding issues an alarm condition Below this group we have the Fault Disable indication for each zon...

Страница 3: ...e picture the extinguish output is deactivated To restore the button to its previous position turn it anti clockwise Access level 2 Includes all the functions that the user can do and an access code is required The code is 34 it is the same for all panels and cannot be changed The functions that can be implemented using this code are the following Siren Silence When an alarm is issued and we want ...

Страница 4: ...and Relay 2 then we must enter the technical code 364 and then press the number key 5 The General fault and General alarm LEDs start to blink The Fault Disable LED of zone 1 and zone 2 show the programmed activation method of the zone relays according to the table below We can see the programming process of the Relay 1 and Relay 2 operation in zone 1 and 2 Alarm LEDs according to the table below Β...

Страница 5: ... O N L I R O U T L N I T U R O N L I R O U T L N I T U R O N L I R O U T L N I T U R O N L I To the BS 63X zone Το Relay1 terminal of a BSR 2104 or BSR 2114 R1 alarm relay 1 R2 alarm relay 2 RF fault relay Figure 1 Connecting devices to BS 627 panel Page 5 from 12 BS 527 BS 527 921627000_09_010 OUT IN 470Ω 0 5W BS 537 BS 533 No1 ...

Страница 6: ...h panel offers 2 independent circuits for connecting sirens bells or other devices that need 24Vdc in order to operate Each circuit can supply to the devices a maximum of 300mA Each terminal block by default has a pre installed terminal resistor 5Κ6 This terminal resistor must removed and installed on the last siren of the line or is left on the terminal block if the circuit is not used The connec...

Страница 7: ...agnetic door latch activation electro valves activation Output FR This output is used to be connected with the output Fire Routing of the BSR 2104 and BSR 2114 as shown in figure 1 OUTPUT A A This output is used only for production proposes This must not be used by any other technician but only technician from olympia electronics CONNECTION OPTIONS IN ADDRESSABLE OR CONVENTIONAL PANEL For connecti...

Страница 8: ...sconneted from the mains power supply and the battery The installation of the panel must be carried out by qualified personnel only Disconnect power before servicing Never insert or remove boards or componets with the power on During installation use grounded antistatic wrist band to protect this equiment form ESD The panel must be installed permanetly It is not allowed to connect the device direc...

Страница 9: ...atic circuit breaker rated at 10A This fuse has to be a separate labeled fuse 4 Always use cables with double insulation 5 The diameter of the cable must be at least 1mm Figure 9 6 The inner insulation of each cable must not be cut more than 1cm Figure 9 7 The outer insulation must not be cut more than 1cm away from the internal insulation 8 The batery fuse is a resetable fuse 3A inside the panel ...

Страница 10: ...brake glass call points maximum current 10mA 26VDC 3VDC reset interrupted output with maximum current output 0 3 A The output is protected with a self reseting electronic fuse Output 24VM The relay 1 and 2 contacts have value of 5Α 250VAC The fault relay contacts have value 1Α 30VDC Under no circumstances should voltages or currents outside limits be connected All relays output must be protected w...

Страница 11: ...raph 7 8 EN 54 2 Design Activation time of manual trigger Activation time of outputs after trigger Components of the panel have been selected for the intended purpose and are expected to opetate within their specification when the environmental conditions outside the cabinet of the panel comply with class 3k5 of EN 60721 3 3 1995 Class A temperature range of 5 C to 40 C A factory production contro...

Страница 12: ...Page 12 from 12 921627000_09_010 Certification The panel BS 627 is certrified from HEEQAC Also HEEQAC controls the production under CPR number 0848 CPR 005 Below is the marking ...

Отзывы: