background image


45 

921468007_09_011 

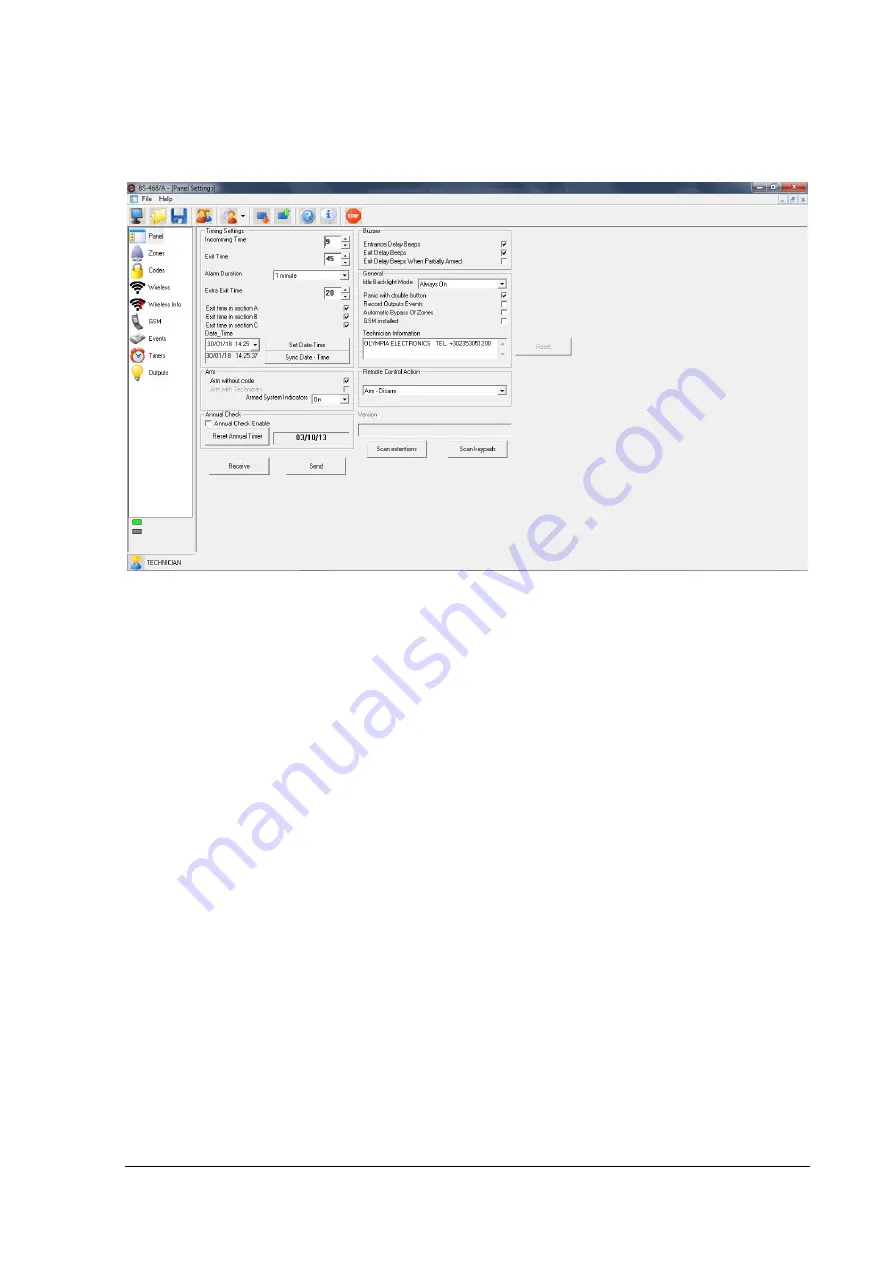
"Panel" Window 

In this window we can see and make changes on the panel settings. We can receive the settings from 
the panel by pressing the button "Receive". This action is needed in case we have not pressed "Down-
load All", as described on the previous page. 


These changes can also be performed by the keypad. By using a PC there is a better overall picture 
and  changes  are  done  quickly  and  easily.  Additionally,  by  using  the  PC  we  have  the  opportunity  to 
synchronise time and date pressing the corresponding button. 

If we want, for example, to change the "Entry time" delay and make it 40 seconds we press the up ar-
row next to the entry time. Now  we can see that the field  we  have changed  is highlighted green and 
the time is 40sec. This means that we have made a change that is not yet permanent (Not sent to the 
panel). 

If  we  want  to  make  the  changes  permanent  we  have  to  press 

"Send"

.  A  window  showing  the  send 

progress  appears  and  it  will  disappear  when  the  settings  have  been  sent.  After  that,  the  entry  time 
field becomes white again. 

In general, this is a standard procedure in any window. Whenever we perform some changes, the cor-
responding fields become green and we have to send these data to apply the changes to the panel.  

In case we press "Scan extensions" or "Scan keypads", we have to wait 30 seconds and then we must 
press "New" button on the toolbar. In the following window the new devices must be visible now. 

"Zones" Window 

In this window we can change and view each zone's properties (see picture on next page). By press-
ing the  button  "Receive",  we can receive the information  of all the  zones. The  user can also acquire 
each zone's properties by single clicking the mouse on the field "Device type" of each zone (last col-
umn). If, for example, the  user presses the cell of Line 8 and Column 9, the PC will ask the data for 
that zone only.  


Содержание BS-468/A/WL

Страница 1: ...BURGLAR ALARM PANEL BS 468 A...

Страница 2: ...uts programming 27 System general parameters programming 28 BS 464 GSM telephone dialer programming 31 Wireless Network 33 Factory Menu 35 3 4 Wireless Zones Functions 35 Wireless Zones Extension Boar...

Страница 3: ...aken to load data from the file is as follows 55 Save settings to a file 55 Send settings to the panel 55 Offline Connection 56 New 56 Panel s Firmware Update 57 4 I OLYMPIA APPLICATIO 58 5 Technical...

Страница 4: ...has port for connecting an YET 205B 630 remote control receiv er and an automatic telephone dialler On the telephone dialler port you can connect a BS 465 wired PSTN telephone dialer or a BS 464 wirel...

Страница 5: ...simply pressing the ABC key if during the programming the option ARM WITHOUT CODE has been se lected The disarming of the system can be done by using the master code or one of the user code that have...

Страница 6: ...are disabled will not be armed during the next arming of the system For example if we enter 04 and then immediately 07 this means that the next time the system is armed zones 4 and 7 will be disabled...

Страница 7: ...at have happened and are stored in the panel s internal memory This means that an error event was triggered for Zone1 at 12 20 on March 07 2012 It also informs us this is the 70th event of a total of...

Страница 8: ...hanged by the user By typing the master code the next display shows With the EVENTS selection we can see all events or delete the events in memory If we choose to erase the events memory the system re...

Страница 9: ...ter that the system deletes the password If we want to change the main password from the CODES menu select CHANGE MAIN PASS WORD By pressing the key we see After entering the 4 new digits of the passw...

Страница 10: ...yboard With the selection IDLE BACKLIGHT MODE we can set the way the display is illuminating when active There are 3 options ALWAYS OFF The display is illuminated after pressing any key The brightness...

Страница 11: ...e DELETE TIMER is highlighted then this means that the timer is inactive The inactive timer always has a de fault time of 12 00 The selection CHANGE TIMER is also used to create a pro cedure By select...

Страница 12: ...re If for example an SMS could not be delivered in a past time and the user press RESET the specific warning will be deleted But if a battery is disconnected by press ing RESET the specific fault will...

Страница 13: ...entrance area On zones 3 and 4 the rest of the radars and on zones 5 to 7 the magnetic contacts that we require to give an immediate alarm Finally on zone 8 con nect the TAMPER of the external siren W...

Страница 14: ...of the ground floor radar detectors and if we arm sections ABC we have full operation of the system 3 Zone 1 Zone with delay section With bell sound Zone 2 Zone with delay section Zone 3 Zone without...

Страница 15: ...n B Zone 16 Zone without delay section B Zone 17 keyboard 1 Zone with delay section This configuration is suitable for a large store with sections A B present 6 Zone 1 Zone with delay section Zone 2 Z...

Страница 16: ...rminals and a small alignment vial that is used to correctly mount the base After connecting the cables the main body is fastened to the base A screw on the bottom side does not permit accidental remo...

Страница 17: ...one after the other No terminal should contain 3 cables or more The jump ers of the terminal resistors must be placed only on the two outermost devices On all the other devic es is should be removed...

Страница 18: ...at the cover of the siren must be removed i e during a battery change In normal operation the cable must be removed from the terminal of the panel When the FL terminal is supplied with 12V the beacon...

Страница 19: ...to the respective terminals of all the detectors The other 2 cables connect in series the contacts RELAY NC of all the detectors of the zone and the resistors found on the terminals of the panel The d...

Страница 20: ...2 menus EVENTS NOTIFICATION of the ARC Alarm Receiving Center of the PSTN and the GSM When a value is entered i e entry time and after the last digit is entered the value is stored auto matically wit...

Страница 21: ...ician that installs the panel It is noted that in BS 466 A in Technician Menu if no key is pressed for 2 hours the keypad returns to the main screen exiting the Technician Menu In BS 477 this time is...

Страница 22: ...Making this selection and pressing we must select the section that is affected by the password We can select A B C or ABC SET WITH DELAY EXTRA The password arms only does not disarm the panel but wit...

Страница 23: ...define if sections A B C have an arming delay We must reply YES or NO for each subsection ENTRANCE DELAY BEEPS A user can select YES if he wants the built in buzzer to sound during the entry countdown...

Страница 24: ...request a bypass confirmation for each active zone REMOTECONTROL ACTION We select the operation mode of the remote control if available The available actions are ARM DISARM PANIC ALL FUNCTIONS and DEA...

Страница 25: ...cian can adjust the parameters of the zones These functions apply for both wired and wireless zones By selecting it we can enter the desired zone number 01 56 After inserting the zone s number the nam...

Страница 26: ...it will arm the whole system or a section of it It can be used to arm the panel through some other system such as a BMS or fire alarm system The zone must be connected with a normally closed contact...

Страница 27: ...ble For the last three settings the panel will automatically select the correct setting If no special settings are required then it is good practice not to alter them Wired zones status TECHNICIAN MEN...

Страница 28: ...esent time System general parameters programming TECHNICIAN MENU SYSTEM DEVICE ADDRESS By default each keyboard BS 466 A is assigned by address 2 If we only have one keyboard there is no reason to cha...

Страница 29: ...ng this menu we select the number of the telephone that we want to al ter Select from 1 to 6 After selecting the number of the phone that we want to alter the following screen is shown We can select w...

Страница 30: ...C PHONE NUMBER We can enter the telephone number of the ARC PANEL ID 0 9 B F we can enter the ID of the alarm panel using the numbers 0 to 9 and the letters from B to F ATTENTION When the BS 477 wirel...

Страница 31: ...nt to alter the fol lowing screen is shown At this point we can select if during the selected events the GSM will call and send an SMS to the tel ephone number will only call or will only send an SMS...

Страница 32: ...mote commands As of the second option 15 seconds is not an strict value 1 second differences can be observed depending each mo bile provider GSM ENTER SIM CARD PIN Two options ENTER PIN and CARD HAS N...

Страница 33: ...l strength appears on a scale from 1 to 4 ASSIGN ZONE Normally on Network Installation every device that is recognized is assigned automatically to the first free wireless zone number Through ASSIGN Z...

Страница 34: ...stalled on the network is pressed or not The numbers which displayed are the wireless zones whose tamper is ac tive not pressed When wireless keypad is used its screen is refreshed every 8 sec Thus th...

Страница 35: ...system The specific procedure takes place by choosing NETWORK INSTALLATION and can be started only if a user has TECHNICIAN privileges 1 From the welcome screen press and then select MASTER OR TECH ME...

Страница 36: ...of the wireless network settings can be executed normally by the BS 477 Wireless network installation without keyboard and PC The procedure is simple and is realized via BT1 button of the BS 479 expa...

Страница 37: ...d select DELETE ALL ZONES After a few seconds we return in the wireless menu Wireless devices will leave the network after a maximum of 2 5 minutes NOTE If a wireless keyboard sends a command to delet...

Страница 38: ...on the panel from the house next door that are already installed on another BS 468 A panel Also only Olympia Electronics devices can be connected to BS 468 A and vice versa i e Olympia Electron ics wi...

Страница 39: ...ireless Magnetic Contact features 2 DIP switches DS1 and a Tamper Switch DIP Switch 1 OFF position Internal magnetic contact is on DIP Switch 1 ON position Internal magnetic contact is off External ma...

Страница 40: ...than 20 For a safe conclusion about the signal at one point the keypad should take measurements at this point for 10 15 seconds in order to renew display 5 6 times Thus the user will be able to draw a...

Страница 41: ...indicator is red instead of green see first picture on the next page we must close the PC program unplug the USB cable and insert it again After the drivers finish the installation pro cedure we can s...

Страница 42: ...e current attached de vices of the panel will appear While the panel tries to enumerate the connected system peripherals the OK button is not active The picture bellow shows an example of a system tha...

Страница 43: ...ing on the code the access level is different The factory setting for the technician code is 9 9 9 9 and for master code 1 2 3 4 From now and on we can change or view all the settings of the panel suc...

Страница 44: ...such as Zones information passwords events timers and outputs Because this function is time consuming if we need to take information for specific features of the panel it is better to load the data fr...

Страница 45: ...he panel If we want to make the changes permanent we have to press Send A window showing the send progress appears and it will disappear when the settings have been sent After that the entry time fiel...

Страница 46: ...46 921468007_09_011 While being in Technician mode the user can adjust the function of each zone If Master mode is enabled see picture below the user can only change the name of the zone...

Страница 47: ...e name of the Code see the picture below The Code name is not being sent to the panel It is saved in a file and can help the alarm installer When we change the password we are asked to type it 2 times...

Страница 48: ...columns that appear are A A The event number Date and time of the event Category It may be Alarm Fault General Normal Bypass Warning etc Source Where the event came from It can be the Panel Keypad Zon...

Страница 49: ...e file with the settings of the panel We can save them in a separate file by pressing the button Save located in the down right corner as shown in the picture below The Open button is used to load an...

Страница 50: ...Sector A every Monday at 7 00 while Timer 4 arms the system every Wednesday at 17 00 Outputs Window In Outputs window we can see and set the panel s outputs functions Their operation is described in a...

Страница 51: ...installation Added devices appear in the white text box below the Network Setup section Zones deletion With Delete all wireless zones button we can delete all the available wireless zones that exist i...

Страница 52: ...rsion These fields are read only Receive and set RF supervisor and Wireless Siren LED By pressing the Receive button we can read the data from the panel By pressing the Send button we can send these d...

Страница 53: ...rresponding settings The number must be active In the area below the number there are cells where we can define the actions that will be performed when events are triggered by the panel These actions...

Страница 54: ...absence of AC power If the system is connected to a Alarm Receiving Center we can set or read the settings of this center Master and Technician user password modification In case we have gained TECHN...

Страница 55: ...nd or extensions 2 Load settings file 3 Press New and then Connect Save settings to a file By pressing the following button we can save our personal panel configuration ATTENTION In order to save all...

Страница 56: ...the indicator to the down left bottom of the above screen reveals the connection ab sense between the panel and the PC After we press the button New we see the following window We can choose whether...

Страница 57: ...in panel board and NOT on the keypad BS 466 A The user is asked if he agrees with the upgrade At this point the version in which the table will be upgraded is also mentioned For the latest version of...

Страница 58: ...8007_09_011 4 I OLYMPIA APPLICATIO Olympia Electronics Alarm application is available for smart phones and tablets for Android or IOS You can download it for iOS from Apple store For Android visit our...

Страница 59: ...d when the alarm goes off Outputs P1 P2 P3 General outputs with a 13 8V 200mA rating These outputs are activated depending on the panel settings Relay Output Relay change over output NC C NO The volta...

Страница 60: ...ompanies each product This warranty ceases to exist if the buyer does not follow the technical instructions included in official documents given by Olympia Electronics or if the buyer modifies the goo...

Страница 61: ...password 1 2 3 4 ____________ Technician password 9 9 9 9 ____________ Users Passwords Password Owner Function Password Owner Function 01 26 02 27 03 28 04 29 05 30 06 31 07 32 08 33 09 34 10 35 11 3...

Страница 62: ...22 41 04 23 42 05 24 43 06 25 44 07 26 45 08 27 46 09 28 47 10 29 48 11 30 49 12 31 50 13 32 51 14 33 52 15 34 53 16 35 54 17 36 55 18 37 56 19 38 Various information Entry time ________ seconds Exit...

Отзывы: