background image

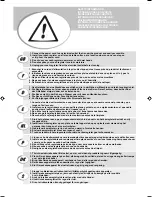
1. Connect the power cord to an electrical outlet that is near the product and easily accessible.
2. Install your cash register on a flat and stable surface, at a location where no one can step on

or trip over the power cord.

3. Do not use your cash register near water, or with wet hands.
4. Do not expose your cash register to rain or moisture.
5. Unplug your cash register from the electrical outlet before cleaning.

SAFETY INFORMATION
INFORMATIONS DE SECURITE
SICHERHEITSVORSCHRIFTEN
INFORMACIÓN DE SEGURIDAD
VEILIGHEIDSINFORMATIE
INFORMAÇÃO SOBRE SEGURANÇA
SIKKERHEDSFORANSTALTNINGER
SÄKERHETSINFORMATION

1. Brancher le cordon d’alimentation à la prise électrique qui se trouve près du produit et facilement

accessible.

2. Initialiser la caisse enregistreuse sur une surface plaine et stable, dans une place où il n’y pas le

risque de presser ou de heurter le cordon.

3. Ne pas utiliser la caisse enregistreuse près de l’eau, ou avec les mains mouillées.
4. Ne pas exposer la caisse enregistreuse à la pluie ou à l’humidité.
5. Débrancher la caisse enregistreuse de la prise électrique avant de la nettoyer.

1. Das Netzkabel an eine Steckdose anschließen, die in der Nähe der Maschine und leicht zugänglich ist.
2. Die Registrierkasse auf einer ebenen stabilen Fläche installieren. Darauf achten, dass keiner über

das Netzkabel stolpern oder auf es treten kann.

3. Die Kasse nicht in der Nähe von Wasser oder mit nassen Händen benutzen.
4. Die Kasse nicht Regen oder Feuchtigkeit aussetzen.
5. Vor Reinigungsarbeiten die Kasse vom Stromnetz trennen.

1. Sluit het netsnoer aan op een stopcontact dat zich in de buurt van het kasregister bevindt en vrij

toegankelijk is.

2. Installeer uw kasregister op een plat en stabiel oppervlak, op een plaats waar niemand op het

netsnoer kan trappen of  erover struikelen.

3. Gebruik uw kasregister niet in de buurt van water, of met natte handen.
4. Stel uw kasregister niet bloot aan regen of vocht.
5. Trek de stekker uit het stopcontact voordat u het kasregister gaat schoonmaken.

1. Conecte el cable de alimentación a una toma eléctrica que se encuentre cerca del producto y que

tenga un fácil acceso.

2. Instale su caja registradora en una superficie plana y estable, en un emplazamiento en el que nadie

pueda pisar el cable de alimentación o tropezar con él.

3. No utilice la caja registradora cerca del agua ni si tiene las manos húmedas.
4. No exponga la caja registradora a la lluvia o la humedad.
5. Desconecte la caja registradora de la toma eléctrica antes de la limpieza.

1. Ligue o cabo de alimentação a uma tomada eléctrica que esteja perto da máquina e seja de fácil acesso.
2. Instale a caixa registadora sobre uma superfície plana e estável, num local onde ninguém possa chocar

com ela ou tropeçar no cabo de alimentação.

3. Não utilize a caixa registadora perto de água, nem a manuseie se tiver as mãos molhadas.
4. Não exponha a caixa registadora a chuva ou humidade.
5. Desligue a caixa registadora da tomada de corrente antes de a limpar.

1. Tilslut de elektriske kabel til elnettet, som er ved siden af produktet og nemt tilgængelig.
2. Placér Deres kasseapparat på en flad, sikker og stabil overflade, et sted hvor ingen kan gå eller trampe

over det elektrisk kabel.

3. Brug ikke Deres kasseapparat i nærheden af vand, eller med våde hænder.
4. Deres kasseapparat må ikke udsættes for regn eller fugtighed.
5. Slut Deres kasseapparat fra elnettet inden de går i gang med rengøring.

1. Stoppa in nätsladdens stickkontakt i ett lättåtkomligt vägguttag nära apparaten.
2. Installera kassaregistret på en jämn och stabil yta där ingen kan trampa på eller snubbla

över nätsladden.

3. Använd inte kassaregistret nära vatten eller med våta händer.
4. Utsätt inte kassaregistret för regn eller fukt.
5. Dra ut stickkontakten från vägguttaget före rengöringen.

Содержание ECR 7700

Страница 1: ...ECR 7700 ECR 7700 ECR 7700 ECR 7700 ECR 7700 Cash Register USER S GUIDE ENGLISH...

Страница 2: ...ituci n de componentes o accesorios originales con otros no aprovados por el fabricante o bien efectuada por parte personal no autorizado Het is belangrijk te weten dat de volgende acties nadelige gev...

Страница 3: ...FIGURES IMAGES ABBILDUNGEN FIGURAS AFBEELDINGEN FIGURAS FIGURER BILDER 5 2 1 4 6 7 8 9 10 1 2 3 4 5 7 9 10 21 20 19 17 18 16 15 14 13 11 6 8 3 12...

Страница 4: ...uikelen 3 Gebruik uw kasregister niet in de buurt van water of met natte handen 4 Stel uw kasregister niet bloot aan regen of vocht 5 Trek de stekker uit het stopcontact voordat u het kasregister gaat...

Страница 5: ...re confiance avec la caisse enregistreuse 1 Die Kasse an eine Netzsteckdose anschlie en und die Batterien einsetzen 2 Papier laden 3 Die Quick Start Programmierung durchf hren 4 Einfache Verkaufsvorg...

Страница 6: ...ATTERIESTAMPONSDELAM MOIRE BATTERIENZURSPEICHERSICHERUNGEINSETZEN INSERCI NDELASBATER ASDERESPALDODELAMEMORIA INSTALLERENVANDEBATTERIJENVOORNOODVOEDING INSERIRASPILHASDEBACKUPDAMEM RIA INDS THUKOMMELS...

Страница 7: ...LOADING THERMAL PAPER INSTALLATION DU PAPIER THERMIQUE EINLEGEN VON THERMOPAPIER CARGA DEL PAPEL T RMICO THERMISCH PAPIER PLAATSEN COLOCAR PAPEL T RMICO IS TNING AF TERMOPAPIR LADDAV RMEK NSLIGTPAPPER...

Страница 8: ...inicio de la jornada Morgensopstarten Arranque da manh Morgensopstart Salestransactions Transactions de ventes Verkaufsvorg nge Transacciones de venta Verkooptransacties Transac es de vendas Salgstran...

Страница 9: ...perator Display 3 Control lock 4 Keypad 5 Cash Drawer 6 Cash Drawer Lock 7 Item deposit drawer 8 Power Cord 9 Customer Receipt Output Window 10 Printer Compartment Cover Removable Cash Drawer with Loc...

Страница 10: ...ters indicated on the related key and indicated in the Character Table when defining clerk names receipt header receipt footer department names PLU product names and currency identifiers During captio...

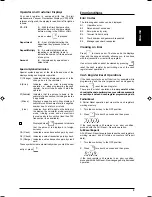
Страница 11: ...transaction paid by cash Ch Check Indicates a sales transaction paid by check Cr Charge Indicates a sales transaction paid by credit card These symbols clear automatically when you start the next ent...

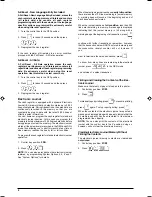
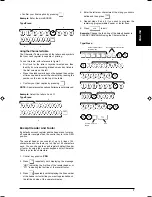
Страница 12: ...ry reaches the nearly full or full condition To program the cash register for standard electronic journal operation 1 Control key position PRG 2 Press NOTE You can also personalize other electronic jo...

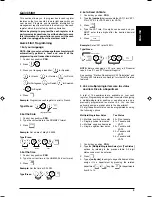
Страница 13: ...pe the number that represents the VAT 1 for VAT1 2 for VAT2 3 for VAT3 and 4 for VAT4 3 Press 4 Type the VAT rate Five digits can be used and you MUST enter three digits after the desired decimal plac...

Страница 14: ...sert the batteries to save thisinformationifapowerfailureoccursorifyouunplug the cash register from the power outlet Making Changes to Cash Register Programming If you wish to make a change to your in...

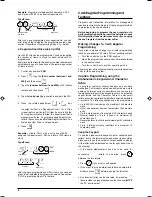
Страница 15: ...osition The receipt header can consist of up to 6 lines of 24 characters each the footer up to 4 lines of 24 characters each You can change the cash register s default header or footer by using the nu...

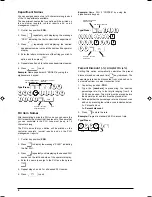
Страница 16: ...2 Press to display the message PL001 indicating the first PLU 3 Press repeatedly until displaying the desired PLU number on the left hand side of the operator display 4 Enter the name to assign to th...

Страница 17: ...in foreign currency and on the management reports 1 Control key position PRG 2 Press until displaying the message FC1 indicating the first of the four possible foreign currency exchange rates 3 Press...

Страница 18: ...tion System Options by setting machine conditions 37 38 39 40 and 41 you program the cash register to print the VAT information that you need 1 Control key position PRG 2 Type the machine condition nu...

Страница 19: ...hout needing to enter a Clerk number only or a Clerk number and its related 3 digit security code You can also program other clerk related features See System Options Machine conditions 9 and 10 for d...

Страница 20: ...trol key position PRG 2 Press 3 Press Using the Cash Register in a Password Protected Mode If a manager password was defined to protect unauthorized access to the Z mode proceed as follows to enter th...

Страница 21: ...ull condition at the start of the transaction 0 Do not sound 1 Sound Training Mode password defined Confirm entered password Switch to Training Modepassword definitionmode 7 Sound warning beep for EJ...

Страница 22: ...ount printing enable disable 0 Print total VAT amount 1 Do not print total VAT amount 38 Taxable amount split per rate printing enable disable 0 Print taxable amount split per rate 1 Do not print taxa...

Страница 23: ...r Z1 Z2 position X and Z Reports Turning the control key to the X1 X2 position prints the accumulated transaction information and RETAINS ALL TOTALS IN MEMORY Take this report any time of the day to p...

Страница 24: ...lerk 1 number or assigned name Time Activity counter for Clerk 2 Sales total of all clerks Z report identifier Department 1 activity counter Z counter Department 1 sales total Department number or ass...

Страница 25: ...Press Department Programming Report This report provides a printout showing how your departments are programmed It provides the status associated VAT and associated price for each department 1 Control...

Страница 26: ...you press Make sure there is plenty of paper loaded in the printer 2 If a manager password was defined type the 4 digit password and press 3 Press When the contents of the electronic journal are print...

Страница 27: ...splay You can display the current date and time outside of a sales transaction by pressing to display the date and to display the time with the cash register in either the REG or JRNL mode Electronic...

Страница 28: ...item to Depart ment 14 with an exact tender of 4 65 1 Press 2 Press 3 Press 4 Press 5 Press Registering a Multiple Item Sale with Exact Cash Tender in Foreign Currency Example Register a 10 00 item t...

Страница 29: ...item to Department 2 and a 50 00 item to Department 3 Complete the transaction with payment using a credit or debit card 1 Press 2 Press 3 Press Check Tender with Change Example Register a 19 50 item...

Страница 30: ...amount discounted is displayed 5 Press 6 Press The change due to the customer is displayed Discounting the Total Sale by Using a Random Discount Rate Example Register a 20 discount to a sales transac...

Страница 31: ...rtment 2 Then register a 3 00 item to this same Department End the transaction with an exact change tender 1 Press 2 Press The amount voided is displayed and printed 3 Press 4 Press 5 Press Refunding...

Страница 32: ...opens and the transaction is recorded on receipt Registering an Identification Number to a Transaction Up to 7 digits can be used for the identification number This entry can be made prior to any ope...

Страница 33: ...emperature de fonctionnement 0 C 40 C Dimensions 340 mm L x 360 mm P x 230 mm H Poids 5 1 Kg Registrierkasse Technische Eigenschaften Im folgenden sind technischen Eigenschaften dieses Registrier kass...

Страница 34: ...riftstemperatur 0 C 40 C M tt 340 mm B x 360 mm L x 230 mm H Vikt 5 1 Kg NEDERLANDS Specificaties Hieronder vindt u de technische eigenschappen van dit model kasregister Type Elektronisch kasregister...

Страница 35: ...ombredefoisquel ondoitpresserlatouche N mal dr cken N mero de veces a pulsar Aantalkerendrukken N de vezes que deve premir Tryk antal gange Antalg ngerf rnertryckning B Touchesclavier Tastenblock Tecl...

Страница 36: ......

Страница 37: ...es mod 2 PARA LOS OTROS PA SES FUERA DE LA UE El tratamiento la recogida el reciclaje y la eliminaci n de equipos el ctricos y electr nicos se deber n llevar a cabo de conformidad con las Leyes vigent...

Страница 38: ...Code 551403 Code 551403 Code 551403 Code 551403 Code 551403...

Отзывы: