background image

1

PRINT

8

C O N T E N T S

I N D E X

Printer Driver Settings

To view Help for a setting, click the 

 button in the upper right-hand corner of the window and then click the setting.

Some restrictions exist on the combinations of settings that can be selected in the printer driver setup screen. When a restriction is 
in effect, an information icon (

) will appear next to the setting. Click the icon to view an explanation of the restriction.

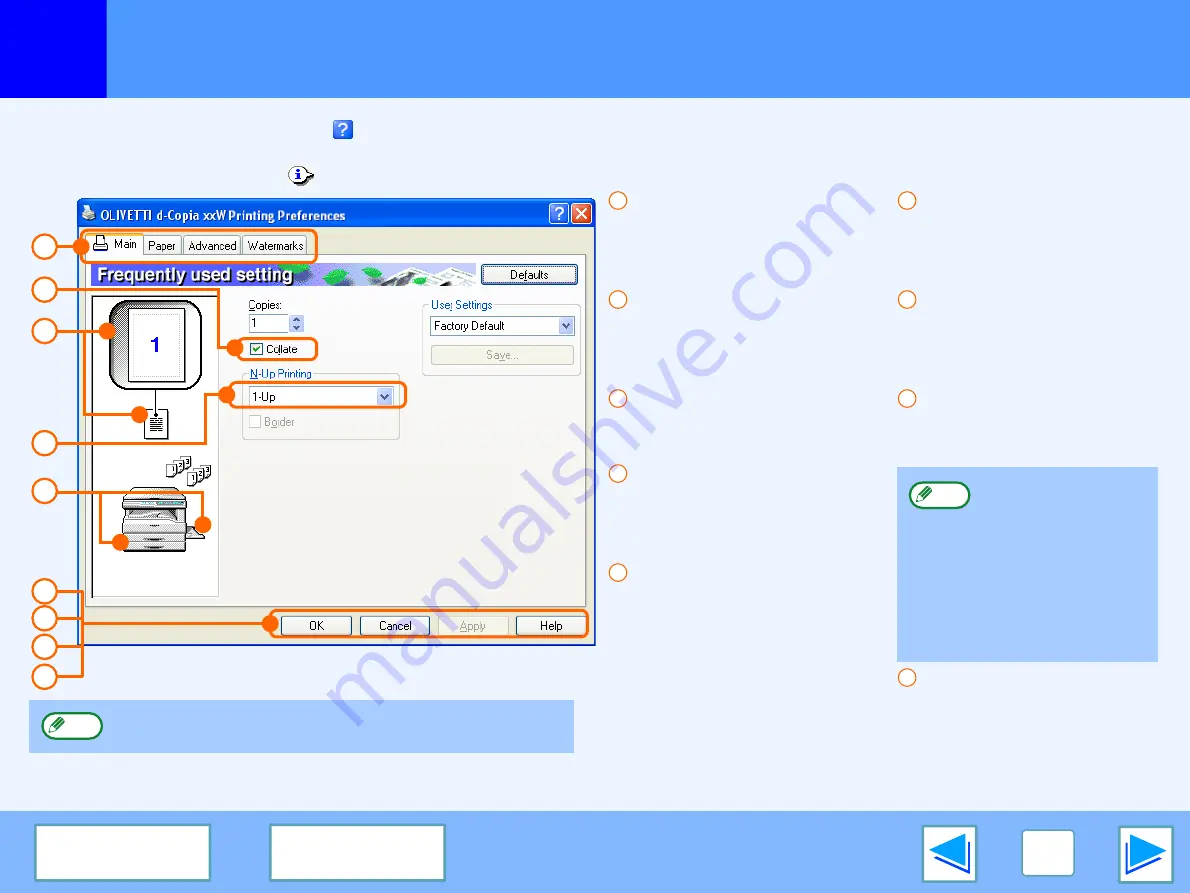
Tab

The settings are grouped 
on tabs. Click on a tab to 
bring it to the front.

Checkbox

Click on a checkbox to 
activate or deactivate a 
function.

Print setting image

This shows the effect of the 
selected print settings.

Drop-down list

Allows you to make a 
selection from a list of 
choices.

Image of paper trays

The tray selected in "Paper 
Selection" in the "Paper" 
tab appears in blue. You 
can also click on a tray to 
select it.

"OK" button

Click this button to save 
your settings and exit the 
dialog box.

"Cancel" button

Click this button to exit the 
dialog box without making 
any changes to the settings.

"Apply" button

Click to save your settings 
without closing the dialog box.

"Help" button

Click this button to display 
the help file for the printer 
driver.

1

3

2

4

5

6
7

8

9

The settings and the image of the machine will vary 
depending on the model.

Note

1

2

3

4

5

Windows NT 4.0 
does not have the 
"Apply" button.
The "Apply" button 
does not appear 
when you open this 
window from an 
application.

6

7

8

Note

9

Содержание d-Copia 20W

Страница 1: ...d Copia 16W 20W Online Manual Start Start Click this Start button...

Страница 2: ...ive owners For information on the following topics please refer to the Operation Manual for the digital multifunctional system Basic machine procedures adding paper replacing the toner cartridge using...

Страница 3: ...to jump directly to that section Takes you forward page by page Takes you back page by page Following Links This manual uses a link function that allows you to jump to a related page If you click gree...

Страница 4: ...n 7 Printer Driver Settings 8 Printing Multiple Pages on One Page 9 Fitting the Printed Image to the Paper 10 Rotating the Print Image 180 Degrees 11 Printing a Watermark 12 Outline of the Print Statu...

Страница 5: ...rint 3 Select Print from the application s File menu The Print dialog box will appear 4 Make sure that OLIVETTI d Copia xxW is selected as the printer If you need to change any print settings click th...

Страница 6: ...aper for a print job is not loaded in the machine the printing procedure will vary depending on the Use Close Paper Size setting in the user programs see USER PROGRAMS in the Operation Manual When Use...

Страница 7: ...Start button and select Settings 2 Click Printers and Other Hardware and then click Printers and Faxes In Windows 2000 click Printers 3 Click the OLIVETTI d Copia xxW printer driver icon and select Pr...

Страница 8: ...ct of the selected print settings Drop down list Allows you to make a selection from a list of choices Image of paper trays The tray selected in Paper Selection in the Paper tab appears in blue You ca...

Страница 9: ...n the printer driver setup screen and select 2 Up or 4 Up for N Up Printing on the Main tab See Basic Printing for details on how to open the printer driver If you select the Border checkbox borderlin...

Страница 10: ...how to open the printer driver 1 Click the Paper tab in the printer driver setup screen 2 Select the original size A3 of the print image in Paper Size 3 Check the Fit To Page box 4 Select the actual...

Страница 11: ...the feature select the image orientation in Image Orientation on the Paper tab and then select the Rotate 180 degrees checkbox See Basic Printing for details on how to open the printer driver The fol...

Страница 12: ...d follow the steps below See Basic Printing for details on how to open the printer driver How to Print a Watermark From the Watermark drop down list select the watermark that you wish to print for exa...

Страница 13: ...are explained below Follow the instructions in the status window to solve the problem Tab Click a tab to bring it to the front The Options tab allows you to select display options for the Print Statu...

Страница 14: ...XP network environment Note that the Windows network environment must already be established Print server as explained here is a computer that is directly connected to the machine and a Client is any...

Страница 15: ...in the Network dialog box 6 Click Printers and Other Hardware in the control panel and click Printers and Faxes In operating systems other than Windows XP double click the printer icon 7 Click the OL...

Страница 16: ...re and click Printers and Faxes 3 Click Add a printer in Printer Tasks The Add Printer Wizard will appear 4 Click the Next button This page provides steps for Windows XP Home Edition users only If you...

Страница 17: ...and click the Next button 6 Select Browse for a printer and click the Next button 7 Select the printer to be shared in the network and click the Next button The contents of this window will vary depen...

Страница 18: ...Click the OLIVETTI d Copia xxW printer driver icon and select Properties from the File menu The printer properties will appear 3 Click the Ports tab and click the Add Port button The Printer Ports di...

Страница 19: ...Window 13 Printer driver 8 How to Use the Online Manual 3 I Image Orientation 11 Introduction 2 M Main 8 N N up printing 9 O ON LINE 5 Outline of the Print Status Window 13 P Pausing a print job 6 Pr...

Отзывы: