background image

33

4

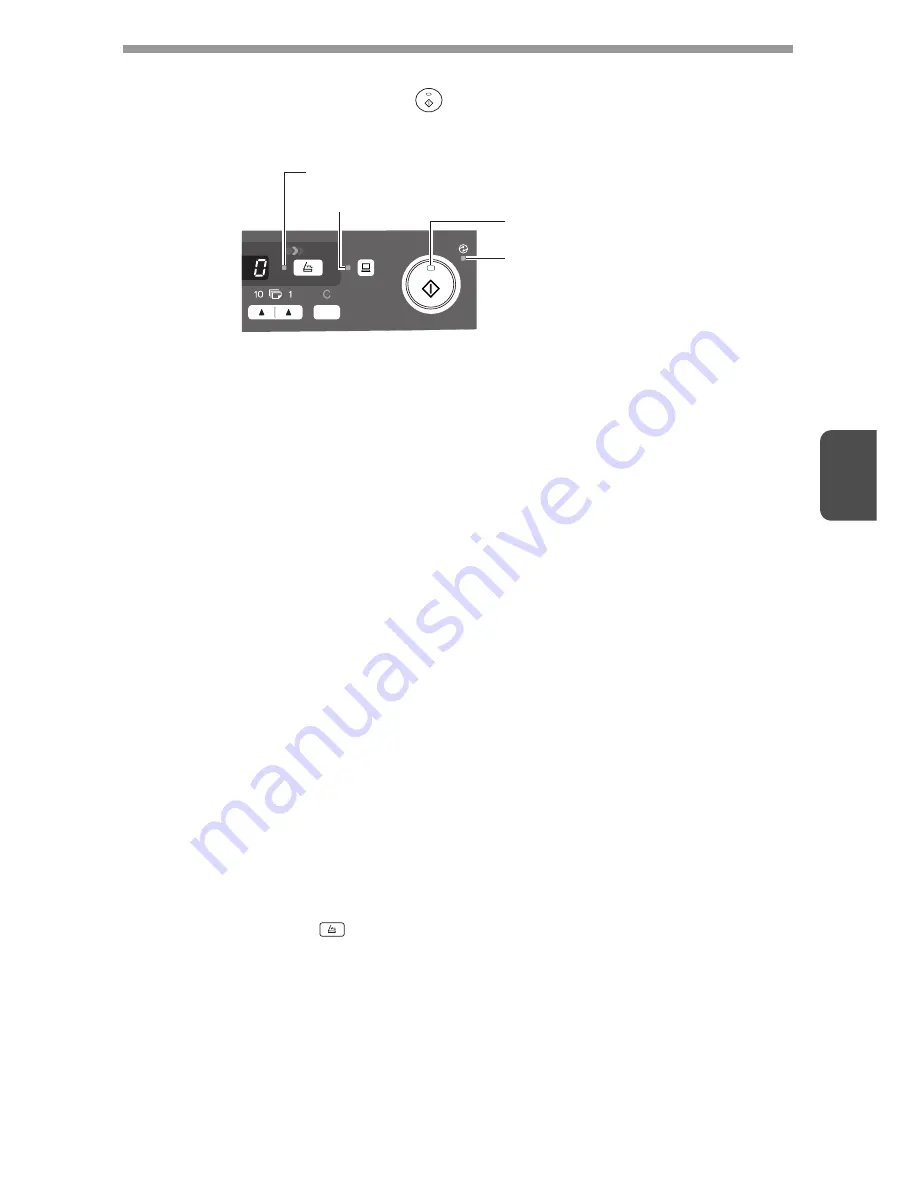
INDICATORS ON THE OPERATION PANEL

The ONLINE indicator and the start (

) indicator indicate the state of the printer or 

scanner.

Start indicator

On:

Indicates the unit is ready for copying or scanning is being performed.

Blinking: The indicator blinks in the following situations:

• When a print job is interrupted.
• When reserving a copy job.
• When toner is being replenished during a copy or print job.

Off:

The indicator is off in the following situations:
• During copying or scanning.
• The unit is in the auto power shut-off mode.
• When a misfeed or error has occurred.
• During print online.

ONLINE indicator

The ONLINE key is pressed and on line and off line are changed.
On:

Indicates the unit is ready for printing or scanning is being performed.
(On line)

Blinking: Printing or data is being received from a computer.
Off:

Copying is being performed. (Off line)

Power save indicator

On:

Indicates the unit is in a power save mode.

Blinking: Indicates that the unit is initializing (when the side cover is opened and 

closed or the power turned off and on).

SCAN indicator

On:

The SCAN (

) key has been pressed and the unit is in scanner mode.

Blinking: A scan job is being executed from the computer, or scan data is stored 

in the unit's memory.

Off:

The unit is in the copy mode.

Power save indicator

Start indicator

ONLINE indicator

SCAN indicator

Содержание d-Copia 200D

Страница 1: ...Code 546106en GB d Copia 200D d Copia 201D OPERATION MANUAL DIGITAL MULTIFUNCTIONAL SYSTEM...

Страница 2: ...zed but in a stand by condition at this POWER switch position If your copier is so marked please read I for ON and O for OFF Caution For a complete electrical disconnection pull out the main plug The...

Страница 3: ...rols or adjustments or performance of procedures other than those specified herein may result in hazardous radiation exposure The socket outlet shall be installed near the unit and shall be easily acc...

Страница 4: ...oducts that have earned the ENERGY STAR are designed to protect the environment through superior energy efficiency Wave length 780 nm 15 nm 10 nm Pulse times 12 88 s 12 88 ns 7 mm Output power Max 0 2...

Страница 5: ...OW TO USE THE ONLINE MANUAL 45 5 MAKING COPIES COPY FLOW 46 ORIGINAL PLACEMENT 47 SET THE COPY QUANTITY 49 EXPOSURE ADJUSTMENT PHOTO COPYING 49 REDUCTION ENLARGEMENT ZOOM 51 SELECTING THE PAPER TRAY 5...

Страница 6: ...s Conventions used in this manual and online manual This operation manual explains the operation of the d Copia 200D and d Copia 201D models In cases where the operation is the same the d Copia 201D i...

Страница 7: ...eder tray Peep hole Document feeder cover 6 3 11 12 5 LAN connector d Copia 201D only Interface 13 Document glass Operation panel Front cover Paper tray Multi bypass tray Side cover Side cover open bu...

Страница 8: ...eder tray if a misfeed occurs in the machine when the SPF is used d Copia 201D p 69 Display 1 2 3 4 5 6 7 8 9 Displays the specified copy quantity zoom copy ratio user program code and error code SCAN...

Страница 9: ...ed see TROUBLESHOOTING THE UNIT p 62 1 Open the package and make sure that all the accessories are supplied with the unit p 8 2 Remove the protective materials p 9 8 Now you can copy p 46 print p 35 o...

Страница 10: ...ot included or is damaged contact your authorised service representative PREPARING THE UNIT FOR INSTALLATION 1 Be sure to hold the handles on both sides of the unit to unpack the unit and carry it to...

Страница 11: ...the scan head locking switch The scan head locking switch is under the document glass If the switch is locked the unit will not operate Unlock the switch as shown below To lock the scan head locking s...

Страница 12: ...he toner developper cartridge from the bag Remove the protective paper Hold the cartridge on both sides and shake it horizontally four or five times Hold the tab of the protective cover and pull the t...

Страница 13: ...side cover by pressing the round projections near the side cover open button When closing the covers be sure to close the front cover securely and then close the side cover If the covers are closed in...

Страница 14: ...ial settings see the Initial settings of operation panel described on the next page If you use the unit in a country other than the country where the unit was purchased you will need to make sure that...

Страница 15: ...e Auto clear time setting p 55 elapses after a job is finished or when the clear key is pressed twice The initial settings of the operation panel are shown below When copying has begun in this state t...

Страница 16: ...paper weighing from 105g m2 to 128g m2 A4 is the maximum size that can be fed through the multi bypass tray Special papers such as transparency film labels and envelopes must be fed one sheet at a tim...

Страница 17: ...e of the paper tray 3 Store the pressure plate lock which has been removed in step 2 To store the pressure plate lock rotate the lock to fix it on the relevant location 4 Adjust the paper guides on th...

Страница 18: ...k if the guide is not set too narrow causing the paper to bend Loading paper in these ways will result in document skew or a paper jam When not using the unit for an extended period remove all paper f...

Страница 19: ...size The multi bypass tray 1 Open the multi bypass tray and extend the tray The multi bypass tray can hold maximum of 50 sheets of paper Capacity will vary depending on the type of paper loaded The or...

Страница 20: ...use envelopes that are filled with air or envelopes that have labels or stamps attached Envelopes of which the surface is not flat because of embossing may cause the copies prints to become smudged Un...

Страница 21: ...a network printer Scanner driver The scanner driver allows you to use the scanning function of the machine with TWAIN compliant and WIA compliant applications Desktop Document Manager Desktop Documen...

Страница 22: ...ed will vary depending on the type of connection between the machine and your computer 2 Although it is possible to install Button Manager and Desktop Document Manager on Windows 98 Me 2000 XP Vista n...

Страница 23: ...re license and then click the Yes button 6 Read the Readme First in the Welcome window and then click the Next button If you need to use a different connection method after installing the software usi...

Страница 24: ...o show information on packages that are selected 7 To install all of the software click the Standard button and go to step 12 To install particular packages click the Custom button and go to next step...

Страница 25: ...Installing the Utility Software 11 Click the Button Manager or the Desktop Document Manager button Click the Display Readme button to show information on packages that are selected Follow the on scree...

Страница 26: ...alling Desktop Document Manager Imaging If Continue is selected Desktop Document Manager Imaging will be installed If Imaging for Windows is installed on your computer Desktop Document Manager Imaging...

Страница 27: ...M icon On Windows Vista click the Start button click Computer and then double click the CD ROM icon In Windows 98 Me 2000 double click My Computer and then double click the CD ROM icon USB is availabl...

Страница 28: ...on a network 8 Click the Set the IP Address button 9 The printer or printers connected to the network will be detected Click the printer to be configured the machine and click the Next button You can...

Страница 29: ...e Set the IP Address button first and go to step 8 on page 26 The Ethernet Address is indicated on the left side of the machine near the LAN connector If the machine can not be recognized enter the Et...

Страница 30: ...pears at the end of the IP address and click the Next button 13 A window appears to let you check your entries Make sure that the entries are correct and then click the Finish button If any of the ent...

Страница 31: ...low these steps to install the printer driver in the client computer 1 Perform steps 2 through 6 in Using the machine with a USB connection p 21 2 Click the Custom button If you are using Windows Vist...

Страница 32: ...button If you are using Windows 98 Me 2000 XP you can also click the Add Network Port button and select the printer to be shared by browsing the network in the window that appears On Windows Vista th...

Страница 33: ...rinter driver in the client computer 1 Perform steps 3 through 7 in Using the machine as a network printer p 25 p 26 2 Click the Printer Driver button If you are using Windows Vista and a security war...

Страница 34: ...rk in the window that appears On Windows Vista the Add Network Port button does not appear 5 Follow the on screen instructions 6 When the Finish screen appears click the Close button This completes th...

Страница 35: ...During print online ONLINE indicator The ONLINE key is pressed and on line and off line are changed On Indicates the unit is ready for printing or scanning is being performed On line Blinking Printin...

Страница 36: ...t Settings and click Printers 3 Click the d Copia 200D 201D printer driver icon and from the File menu select Properties 4 On Windows Vista select Properties from the Organize menu 4 Click Printing Pr...

Страница 37: ...tings see the online manual or the help file for the printer driver If copying is being performed when printing is started copying will continue After copying is complete printing will be executed whe...

Страница 38: ...tab 3 Click the Select an event button and select ScanMenu SC1 from the pull down menu Select Olivetti Button Manager P in Start this program and click Apply 4 Repeat step 3 to set ScanMenu SC2 throug...

Страница 39: ...vetti Button Manager P in Start this program and click Apply Do the same for each ScanMenu through ScanMenu SC6 When the settings have been completed click the OK button to close the screen When the s...

Страница 40: ...on Manager see the online manual or the help file This is the corresponding setting in the Button Manager to automatically send multiple images from the SPF at 75 dpi to Desktop Document Manager using...

Страница 41: ...d in Button Manager This can be done with the Windows OS showing the Event Manager selection dialog or directly into a selected application if the Button Manager is the only allowed handler for device...

Страница 42: ...ra device register with the Windows Event Manager and shown as available in the registered applications The path an event takes to get to the user s selected application depends upon the event setting...

Страница 43: ...tion numbers are initially as follows To check the settings see Scan Button Destination Setting Dialog Box p 38 and then open the settings window of the Button Manager Scanning is not possible during...

Страница 44: ...ox selected in the Scan Button Destination Setting Dialog Box p 38 the TWAIN settings screen p 43 will automatically appear Check the settings and then press the start key again or click the Scan butt...

Страница 45: ...ge from the File menu or click the Acquire button 5 Set the configuration for scanning refer to the online manual and help file and click the Scan button Scan is started If you use more than one scann...

Страница 46: ...amera Wizard appears Click Next and establish the basic settings for scanning For information on the settings see the Windows XP help file After completing each setting click Next 4 Select a name form...

Страница 47: ...CD ROM icon 4 Double click the Manual folder double click the English folder and then double click the d Copia 200D 201D pdf icon 5 Click to read the online manual To close the online manual click the...

Страница 48: ...e that paper has been loaded in the paper tray p 15 or multi bypass tray p 17 and check the paper size p 14 If paper is not loaded see page 15 2 Place the original If you are using the document glass...

Страница 49: ...with the original scale and the centering mark Gently close the original cover SPF After placing the original be sure to close the SPF If left open parts outside of the original will be copied black...

Страница 50: ...feeds may result If the original is placed correctly in the SPF the SPF indicator will light up If the original is not placed correctly the SPF indicator will not light If the SPF is not closed correc...

Страница 51: ...sity manually or to copy photographs the exposure level can be adjusted in five steps manually 1 Press the exposure mode selector key to select the MANUAL mode or PHOTO mode 2 Use the light and dark k...

Страница 52: ...hold down the exposure mode selector key for approximately 5 seconds The PHOTO indicator will go out and the AUTO indicator will begin to blink One or two light and dark indicators corresponding to th...

Страница 53: ...splayed in the display SELECTING THE PAPER TRAY Press the tray select key Each time you press the tray select key the location indicated by the paper feed location indicator changes in the following o...

Страница 54: ...ted between Turn on Long Edge and Turn on Short Edge When making two sided copies from the original table the paper size must be A4 letter When making two sided copies from the SPF d Copia 201D A4 B5...

Страница 55: ...llustrations on page 52 3 Select the copy settings See SET THE COPY QUANTITY p 49 EXPOSURE ADJUSTMENT PHOTO COPYING p 49 and REDUCTION ENLARGEMENT ZOOM p 51 Using the document glass 1 Press the start...

Страница 56: ...g procedure Auto clear The unit returns to the initial settings a preset amount of time after the end of job This preset amount of time auto clear time can be changed Resolution of AUTO MANUAL mode Yo...

Страница 57: ...t a user program number For the user program numbers see the following table The selected number will blink in the left side of the display 3 Press the start key The entered program number will be ste...

Страница 58: ...is 1 234 6 SPF automatic original discharge time d Copia 201D 1 5 min 2 30 min 3 60 min 4 120 min 5 240 min 6 OFF 10 Resolution of AUTO MANUAL mode 1 300dpi 2 600dpi 21 Reset factory 1 YES 2 NO 24 Pr...

Страница 59: ...EVELOPER CARTRIDGE p 10 2 Gently pull the toner developper cartridge out while pressing the lock release button 3 Install a new toner developper cartridge To install the new cartridge see INSTALLING T...

Страница 60: ...will stop operating until the cartridge is replaced Replace the drum cartridge at this time Based on copying onto A4 size paper at 5 toned area 1 Remove the toner developper cartridge see step 1 and 2...

Страница 61: ...RTRIDGE p 10 5 Close the front cover and then the side cover by pressing the round projections near the side cover open button The drum replacement required indicator will go out and the start indicat...

Страница 62: ...ft clean cloth If necessary dampen the cloth with a glass cleaner Do not spray flammable cleaner gas Gas from the spray may come in contact with the internal electrical components or high temperature...

Страница 63: ...by holding the tab Set the charger cleaner onto the right end of the transfer charger gently slide the cleaner to the left end and then remove it Repeat this operation two or three times 4 Return the...

Страница 64: ...smudges appear on copies Document glass or SPF dirty Clean regularly 60 Original smudged or blotchy Use a clean original Striped copies Is transfer charger clean Clean the transfer charger 61 Paper mi...

Страница 65: ...mode 54 The unit is in the auto power shut off mode Press the start key to cancel the auto power shut off mode 54 The paper tray indicator is blinking The paper tray is not pushed in correctly or the...

Страница 66: ...t the unit will stop and the SPF misfeed indicator will blink while the misfeed indicator will remain off For a misfeed of originals in the SPF see D Misfeed in the SPF d Copia 201D p 68 1 Open the mu...

Страница 67: ...rojections near the side cover open button The misfeed indicator will go out and the start indicator will light up The fusing unit is hot Do not touch the fusing unit when removing misfed paper Doing...

Страница 68: ...s near the side cover open button The misfeed indicator will go out and the start indicator will light up The fusing unit is hot Do not touch the fusing unit when removing misfed paper Doing so may ca...

Страница 69: ...ow and gently remove the misfed paper from the exit area 4 Raise the fusing unit release lever close the front cover and then close the side cover by pressing the round projections near the side cover...

Страница 70: ...ment feeder tray Press the SPF jam release lever see below while you remove the original Close the document feeder cover Open and close the SPF to clear the SPF misfeed indicator If the misfed origina...

Страница 71: ...have not yet been scanned from the document feeder tray For the original s stuck in the SPF do not remove manually This may cause a machine malfunction See the step 3 3 Press the copy ratio display ke...

Страница 72: ...Continuous copying Max 99 pages subtractive counter First copy time 7 Approximately 8 0 seconds When user program 24 is set to OFF 10 7 seconds When user program 24 is set to ON paper A4 exposure mod...

Страница 73: ...the name plate located on the back of the unit Power consumption Max 1 0kW Overall dimensions Width 607 6mm 809mm Depth 462 5mm 492 5mm Weight Approximately 8 16 0kg 23 0kg Unit dimensions Width 518...

Страница 74: ...USB interface cable Use a shielded cable LAN interface cable d Copia 201D only Use a shielded type cable Be sure to use only genuine OLIVETTI parts and supplies For best copying results be sure to us...

Страница 75: ...been stored in the front of the paper tray 5 Push the paper tray back into the unit 6 Lock the scan head locking switch p 9 7 Close the multi bypass tray and the paper output tray extension and attach...

Страница 76: ...atio selector indicator 6 51 Copy ratio selector key 6 51 D Dark key 6 49 Desktop Document Manager 19 Display 6 Displaying total number of copies 56 Disposing of toner developper cartridge 57 Document...

Страница 77: ...2 Preheat mode 54 55 Preparing the unit for installation 8 Prevention of OC copies when the SPF is up function 54 56 Printer driver 19 Proper storage 73 R Reduction enlargement zoom 51 Resolution of A...

Страница 78: ...stalling the toner developper cartridge 10 Loading paper Multi bypass tray 17 Paper tray 15 Loading the original Document glass 47 SPF 48 Moving the unit 73 Opening the printer driver 34 Power off 13...

Страница 79: ...LASERS TEILYLLE L KATSO S TEESEEN Laserstrahl CAUTION CLASS 3B INVISIBLE LASER RADIATION WHEN OPEN AND INTERLOCKS DEFEATED AVOID EXPOSURE TO BEAM VORSICHT UNSICHTBARE LASERSTRAHLUNG DER KLASSE 3B WENN...

Страница 80: ...d Copia 200D_d Copia 201D_v1 d Copia 200D_d Copia 201D OPERATION MANUAL...

Отзывы: