


Repair information
4-35
Image transfer unit (ITU)
1.
Write down the number on the new ITU before installing it. You will need the 16-digit numeric value from
the barcode after the installation, and it is easier to see at this point.
2.
Remove the right cover. See
“Right cover removal” on page 4-7
3.
Remove the rear shield. See
“Rear shield removal” on page 4-7
.
4.
Remove the waste toner container. See
“Waste toner bottle” on page 4-67
.
5.
Remove the imaging unit (IU). See
“Imaging unit (IU) removal” on page 4-40
.
Note:
The ITU FRU includes a spring clamp kit. If the printer does not have this kit installed, perform the
following steps to prepare for the later installation. Continue below with
spring clamp kit” on page 4-35
. If the spring clamp kit is not installed, skip to
(with or without the spring clamp kit)” on page 4-37
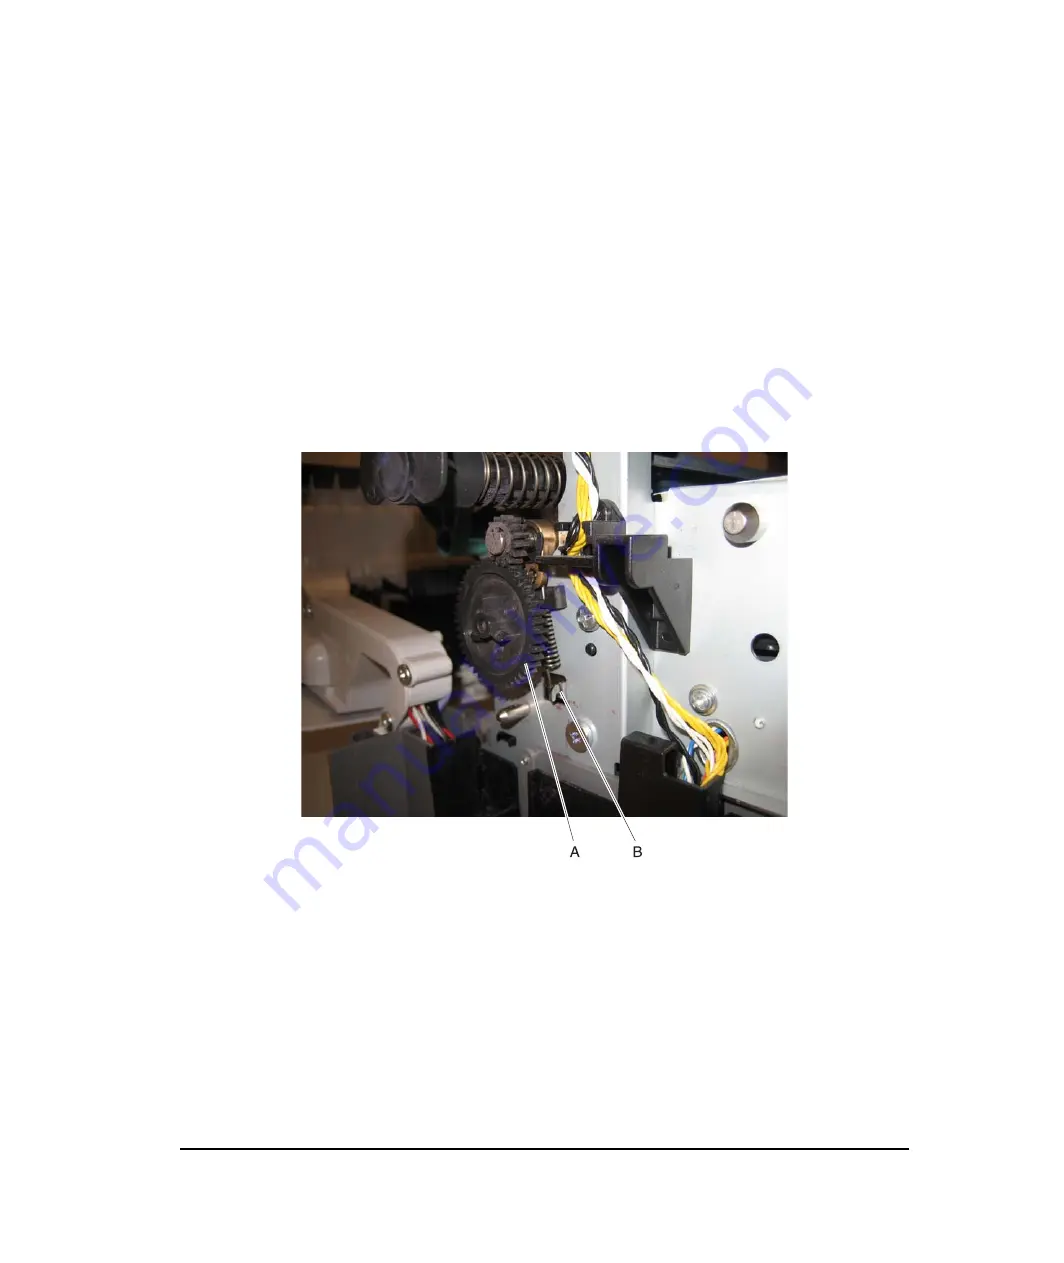
Removal of ITU without the spring clamp kit
1.
Pull the gear (A) straight out to un
snap
it, and then discard it. A new gear is included in the spring clamp kit
and must be used with the new spring clamp.
2.
Remove the rubber pad (C).
3.
Place the spring clamp onto the shaft (D).
Y112730-2
Содержание d-Color MF920
Страница 1: ...SERVICE MANUAL Copiatrici Copiers d Color MF920 d Color MF923 Code Y112730 2...
Страница 10: ...x Service Manual Y112730 2...
Страница 15: ...Notices and safety information xv Y112730 2...
Страница 16: ...xvi Service Manual Y112730 2...
Страница 18: ...xviii Service Manual Y112730 2...
Страница 22: ...xxii Service Manual Y112730 2...
Страница 124: ...2 80 Service Manual Y112730 2...
Страница 198: ...3 74 Service Manual Y112730 2...
Страница 203: ...Repair information 4 5 4 Remove the three screws A on the rear side of the left cover A Y112730 2...
Страница 211: ...Repair information 4 13 9 Remove the two springs D 10 Remove the two screws E on the bottom Y112730 2...
Страница 234: ...4 36 Service Manual 4 Snap the new gear onto the shaft D The installation is the same as the old gear Y112730 2...
Страница 288: ...4 90 Service Manual 6 While holding the op panel mounting assembly remove the op panel bezel cover Y112730 2...
Страница 302: ...4 104 Service Manual Y112730 2...
Страница 305: ...Locations 5 3 Interior view Y112730 2...
Страница 306: ...5 4 Service Manual Printer boards Controller Board Y112730 2...
Страница 317: ...Locations 5 15 HVPS Y112730 2...
Страница 319: ...Locations 5 17 LVPS Y112730 2...
Страница 324: ...6 2 Service Manual Y112730 2...
Страница 331: ...Index I 7 Y112730 2...
Страница 332: ...UPDATINGSTATUS DATE UPDATEDPAGES PAGES CODE 09 2010 1ST EDITION 332 Y112730 2...


