5-6
d-Color MF 3300/3800
[System Settings]
5
5.1
[Expert Adjustment]
To display: [Utility] - [Administrator Settings] - [System Settings] - [Expert Adjustment]
Correct a defective print image.
Settings
Description
[Printer Adjustment]
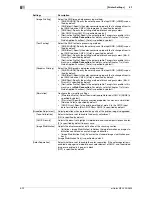
Adjust the print start position and defective print images.
[Leading Edge Ad-
justment]
Select the type of paper (plain paper, plain paper (Glossy Mode), thick paper,
envelope) for adjusting the print position. Adjust the print start position at the
leading edge of the paper relative to the paper discharge direction for each pa-
per type.
[0.0 mm] is specified by default.
[Centering]
Select the paper tray for adjusting the print position. Adjust the print start po-
sition at the left-hand edge of the paper relative to the paper discharge direc-
tion for each paper tray.
[0.0 mm] is specified by default.
[Leading Edge Ad-
justment (Duplex
Side 2)]
Select the type of paper (plain paper, plain paper (Glossy Mode), thick paper,
envelope) for adjusting the print position. Adjust the print start position at the
leading edge of the back side of the paper relative to the paper discharge di-
rection for printing the back side during 2-sided printing, for each paper type.
[0.0 mm] is specified by default.
[Centering (Duplex
Side 2)]
Select the paper tray for adjusting the print position. Adjust the print start po-
sition at the left-hand edge of the paper relative to the paper discharge direc-
tion for printing the back side during 2-sided printing, for each paper tray.
[0.0 mm] is specified by default.
[Media Adjustment]
Adjust print defects (voids, white spots, roughness) that are caused by paper
properties for each paper type.
•
[First Side]: Select this option if defective images are found on the front side
of 1-sided or 2-sided printing. Select the paper type to adjust a defective
image.
•
[Second Side]: Select this option if defective images are found on the back
side of 2-sided printing. Select the paper type to adjust a defective image.
Copy or print after configuration, then repeat adjustments, if necessary.
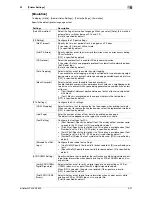
[Calibration Setting]
Change the timing for executing image stabilization as well as the type of im-
age stabilization, if necessary. Make selection according to the printing fre-
quency and the color/black use ratio.
•
[Priority Color]: Select this option when both the printing frequency and the
color printing ratio are high. Color image stabilization is performed if a
change in absolute humidity is detected during warm-up.
•
[Priority Monochrome]: Select this option when both the printing frequency
and the color printing ratio are low. Monochrome image stabilization is per-
formed if a change in absolute humidity is detected during warm-up. Color
image stabilization is to be performed before printing color documents.
•
[Standard]: Select this option when the printing frequency is low and the
color printing ratio is high. Normal image stabilization is performed if a
change in the absolute humidity is detected during warm-up.
[Standard] is specified by default.
[Image ADJ Param]
Change parameters to adjust an image, if necessary.
[0] is specified by default.
[Density Adjustment]
Adjust the image density for each printing color when printing on thick paper,
in glossy mode, or at 1200 dpi.
The larger the number, the darker the background.
[0] is specified by default.
[Monochrome Density
Adj.]
Adjust the density of an image to be printed in black and white.
The larger the number, the darker the background.
[0] is specified by default.
Содержание d-COLOR MF3300
Страница 6: ...Contents 4 d Color MF 3300 3800...
Страница 7: ...1 Configuring Settings of This Machine...
Страница 8: ......
Страница 12: ...1 6 d Color MF 3300 3800 Displaying Administrator Settings 1 1 2...
Страница 13: ...2 Accessibility...
Страница 14: ......
Страница 17: ...3 One Touch User Box Registration...
Страница 18: ......
Страница 23: ...4 User Settings...
Страница 24: ......
Страница 33: ...5 Administrator Settings...
Страница 34: ......


