background image

LCAC

NL - 7

NEDERLANDS

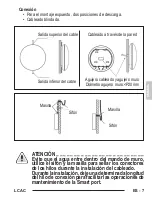
Verbinding

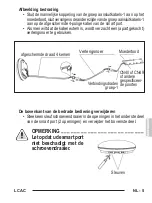
•  Voor zichtbare montage, twee afvoerposities.

•  Afgeschermde bekabeling.

VOORZICHTIG _ _ _ _ _ _ _ _ _ _ _ _ _ _ _ _ _ _ _ _ _ _ _ _ 

Vermijd het dat water in de bedrade afstandsbediening 

komt, gebruik een insluiting en een dichtingsmiddel 

om de connectoren van de draden te verzegelen tijdens 

de installatie van de draden. Laat tijdens de installatie 

een bepaalde lengte van de aansluitdraad over om het 

onderhoud van de smart port te vergemakkelijken.

Dichtingsmiddel

Dichtingsmiddel

Insluiting

Insluiting

Bovenuitgang kabel

Bekabeling door de muur

Onderuitgang kabel

Gat bekabeling en gat muur

Diameter gat muur:<P20mm

Содержание B0970

Страница 1: ...ISCO WIFI USER MANUAL EN MANUEL DE L UTILISATEUR BETRIEBSANLEITUNG FR DE MANUAL DE USO ES EL MANUAL DE USO INSTRUKCJA OBS UGI PT PL GEBRUIKERSHANDLEIDING MANUAL DE UTILIZARE NL RO MANUALE D USO IT MAN...

Страница 2: ...agens contidas no presente manual t m uma fun o meramente exemplificativa O aparelho em sua posse pode ser diferente do mostrado Opere de acordo com o seu aparelho Alle afbeeldingen in deze handleidin...

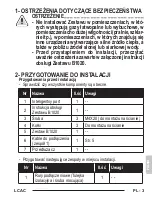
Страница 3: ...di procedere con l installazione leggere con attenzione le avvertenze riportate sul manuale uso del Kit B1020 in allegato 2 PREPARAZIONE ALL INSTALLAZIONE Preparazione prima dell installazione Verifi...

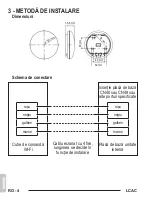
Страница 4: ...Dimensioni Schema del principio di collegamento Scatola di comando Wifi Inserto della scheda madre CN40 o CN49 o altre porte specificate Scheda madre unit interna Cavo schermato a 4 Poli la lunghezza...

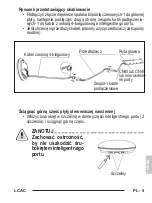
Страница 5: ...re una prolunga acquistata separatamente Gruppo 1 cavi di collegamento CN40 o CN49 o altre porte specificate Prolunga Fessure Cavo schermato a 4 Poli Scheda madre Rimuovere la parte superiore del coma...

Страница 6: ...20 Fissaggio della piastra posteriore del comando a muro Per il montaggio a vista fissare la piastra posteriore sul muro con le 3 viti M4 20 e tasselli Inserire lo smart kit all interno del PCB princ...

Страница 7: ...interno del comando a muro utilizzare il sifone e lo stucco per sigillare i connettorideifilidurantel installazionedelcablaggio Durante l installazione lasciare una certa lunghezza del filo di collega...

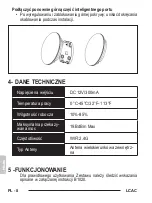
Страница 8: ...gio durante l installazione 4 DATI TECNICI Tensione in ingresso DC 12V 300mA Temperatura di esercizio 0 C 45 C 32 F 1 13 F Umidit di esercizio 10 85 Massima Potenza Trasmessa 19 BdBm Max Frequenza WIF...

Страница 9: ...nstallation read the warn ings indicated on the attached manual for use of the Kit B1020 with care 2 INSTALLATION ACCESSORY Preparation before installation Please confirm that all the following parts...

Страница 10: ...INSTALLATION METHOD Dimensions Wiring Principle Sketch Indoor unit mainboard 4 Core Shield Cable the length is decided by installation red black yellow brown red black yellow brown Wifi control box I...

Страница 11: ...se use an extension cord pur chased separately The connective wires group 1 Slots 4 core shielding wire Mainboard Remove the upper part of wire controller Insert a flat bladed screwdriver inside the s...

Страница 12: ...Screws M4 20 Fasten the back plate of the wire controller For exposed mounting fasten the back plate on the wall with the 3 screws M4 20 and plugs Insert the smart kit with slightly strength into the...

Страница 13: ..._ Avoidthewaterenterintothewiredremotecontroller use trap and putty to seal the connectors of wires during wiring installation During installation leave a certain length of the con nection wire to eas...

Страница 14: ...ring during installation 4 SPECIFICATION Input voltage DC 12V 300mA Operating temperature 0 C 45 C 32 F 1 13 F Operating humidity 10 85 Maximum Transmitted Power 19 BdBm Max Frequency WIFl 2 4G Antenn...

Страница 15: ...n lire attentivement les mises en garde contenues dans le manuel d utilisation du Kit B1020 joint 2 ACCESSOIRES D INSTALLATION Pr paration avant l installation Veuillez confirmer que toutes les pi ces...

Страница 16: ...N Dimensions Sch ma du principe de c blage Carte m re de l unit int rieure C ble blind 4 conduc teurs la longueur est d termin e par l installation rouge noir jaune marron rouge noir jaune marron Bo t...

Страница 17: ...une rallonge achet e s par ment Les fils de connexion du groupe 1 Fentes C ble de blindage 4 conducteurs Carte m re Retirer la partie sup rieure du contr leur c bl Ins rer un tournevis fente dans les...

Страница 18: ...re Vis M4 20 Fixer la plaque arri re du contr leur c bl Pour un montage apparent fixez la plaque arri re au mur avec 3 vis M4 20 et les chevilles Ins rer le smart kit l int rieur du PCB principal du p...

Страница 19: ..._ _ _ _ _ _ _ _ _ _ _ _ Afind viterquedel eaun entredanslat l commande c bl e utilisezunetrappeetdumasticpourscellerles connecteursdesfilspendantl installationduc blage FaireensortedenepasendommagerSm...

Страница 20: ...installation 4 SP CIFICATION Tension d entr e DC 12V 300mA Temp rature de fonc tionnement 0 C 45 C 32 F 1 13 F Humidit de fonction nement 10 85 Puissance maximum transmise 19 BdBm Max Fr quence WIFl 2...

Страница 21: ...der Installation dieAnweisungen in der Gebrauchsanweisung des Bausatzes B1020 in der Anlage sorgf ltig lesen 2 INSTALLATIONSZUBEH R Vorbereitungen vor der Installation Bitte berpr fen dass alle nachfo...

Страница 22: ...Abmessungen Skizze des Verkabelungsverfahrens Hauptplatine Innen raumger t 4 adriges abgeschirmtes Kabel die L nge wird durch die Installation bestimmt rot schwarz gelb braun rot schwarz gelb braun WL...

Страница 23: ...gerung separat zu erwerben verwenden Den oberen Teil des kabelgebundenen Reglers abnehmen EinenSchlitzschraubenzieherindasInnerederSchlitzeimunterenTeil des Smart Ports 2 Schlitze einf hren und das ob...

Страница 24: ...denen Reglers befestigen Bei einer Aufputzmontage die r ckseitige Platte mit 3 Schrauben M4x20 und D beln befestigen Den Smart Bausatz in das Innere der Haupt Leiterplatte des Smart Ports einsetzen da...

Страница 25: ...rden dass Wasser in den kabelgebundenenReglereindringt einenVerschluss undKittverwenden umbeiderInstallationdieKabel anschl sse zu versiegeln Darauf achten den Smart PortnichtmitdemSchraubenzieherzube...

Страница 26: ...ht einklemmen 4 SPEZIFIKATIONEN Eingangsspannung DC 12V 300mA Betriebstemperatur 0 C 45 C 32 F 1 13 F Betriebsfeuchtigkeit 10 85 H chste bertragene Leistung 19 BdBm Max Frequenz WLAN 2 4G Antennentyp...

Страница 27: ...eder con la instalaci n lea con cui dado las advertencias indicadas en el manual para el uso del Kit B1020 en anexo 2 PREPARACI N A LA INSTALACI N Preparaci n antes de la instalaci n Verifique que tod...

Страница 28: ...iones Esquema del principio de conexi n Placa base de la unidad interna Cable blindado de 4 Polos la longitud se decide basa do en la instalaci n rojo negro amarillo marr n rojo negro amarillo marr n...

Страница 29: ...able utilice un alargador adquirida separa damente Grupo 1 cables de conexi n Ranuras Cable blindado de 4 Polos Placa base Remueva la parte superior del mando de muro Inserte un destornillador de hoja...

Страница 30: ...Tornillos M4 20 Fijaci n de la placa trasera del mando de muro Para el montaje expuesto fije la placa trasera en el muro con los 3 tornillos M4 20 y tarugos InserteelsmartkitdentrodelPCBprincipaldela...

Страница 31: ...dentro del mando de muro utilice el sif n y la masilla para sellar los conectores de los hilos durante la instalaci n del cableado Durantelainstalaci n dejeunadeterminadalongitud del hilo de conexi n...

Страница 32: ...nte la instalaci n 4 DATOS T CNICOS Voltaje de entrada DC 12V 300mA Temperatura de funcio namiento 0 C 45 C 32 F 1 13 F Humedad de ejercicio 10 85 Potencia M xima Transmitida 19 BdBm Max Frecuencia WI...

Страница 33: ...instala o leia atentamente os avisos no manual de opera o do Kit B1020 em anexo 2 INSTALA O DOS ACESS RIOS Prepara o antes da instala o Por favor confirme que todas as seguintes pe as foram fornecida...

Страница 34: ...ns es Esbo o princ pio de cablagem Placa principal da unidade interior Cabo protetor de 4 n cleos o comprimento decidido pela instala o vermelho preto amarelo castanho vermelho preto amarelo castanho...

Страница 35: ...cabodeextens o adquirido separadamente Remova a parte superior do controlador com fios Insira uma chave de fendas nas ranhuras na parte inferior da porta inteligente 2 ranhuras e remova a parte superi...

Страница 36: ...seira do controlador com fios Para montagem exposta aperte a placa traseira na parede com os 3 parafusos M4x20 e buchas Insira o kit inteligente no PCB principal da porta inteligente for ando ligeiram...

Страница 37: ...oto com fio use trava e massa para vedar os conectores dos fios durante a instala o da cablagem Durante a instala o deixe um certo comprimento do fio de conex o para facilitar as opera es de manuten o...

Страница 38: ...cablagem durante a instala o 4 ESPECIFICA ES Tens o de entrada DC 12V 300mA Temperatura de exer c cio 0 C 45 C 32 F 1 13 F Humidade de funciona mento 10 85 M xima pot ncia trans mitida 19 BdBm M x Fre...

Страница 39: ...de handleiding voor het gebruik van de Kit B1020 staan alvorens tot installatie over te gaan 2 BIJKOMENDE OPMERKING OVER DE INSTALLATIE Voorbereiding van de installatie Controleer of alle volgende ond...

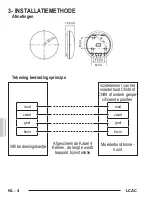
Страница 40: ...ODE Afmetingen Tekening bedradingsprincipe Moederbord binne nunit Afgeschermde Kabel 4 Kernen de lengte wordt bepaald bij installatie rood zwart geel bruin rood zwart geel bruin Wifi bedieningskastje...

Страница 41: ...wordt verzocht een apart gekocht verlengsnoer te gebruiken De bovenkant van de bedrade bediening verwijderen Steek een sleufschroevendraaier in de openingen in het onderste deel van de smart port 2 o...

Страница 42: ...de bedrade bediening bevestigen Zet de achterplaat voor een zichtbare muurmontage vast op de muur met de 3 schroeven M4 20 en pluggen Plaats de smart kit in de hoofd PCB van de smart port door licht...

Страница 43: ...een insluiting en een dichtingsmiddel omdeconnectorenvandedradenteverzegelentijdens deinstallatievandedraden Laattijdensdeinstallatie eenbepaaldelengtevandeaansluitdraadoveromhet onderhoud van de sma...

Страница 44: ...aad hierbij bekneld raakt 4 SPECIFICATIE Ingangsspanning DC 12V 300mA Bedrijfstemperatuur 0 C 45 C 32 F 1 13 F Bedrijfsvochtigheid 10 85 Uitgezonden Maximum vermogen 19 BdBm Max Frequentie WIFl 2 4G T...

Страница 45: ...LCAC EL 3 1 _ _ _ _ _ _ _ _ _ _ _ _ _ _ _ _ _ _ _ _ _ _ KitB1020 2 1 Smart port 1 2 Kit B1020 1 3 3 M4X20 4 3 5 Kit B1020 1 6 1 1 5 7 1 1 1...

Страница 46: ...LCAC 36 8 mm 62 mm 48 mm 48 mm 6 2 m m 120 mm EL 4 3 Wifi CN40 CN49 4...

Страница 47: ...LCAC EL 5 1 1 4 smart smart 2 _ _ _ _ _ _ _ _ _ _ _ _ _ _ _ _ _ _ _ _ _ _ _ _ Smart 1 CN40 CN49 4...

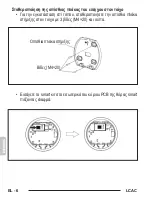
Страница 48: ...LCAC EL 6 3 M4 20 smart PCB smart M4 20...

Страница 49: ...LCAC EL 7 _ _ _ _ _ _ _ _ _ _ _ _ _ _ _ _ _ _ _ _ _ _ _ _ Smart P20mm...

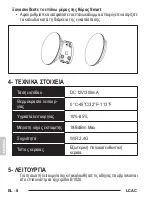
Страница 50: ...LCAC EL 8 Smart 4 DC 12V 300mA 0 C 45 C 32 F 1 13 F 10 85 19 BdBm Max WIFl 2 4G 5 1020...

Страница 51: ...wody Przed przyst pieniem do instalacji przeczyta uwa nie ostrze enia zawarte w za czonej instrukcji obs ugi Zestawu B1020 2 PRZYGOTOWANIE DO INSTALACJI Przygotowania przed instalacj Sprawdzi czy wsz...

Страница 52: ...ymiary G wny schemat po czeniowy Skrzynka sterownicza Wifi Wk ad p yty g wnej CN40 lub CN49 lub inne wskazane porty G wna p yta jednostki wewn trznej Kabel z os on 4 biegu nowy d ugo zostanie okre lon...

Страница 53: ...siprzed u y kabel prosimyu y przed u acz zakupiony osobno ci gn g rn cz p yty sterowniczej na ciennej W o y rubokr t w szczelin w dolnej cz ci inteligentnego portu 2 szczelina i ci gn g rn cz ZANOTUJ...

Страница 54: ...lnej p yty sterowniczej na cianie Dla widocznego monta u zamocowa tyln p yt na cianie przy pomocy 3 rub M4 20 i ko k w W o y inteligentny zestaw do wn trza g wnego PCB inteligentnego portu lekko docis...

Страница 55: ...trza sterowania na ciennego u y syfonuigipsuwceluzapiecz towa niaz czyprzewod wpodczasinstalacjiokablowania Podczas instalacji pozostawi pewn d ugo prze wodu pod czeniowego dla u atwienia czynno ci ko...

Страница 56: ...instalacji 4 DANE TECHNICZNE Napi cie na wej ciu DC 12V 300mA Temperatura pracy 0 C 45 C 32 F 1 13 F Wilgotno robocza 10 85 Maksymalna przekazy wana moc 19 BdBm Max Cz stotliwo WIFl 2 4G Typ Anteny An...

Страница 57: ...epe instalarea citi i cu aten ie instruc iunile con inute n manualul de utilizare a Kit ului B1020 anexat 2 PREG TIRE PENTRU INSTALARE Preg tire nainte de instalare Verifica i dac sunt prezente toate...

Страница 58: ...INSTALARE Dimensiuni Schema de conectare Cutie de comand Wi Fi Inser ie plac de baz CN40 sau CN49 sau alte porturi specificate Plac de baz unitate intern Cablu ecranat cu 4 fire lungimea se decide n f...

Страница 59: ...utiliza i un cablu prelungitor achizionat separat Scoate i partea superioar a comenzii de perete Introduce i o urubelni dreapt n fantele din partea inferioar a portului smart 2 fante i ndep rta i par...

Страница 60: ...terioare a comenzii de perete Pentru montaj aparent fixa i placa posterioar pe perete cu ajutorul celor 3 uruburi M4 20 i dibluri Introduce i kit ul smart n PCB ul principal al portului smart for nd u...

Страница 61: ...omandadeperete folosi i sifonul i stucul pentru a etan a papucii firelor n timpul instal rii cablajului n timpul instal rii l sa i o anumit lungime a firului de conexiune pentru a facilita opera iunil...

Страница 62: ...timpul instal rii 4 DATE TEHNICE Tensiune de intrare DC 12V 300mA Temperatur de func i onare 0 C 45 C 32 F 1 13 F Umiditate de func ionare 10 85 Putere maxim trans mis 19 BdBm Max Frecven WIFl 2 4G Ti...

Страница 63: ......

Страница 64: ...265763B...

Отзывы: