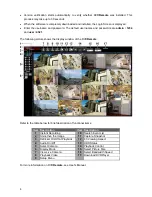
background image


9


DVRRemote Playback 

Playback Remote Video: 

 Click 

<

Play

> on the main window toolbar, and then <

Remote Playback

> tab. 

 The 

<

From

> and <

To

> on top of the screen display the date and time from which recorded 

video is available for playback. 

 Choose 

<

Playback

> in <

Select

> field for playback recorded video. 

  Select the date and time of the segment to play back from the <

Start

> field. The date and time 

can be changed either by typing desired numbers directly or using the arrow buttons. 

 Click 

<

OK

> to start the playback, or click <

Close

> to abort. 


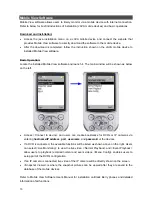
Playback Local *.drv File: 

 Click 

<

Play

> on the main window toolbar, and then <

Local Playback

> tab. 

 Click 

<

Open

> and the file selection screen is displayed. Select the *.drv video file to playback 

and click <

OK

>. 

 Click 

<

OK

> to start the playback, or click <

Cancel

> to abort. 

  View the video playback using the Playback controls. 

  To end the playback, click <

Live

> to return to live video.


Playback Local *.avi Files: 

  Start the windows media player or other media player from <

Start

> menu (or any other possible 

access). 

 Select 

<

File

> and then <

Open

>.  

  Select the wanted *.avi file, and click <

Open

>.  


NOTE:

 The *.avi files for each channel are stored separately. Therefore the video can 

be played back in single channel, full screen mode only. 


Playback Event Video 

 Click 

SEARCH

 on the main window toolbar. The Event List appears. 

  Scroll through the Event List and highlight the interested events. 

  Double-click on the desired event to view the event video. 
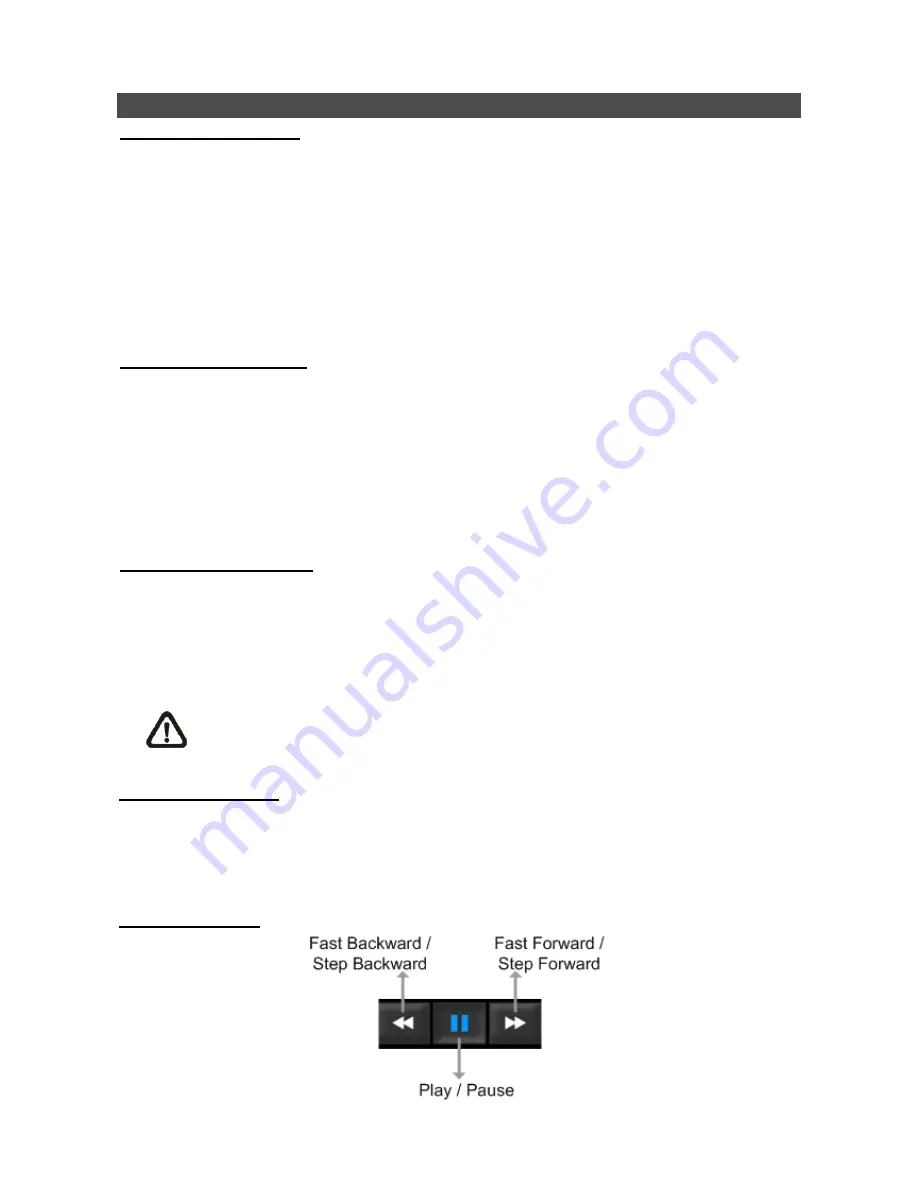
 
Playback Controls: 

Содержание L08FF-04

Страница 1: ...oints 1 6 2 Power LED It lights up when power source is connected 3 Alarm LED It lights up when an alarm is triggered 4 Network LED It lights up when network is connected In addition it blinks when da...

Страница 2: ...n connectors are for the DVR to connect audio source devices For 4CH models 4 RCA Audio In connectors will be provided whereas for 8CH and 16CH models a D Sub Audio In connector is provided 4 Call Mon...

Страница 3: ...H 15 Audio 4 22 GND 2 Audio 3 9 GND 16 Audio 6 23 GND 3 Audio 5 10 GND 17 Audio 8 24 GND 4 Audio 7 11 GND 18 Audio 10 16CH 25 Reserved 5 Audio 9 16CH 12 GND 19 Audio 12 16CH 6 Audio 11 16CH 13 Reserve...

Страница 4: ...m Setup menu and press ENTER Press the UP DOWN keys to select the desired language Network Setup Configure the LAN setup for the DVR to properly function with Ethernet connection From OSD main menu se...

Страница 5: ...able protocols include DSCP AD422 Pelco D Pelco P Fastrax 2 JVC Panasonic_C and Panasonic_N The default is None Note that ID number must match the ID address defined by the dome camera To configure th...

Страница 6: ...s ENTER again to confirm Move the cursor to select any day shown in bold font and a time ruler will be displayed Press ENTER and an arrow will show up above the time ruler Press LEFT RIGHT to select a...

Страница 7: ...ing Internet Setting Start the IE select Tools from the main menu of the browser then Internet Options and then click the Security tab Select Trusted sites and click Sites to specify its security sett...

Страница 8: ...shows the display window of the DVRRemote Refer to the table below for brief description of functional items Item Description Item Description 1 Instant Recording 10 Search Event List 2 Smoothen the...

Страница 9: ...en and the file selection screen is displayed Select the drv video file to playback and click OK Click OK to start the playback or click Cancel to abort View the video playback using the Playback cont...

Страница 10: ...be shown as below on the left Access Connect to device and users can create bookmarks for DVRs or IP cameras via entering hostname IP address port username and password of the devices If a DVR is con...

Отзывы: