background image

Manual Name: 

OKIDATA OL400e & 410e


Chapter:

5 Interfacing

Connecting the Cable

                                                                                                                                                
Connecting the Cable
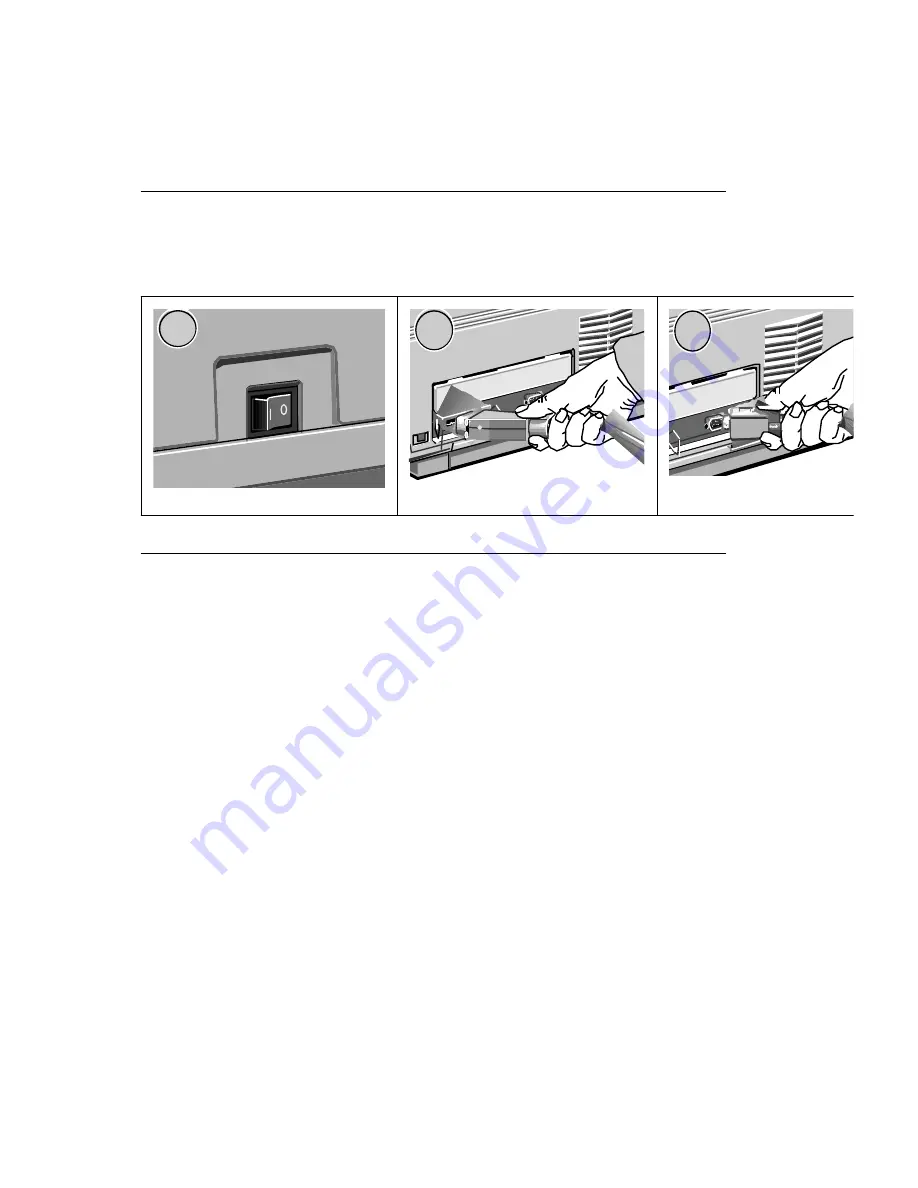
Make sure the printer and computer are off (1). Insert the printer end of the cable firmly
into the proper connector on the back of the printer (parallel, (2); serial, (3) ). Fasten the cable 
to the printer securely. Connect the other end of the cable to the proper connector on your computer. 
Fasten the cable securely to your computer.

POWE R

ON

OFF

POWER

ON

OFF

1

1

2

2

3

3


OL400/410ex (96-02-03)

Содержание OKIDATA OL400e

Страница 1: ...for your Printer A firm surface such as a table or desktop Space to open the cover and pull out the paper tray and the rear output extender Air circulation around the printer to prevent overheating A...

Страница 2: ...ur printer The shipping box should contain Okidata OL400e or OL410e Printer Software Support Driver Diskette Toner Cartridge Printer Handbook Black light shield bag for storing image drum if printer m...

Страница 3: ...distribute the toner 5 Peel tape off the bottom 6 Grasp the blue lock lever 1 and place the left side of the toner cartridge under the tab 2 Lower the right side into the toner well aligning the lock...

Страница 4: ...s use paper made for laser printers or photocopiers Weight for automatic feed top paper exit 16 24 lb Weight for manual feed rear paper exit see 16 35 lb Smooth finish Letterhead or preprinted forms i...

Страница 5: ...tions Precautions Store paper in a dark dry place with constant temperature and humidity Avoid printing on both sides of the paper Avoid printing on preprinted documents that have been in a photocopie...

Страница 6: ...spring open 2 Slide the tray out of the printer 3 Adjust the tray guides for the correct paper size 4 Fan a stack of paper and place it in the tray under the tabs Do not fill above the PAPER FULL mar...

Страница 7: ...Pull the front exit extender forward Lift out the support bar Printed pages exit face down Pages are stacked in the order printed Exit bin holds 100 sheets of 20 lb paper Note Don t change paper path...

Страница 8: ...he support bar To return to top exit push the rear exit extender back in place paper will then exit into the top bin Printed pages exit up in reverse order Maximum output is 50 sheets of 20 lb paper U...

Страница 9: ...to the printer first 2 then into a grounded outlet 3 Turn the printer on 4 It takes about 45 seconds for the printer to initialize warm up and display the ON LINE message telling you its ready to rece...

Страница 10: ...MENU1 Menu2 2 until MEMORY USAGE OL400e or PRINT MODE OL410e displays Press MENU1 Menu2 2 7 times until the display reads LANGUAGE Press ENTER copies 3 The display now reads LANGUAGE ENGLISH Press NE...

Страница 11: ...Demo Page Press ON LINE 1 until the READY light goes out Press NEXT Demo 2 and hold until PRINT DEMO appears Demo page will print OL4OOe LE D Pa ge Pri nte r 0 18 17 5 6 7 1 7 0HQX RSL HV 3 DSHU 6L H...

Страница 12: ...ds on your system and your needs Here are some of their advantages and disadvantages Parallel Interface Centronics compatible Faster Easier to set up Relatively short cable length about 6 ft Serial In...

Страница 13: ...pter 5 Interfacing Interface Cable Requirements Interface Cable Requirements Parallel No longer than 6 ft 1 8 m Must be shielded Serial No longer than 50 ft 15 25 m Must be shielded See for Serial cab...

Страница 14: ...1 Insert the printer end of the cable firmly into the proper connector on the back of the printer parallel 2 serial 3 Fasten the cable to the printer securely Connect the other end of the cable to th...

Страница 15: ...that in most cases you dont have to do anything to set up the interface Usually the default interface settings wont need any changes Be sure to test the interface especially if youre using the serial...

Страница 16: ...al interface you need to redirect data to the serial port To do this enter the following MODE commands at the DOS prompt C for example MODE COM1 9600 N 8 1 P ENTER MODE LPT1 COM1 ENTER You can add the...

Страница 17: ...ENTER Everything is okay ENTER The system is running ENTER Then press Ctrl Z or the F6 key then ENTER Serial Interface MODE COM1 9600 N 8 1 P ENTER MODE LPT1 COM1 ENTER COPY CON LPT1 ENTER Everything...

Страница 18: ...sed FORM FEED if DATA displays 5 If youre using a serial interface are the printer menu settings correct See Do you have the right cable 6 Are there any error message See 7 Is the printer connected to...

Страница 19: ...d y DATA HP Light Status Means On Off Blinking Printer is on line ready to receive data button functions inactive except for ON LINE Printer is off line cannot receive data button functions active Pr...

Страница 20: ...THE Display Window It tells you What the printer is doing during normal operation When you need to add paper or change consumables When theres something wrong with the printer M en u 2 R EC OV ER R e...

Страница 21: ...7 1 7 0 H QX RSL HV 3 DSHU 6L H HP R 35 1 7 0 1 8 3 UL QW RQW V 5 HV HW 2 5 0 21 1 7U D 6HOH FW 5 2 9 5 1 Press to switch printer between on line off line state Press to end menu session 2 Press to pr...

Страница 22: ...default until you change it again Your selections stay in memory even when you turn off the printer If your software can control a feature that is also controlled in a printer menu the software will...

Страница 23: ...sing the Menu Printing the Menu Printing the Menu Press ON LINE to take printer off line Press PRINT MENU Print Fonts The printout includes Menu 1 selections Menu 2 selections Factory default settings...

Страница 24: ...g the Menu Resetting Menus to Factory Settings Resetting Menus to Factory Settings The menus can be reset to the factory default settings in the Maintenance Menu Double click for instructions on enter...

Страница 25: ...ection is made from a menu while there is data in the buffer that has not yet been printed or while a DLL Macro is present the RESET TO SAVE message displays prompting you to press the RECOVER Reset b...

Страница 26: ...nus Quick Menus allow direct access to three often used features Copies Paper Size Tray Select Double click here to view the Quick Menu Table Double click here to view the Menu 1 Table Double click he...

Страница 27: ...ick Menus 1 Press ON LINE to place printer off line 2 Press button indicating feature you want for 2 seconds Feature will display in the window 3 Press NEXT repeatedly to see options 4 Press ENTER to...

Страница 28: ...see options LETTER EXEC LEGAL 14 With optional legal size tray LEGAL 13 With optional legal size tray A4 SIZE A5 SIZE A6 SIZE B5 SIZE FREE LETTER EXEC LEGAL 14 LEGAL 13 A4 SIZE A5 SIZE A6 SIZE B5 SIZE...

Страница 29: ...ppear on the display 3 Press ENTER to pick a category the default option displays 4 Press NEXT or LAST to see more options Stop at the one you want 5 Press ENTER to select your optionan asterisk marks...

Страница 30: ...ay MANUAL Select manual paper feed FEEDER Appears if installed Select feeder AUTOTRAY Appears if tray 2 installed ON OFF Set On printer will switch to second tray when first tray is empty PAPER SIZE T...

Страница 31: ...ENV LETTER EXEC LEGAL 14 LEGAL 13 A4 SIZE A5 SIZE A6 SIZE B5 SIZE FREE Select envelope paper size in feeder if installed MEDIA TYPE TRAY 1 MANUAL MEDIUM LIGHT Normal setting for 20 28lb paper Select...

Страница 32: ...f selected font is scalable proportional spaced 12 00 4 00 to 999 75 Select point size height of characters when scalable font with proportional spacing is selected 0 25 mm increments Horizontal spaci...

Страница 33: ...olumns or condense 80 columns so characters will fit on a line BLNKSKIP OFF ON Set ON printer will ignore FF code when buffer is empty Sometimes Word for Windows will print an extra blank page HOST I...

Страница 34: ...410e Chapter 8 Using the Menu Accessing Menu 2 Accessing Menu 2 Choose options the same way as Menu 1 To enter Menu 2 press and hold MENU 1 Menu 2 for 2 seconds Double click here to view the Menu 2 T...

Страница 35: ...s so edges appear more crisp and less jagged MEMORY USAGE PAGEPROT Appears if optional RAM is installed Off Letter Legal A4 Reserves area in memory for page size selected eliminates print overuns PAGE...

Страница 36: ...KB to 3 6MB AUTO OPERATION AUTOCONT OFF ON If ON software or data error will cause printer to display error message then continue to print Set Off printer will stop printing press RECOVER to continue...

Страница 37: ...nting costs when you are printing rough drafts or proof copies Medium reduces toner by 30 light reduces toner by 50 PARALLEL I F I PRIME OFF ON Set On I Prime signal resets printer Set OFF or HOST I F...

Страница 38: ...NGUAGE ENGLISH DEUTSCH FRANCIS ITLIANO CASTLAN SVENSKA NORSK DANSK NEDERL PORTUGU S Select language displayed German French Italian Spanish Swedish Norwegian Danish Dutch Portuguese OL400 410ex 96 02...

Страница 39: ...ss and hold MENU 1 Menu 2 and turn on the printer USER MNT will display 3 Press MENU 1 Menu 2 repeatedly to move through the categories 4 Press ENTER to invoke a function or NEXT to see options then E...

Страница 40: ...fter replacing image drum cartridge OP MENU Select DISABLE to disable all control panel buttons except ON LINE X ADJUST OL410e only Adjust horizontal print position in 0 25 mm increments 2 0 mm to 2 0...

Страница 41: ...nual feed to print Paper heavier than 24 lbs Envelopes Legal size paper Labels Transparencies Something you dont have in the tray like a letterhead page Its easiest to control manual feed through your...

Страница 42: ...d Set manual feed and paper size in software Press the front of the panel to release the tray 1 Pull the tray down 2 Adjust the guides 3 Insert a sheet letterhead first facing6 up until the printer gr...

Страница 43: ...snt support manual feed 1 Press ON LINE to place the printer off line 2 Press MENU 1 Menu 2 twice TRAY SELECT displays 3 Press ENTER PAPER IN TRAY 1 displays 4 Press NEXT until PAPER IN MANUAL display...

Страница 44: ...or snaps they can damage the image drum Paper no heavier than 28 lb Sturdy construction Smooth even surface Seams down the sides not across the middle Squared off flaps that dont cover the print area...

Страница 45: ...ll out the rear exit extender until it locks 1 Lift out the support bar 2 Press the front of the panel to release the tray 3 Pull the tray down 4 Adjust the guides 5 Insert the envelope flap down and...

Страница 46: ...OL400 410ex 96 02 03...

Страница 47: ...e specifically made for laser printers or photocopiers Must be able to withstand heat of 200 C for 0 1 second Labels should cover the entire carrier sheet carrier and adhesive must not be exposed to a...

Страница 48: ...t is a Font A font is a set of letters and other characters with a common design and style A bitmapped font also has a specific height or point size 1 point 1 72 The OL410 also has resident scalable f...

Страница 49: ...are program Your software can send a printer command that consists of a set of codes one for each of the font characteristics If your software has the appropriate driver you can specify the font you w...

Страница 50: ...Chapter A Working with Fonts aka Ch 10 Printing a Font Page Printing a Font Page 1 Press ON LINE to take printer off line 2 Press and hold PRINT MENU Print Fonts until PRINT FONTS displays 3 The font...

Страница 51: ...wing information about each font Font No Use this number to select fonts in the printer menu Font ID ID number assigned to soft fonts Orient Portrait or Landscape Font Name The name of the font or typ...

Страница 52: ...n the OL400e Courier Swiss Dutch Line Printer They provide 21 fonts in four sizes The OL400e also has two barcode fonts Swiss and Dutch are grouped as B and F cartridge fonts for compatibility with ol...

Страница 53: ...10e Chapter A Working with Fonts aka Ch 10 OL410e Fonts OL410e Fonts The OL410e has three scalable typefaces Courier CG Times Univers It also has the bitmapped Line Printer font and the USPS Zip barco...

Страница 54: ...ply turn off the printer and insert the card into the slot with the label facing the inside of the printer Then select Font Card in your software printer driver see your software documentation for det...

Страница 55: ...ible with HP ProCollection cartridge Bar Codes Plus II PN 70026201 Code 3 0f 9 EAN UPC USPS OCR A OCR B line draw characters and Letter Gothic in three sizes compatible with HP Bar Codes More cartridg...

Страница 56: ...f your software package supports soft fonts theyre engaged just like resident or card fonts Soft fonts are removed from memory when the printer is turned off Remember that downloading fonts takes time...

Страница 57: ...percentage of the page that prints black A typical letter has 3 to 5 print density graphics usually have higher density Higher print density means toner is used up faster At 5 print density a toner ca...

Страница 58: ...ate the developing roller with toner Its normal that the first cartridge will produce about 1 000 pages However the TONER LOW message may appear as early as 350 500 pages The printer will continue to...

Страница 59: ...ys you will soon need to replace the toner cartridge Make sure you have one handy You can continue printing until print quality becomes unacceptable If you keep printing until the toner is almost comp...

Страница 60: ...e Replacing the Toner Cartridge Press the buttons to release the cover then lift up 1 Pull the blue lock lever all the way toward the front of the printer 2 Lift up and discard the cartridge 3 Follow...

Страница 61: ...Cleaning the LED Array Cleaning the LED Array The LED array is on the under side of the printer cover Wipe it gently with the cleaning pad that came with your toner cartridge You can also use a clean...

Страница 62: ...ity the type of paper you use and the number of pages per job The image drum cartridge should last about 12 000 pages at one page per job 16 000 pages at three pages per job 18 000 pages at seven page...

Страница 63: ...e Image Drum Cartridge When the drum reaches 90 of its life the CHG DRUM message displays At this point be sure you have a new drum on hand so you can replace the old one as soon as the print quality...

Страница 64: ...se precautions when handling the cartridge Don t touch the green drum surface Don t set the cartridge down on anything that might scratch the surface of the drum Don t expose the drum to direct sunlig...

Страница 65: ...rt Place the new cartridge into the printer 3 The drum will sit in the printer the closed cover will hold it in place Install a new toner cartridge Reset the drum counter 1 1 2 2 3 3 You can use the t...

Страница 66: ...etting the Drum Counter Resetting the Drum Counter 1 Turn the printer on while holding down MENU 1 Menu 2 USER MNT displays 2 Press MENU 1 Menu 2 three times until DRUM CTR RESET displays 3 Press ENTE...

Страница 67: ...nt quality problems such as repeating marks blotching and shading Set the printer off line Press LAST and NEXT simultaneously and hold for 2 seconds CLEANING MANUAL LETTER REQUEST displays Press the f...

Страница 68: ...ck the remaining sheets to make sure they re not wrinkled or stuck together Replace the tray Open and close the cover to clear the message 3 1 1 2 2 3 3 O L41O e P S L E D P a g e P r i n t e r R M E...

Страница 69: ...Feed Jam Or Paper Exit Jam Top TRAY n FEED JAM or PAPER EXIT JAM top Open the cover 1 Lift out the image drum 2 Be careful the fuser unit at the back of the printer is hot Remove the jammed paper 3 Re...

Страница 70: ...EXIT JAM rear Lift the top cover 1 Pull the jammed paper out from the back of the printer 2 Pulling from the front may damage the printer Remove the image drum and look to make sure the paper is clear...

Страница 71: ...bles Wrap the printer in the plastic bag 5 3 3 O L 41O e PS L E D P a g e P r i n t e r R M E N U 1 M e n u 2 M E N U 1 M e n u 2 M E N U 1 M e n u 2 M E N U 1 M e n u 2 M E N U 1 M e n u 2 M E N U 1...

Страница 72: ...i c s P a r a l l e l a n d R S 2 3 2 C S e r i a l 4 p a g e s p e r mi n u t e 3 0 0 d o t s p e r i n c h 5 1 2 K B t o 4 5 M B H P L a s e r J e t I I P P l u s C e n t r o n i c s P a r a l l e...

Страница 73: ...n needed ON LINE HPIIP ON LINE PWR SAVE ON Ready to receive data Second line alternates between HPIIP and PWR SAVE when fuser and fan are turned off by power save function No action needed ON LINE HPI...

Страница 74: ...to see categories MENU RESET OFF Menu reset option has been accessed Press ENTER to reset Menus 1 2 to factory settings or press MENU to see next category HEX DUMP OFF Hex Dump option has been accesse...

Страница 75: ...s xxxxx FUSER N A Fuser near end of life Another message can display on the first line Normal operations continue When print quality deteriorates contact service to replace fuser COVER OFF Cover is op...

Страница 76: ...ed slot Top line of message may be any valid paper size Insert requested size paper in manual feed slot Buffer Overflow REC BUFFER OVERFLOW OFF Receive buffer is full Press RECOVER to continue Check f...

Страница 77: ...CARD ERROR OFF Card removed during Menu or On Line status Turn printer off reinstall card turn printer on Controller Errors ERROR nn aaaaaaaa OFF Error occurred in controller nn Exception Code aaaaaaa...

Страница 78: ...dry cotton fiber papers causes toner to stick to background Change papers to an acceptable laser bond or use a humidifier Has image drum been exposed to light Leave image drum cartridge in total dark...

Страница 79: ...eaning Page See Contact service Printed page is light or blurred Is toner low Replace toner cartridge Is paper meant for laser printers Use recommended paper LED array is dirty Clean LED array See Bol...

Страница 80: ...ture is supported Control codes not operating correctly Incorrectly entered control codes Check for confusion of letter l with number 1 letter O with number 0 make sure you are using upper lower case...

Страница 81: ...Font selection is by priority and italic is higher than bold Turn italics off before turning bold on Printer ignores control codes sent prior to printing a document The application software automatica...

Страница 82: ...happens but printer indicates it is ready to receive data Configuration error Check cable connection if serial make sure appropriate MODE command has been used PC If more than one printer is availabl...

Страница 83: ...Standard 4MB optional OL410e 2MB standard 3MB optional ROM OL400e 512KB OL410e 3MB Emulation OL400e HPIIP PCL 4 5 OL410e HPIII PCL 5 Communication Interface Parallel RS232C serial 9 pin Automatic Inte...

Страница 84: ...ight Auto Feed 16 24 lb Manual Feed 16 35 lb Noise Level Operating 42 dBA Standby 35 dBA Power Save Quiet Mode 19 dBA Reliability Toner Life 2 000 pages letter approx 5 density Image Drum Life 20 000...

Страница 85: ...0 watts LED Display 8 characters each in 2 lines 9 languages available AC Cord 5 9 ft 1 8m detachable Environmental Requirements Operating Temperature 50 to 89 6F 10 32 C Storage Temperature 14 to 109...

Страница 86: ...e your dealer for a 9 to 25 pin adapter Pin Signal Symbol Direction 1 Data Carrier Detect DCD 2 Receive Data RD To Printer 3 Transmit Data TD From Printer 4 Data Terminal Ready DTR From Printer 5 Sign...

Страница 87: ...tings Your printer and computer interface settings must be the same Use Menu 2 to change the printer settings These are the items that control the printers serial interface and their default settings...

Страница 88: ...le configurations PRINTER COMPUTER 9 pin connector 25 pin connector 2 RD 2 TD 3 TD 3 RD 4 DTR 6 DSR 5 GND 7 SG 7 RTS 5 CTS PRINTER COMPUTER 9 pin connector 9 pin connector 2 RD 3 TD 3 TD 2 RD 4 DTR 6...

Отзывы: