background image

Maintenance > 115

Replacing Consumable Items

Toner Cartridge Replacement

The toner used in this machine is a very fine dry powder. It is contained in four cartridges: 

one each for cyan, magenta, yellow and black.
Have a sheet of paper handy so that you have somewhere to place the used cartridge while 

you install the new one.
Dispose of the old cartridge responsibly, inside the pack that the new one came in. 

Follow 

any regulations, recommendations, etc., which may be in force concerning waste recycling

.

If you do spill any toner powder, lightly brush it off. If this is not enough, use a cool, damp 

cloth to remove any residue.

Do not use hot water, and never use solvents of any kind. They will make stains permanent.

1.

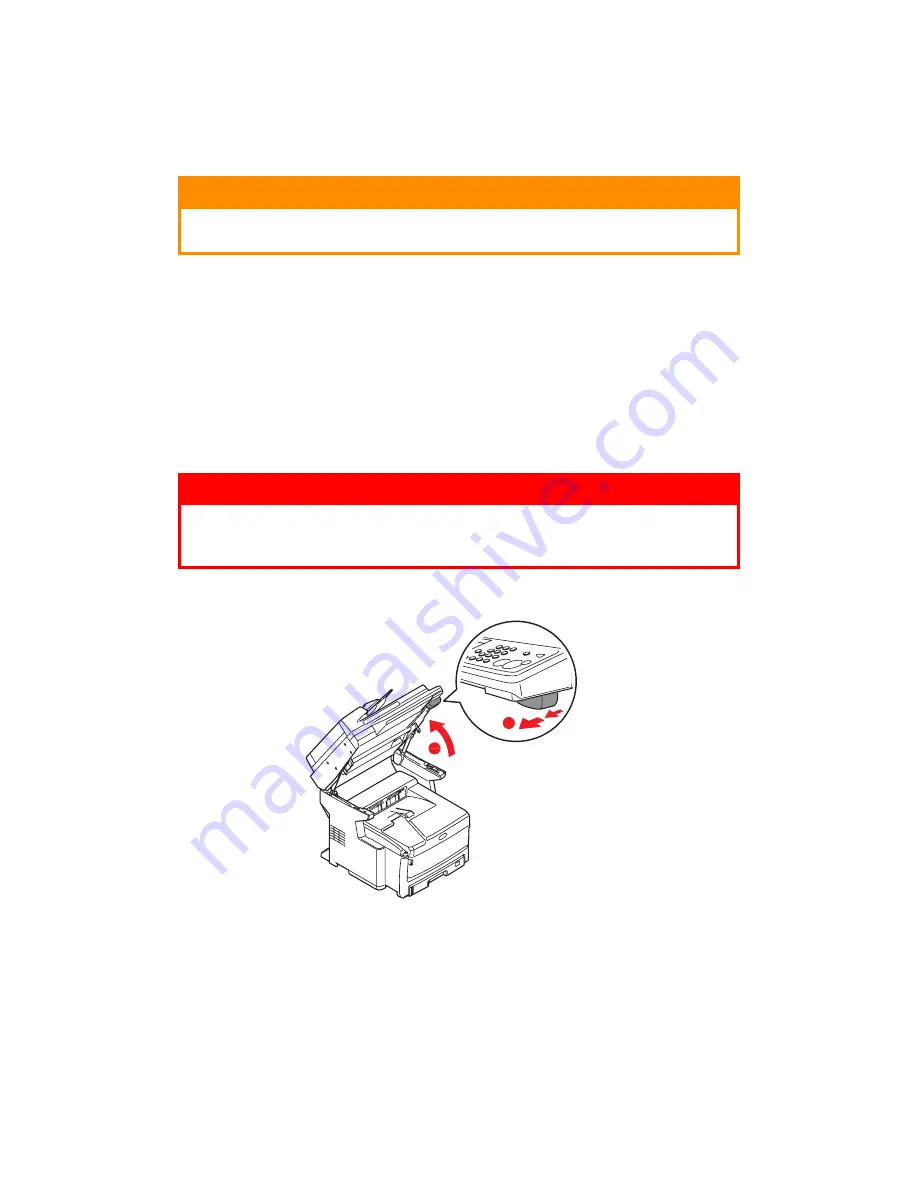
Pull the lever (a) firmly to release the lock and then gently raise the scanner (b).

CAUTION!

To avoid toner wastage and possible toner sensor errors, do not 

change the toner cartridge(s) until “TONER EMPTY” is displayed.

WARNING!

If you inhale any toner or get it in your eyes, drink a little water or 

bathe your eyes liberally in cold water. Seek medical attention 

immediately.

b

a

Содержание MC860n MFP

Страница 1: ...User s Guide 59311701 MC860n MFP...

Страница 2: ...dorsement by the manufacturer While all reasonable efforts have been made to make this document as accurate and helpful as possible we make no warranty of any kind expressed or implied as to the accur...

Страница 3: ...Unit 21 Loading Paper 22 Cassette Trays 22 Multi Purpose Tray 24 Configuring Your Machine 25 Minimum Configuration Requirements 25 To send faxes 25 To send e mails 25 To file document s via intranet...

Страница 4: ...eplacement 115 Image Drum Replacement 119 Transfer Belt Replacement 122 Fuser Replacement 126 Cleaning 129 the Unit Casing 129 the ADF 129 the Document Glass 131 the Touch Screen 131 the LED Head 132...

Страница 5: ...Visit our Web Site 5 Need Help Visit our Web Site For personalized web based support on the products you own including the latest up to the minute information visit your personal solutions center my o...

Страница 6: ...her toner cartridge may not operate at all even if it is described as compatible and if it does work your product s performance and print quality may be degraded Specifications subject to change witho...

Страница 7: ...empt to induce vomiting if person is unconscious If inhaled move the person to an open area for fresh air Seek medical attention If it gets into the eyes flush with large amounts of water for at least...

Страница 8: ...he selection of your recipients e mail addresses the document s is are first scanned and converted into an image file and then transmitted to remote recipients within minutes Scan to Network PC Allows...

Страница 9: ...d USB 2 0 interface The following optional features are available Additional memory to allow printing of more complex pages Additional paper tray s and storage cabinet for loading more media to minimi...

Страница 10: ...b US Bond 75 g m paper 5 Paper tray Holds up to 300 sheets of 20 lb US Bond 75 g m paper 6 Paper size dial Set to paper size loaded in tray 7 Scanner locks 8 Automatic Document Feeder ADF cover releas...

Страница 11: ...LEDs 22 USB connection type B 23 Duplex unit 24 Rear face up stacker This is mainly used for heavy print media When used in conjunction with the multi purpose feed tray the paper path through the MFP...

Страница 12: ...cess to several send modes on the touch screen These allow you to select and control the process whereby a document is scanned and the scanned data is sent by email as an attachment to a local PC to a...

Страница 13: ...sing this button switches the power save mode on or off Its LED os lit when power save mode is on If the machine has gone into power save mode as indicated by the touch screen being black and the LED...

Страница 14: ...MFP for display messages and for report printing is English1 If required this can be changed using the Panel Language Setup utility 1 To ensure your product contains the latest firmware updates it is...

Страница 15: ...n the scanner lock to the UNLOCKED position 2 Repeat step 1 for the second scanner lock 3 Place the key 1 on the hook at the rear of the scanner for safe keeping 4 Fit plugs 2 in the scanner lock loca...

Страница 16: ...ton and follow the on screen instructions to unlock Power Save Mode If you do not use the unit for a while the machine will enter the power save mode to control the power consumption of the device To...

Страница 17: ...the TWAIN scanner printer driver and printer drivers Once the printer is switched on and plugged in the installation is complete See your Software Install Guide for more information 1 Plugging the pr...

Страница 18: ...ver USB or network connections This only detects MC860 devices 1 To search and install select Tools Register Device 2 Highlight the required search result and when prompted click Yes The Configuration...

Страница 19: ...Scan to Local PC on page 101 Setting up the Actkey Utility 1 Install the Actkey utility from the CD Set up will place an Actkey icon on your desktop 2 Double click this icon to open the Actkey console...

Страница 20: ...the base carrier page is entirely covered by labels Other types of label stock may damage the printer due to the labels peeling off during the printing process A suitable type is Avery White Laser La...

Страница 21: ...int side up and top edge into the unit Do not use the duplex two sided printing function Face Down Stacker The face down stacker on the top of the unit can hold up to 250 sheets of 20 b US Bond 75 g m...

Страница 22: ...erly separated then tap the edges of the stack on a flat surface to make it flush again 3 3 Load paper long edge feed LEF for letterhead paper load face down with top edge towards the right of the uni...

Страница 23: ...the 1st upper tray you can pull out the 2nd lower tray during printing to reload it However if printing from the 2nd tray do not pull out the 1st tray This will cause a paper jam For face down printi...

Страница 24: ...sided duplex printing on letterhead paper load the paper with pre printed side down and the top edge away from the unit Envelopes should be loaded face up with top edge to the left and short edge int...

Страница 25: ...re that you have the relevant permission PIN numbers before commencing The factory set passwords PIN are Administrator aaaaaa PIN 000000 Network webpage user admin password aaaaaa Fax Set Up Your unit...

Страница 26: ...2 IP Address The Internet Protocol IP address assigned to your machine by your network administrator 3 Subnet Mask The net mask address assigned by your network administrator 4 Gateway IP The gateway...

Страница 27: ...esses Filing destinations Defines the protocols and destinations to send your scanned document to FTP servers web or any personal computers on the network NOTES 1 DHCP server With DHCP Dynamic Host Co...

Страница 28: ...ld of your browser and then press Enter The unit web page displays For example http 192 168 1 94 from the Configuration Tool Utility If you have not already done so install the unit Configuration Tool...

Страница 29: ...ss to delete from the list Note Listing numbers will shift up to remove replace the deleted listing Insert Select a number Note Inserting will change the listing number Group Select group number to ed...

Страница 30: ...recycled media choose the Plain setting Note Copying and fax reception will only occur when the selected tray or one of the trays when Tray Selection is set to Auto is defined as containing PLAIN medi...

Страница 31: ...Tray Selection is set to Auto Tray usage priority given to trays set to ON then ON If tray is set to OFF it will not be used Copying will only occur when the selected tray or one of the trays when Tra...

Страница 32: ...ed target URL Port No 00001 00445 65535 Use the arrow keys to select the desired port number Note port number is updated automatically when the protocol type is selected PASV Mode OFF ON Only availabl...

Страница 33: ...tion removes the reverse image and characters Density 3 2 1 0 1 2 3 Adjust density Darker Enhance image sharpness and color Lighter Reduce hue and color Resolution 75dpi 100dpi 150dpi 200dpi 300dpi 40...

Страница 34: ...nter OFF ON Adjust the width settings using the arrow buttons Input range 01 50 mm Contrast 3 2 1 0 1 2 3 Adjust contrast setting High Enhance brightness Low Reduce brightness Hue R 3 2 1 0 1 2 3 G Ad...

Страница 35: ...Displays the number of pages scanned from the flatbed and ADF Supplies Status Displays consumable status information System Displays system information 1 Serial No 2 Asset No 3 Lot No 4 CU Version 5 P...

Страница 36: ...ock out the color background of the image assuming document has a color background such that the background color is not printed Use Show Through when copying documents that are printed on both sides...

Страница 37: ...ding orientation Mixed Size OFF ON Allows you to load originals of same width but different length in the ADF When enabled the tray setting is automatic you cannot specify a tray manually Scan Size Au...

Страница 38: ...ckground Allows you to specify the type of images on the document Density Lightest Lighter Normal Darker Darkest Adjust density Darkest Enhance image sharpness and color Lightest Reduce hue and color...

Страница 39: ...ct the box number to delete and press Yes to confirm deletion If you are deleting a secure box entry enter the 4 digit ID code and press Yes to confirm deletion Security function ID check Tx OFF ON Ch...

Страница 40: ...fax Dialing Pause Duration 00 02 10 Second Enter the pause duration required High Resolution 400dpi 600pdi Select the resolution Rx Reduc Rate Auto 100 Select the Rx reduction rate Reduc Margin 00 24...

Страница 41: ...ity Darker Enhance image sharpness and color Lighter Reduce hue and color Resolution 75dpi 100dpi 150dpi 200dpi 300dpi 400dpi 600dpi Allows you to select the appropriate resolution Remember the higher...

Страница 42: ...er the higher the compression the bigger the file size EdgeErase OFF ON Adjust the width settings using the arrow buttons Input range 05 50 mm EraseCentr OFF ON Adjust the width settings using the arr...

Страница 43: ...up to 5 different e mail templates Edit Body Enter standard e mail body text Max 256 characters You can create up to 5 different e mail templates From Reply To From Enter the e mail sender address Ma...

Страница 44: ...lection switching Media Check Disable Enable Determines whether the machine checks the size of the media loaded matches that required for the document sent to print Print Setup Copies 001 999 copies E...

Страница 45: ...the machine switches between color and black and white printing However the 30 60 second cool down delay described for Mono 34ppm is avoided by limiting the mono speed to 26ppm This setting may be pr...

Страница 46: ...Enable Specifies whether the machine should perform jam recovery after a paper jam occurred If enabled the printer will attempt to re print any pages lost due to a paper jam once the jam has been cle...

Страница 47: ...fore printing in order to reduce horizontal white lines This shortens image drum life Hex Dump OFF ON Prints out the data received from the host PC in hexidecimal code Color Menu Density Control Manua...

Страница 48: ...of each color cyan magenta yellow and black Normal setting is 0 Magenta Darkness 3 2 1 0 1 2 3 Yellow Darkness 3 2 1 0 1 2 3 Black Darkness 3 2 1 0 1 2 3 Adjust Registration Execute Press Yes to exec...

Страница 49: ...o When Manual non critical warnings such as requests for a different paper size can be cleared by pressing the RESET button When set to Auto they are cleared when the print job resumes Auto Continue O...

Страница 50: ...OFF ON The thinnest line width in PCL a 1 dot line may look broken ON when the thinnest line width is specified line width is emphasized to look wider OFF the line appears as specified Tray ID Tray 2...

Страница 51: ...DIFF As CPI character heights vary Cont Paper Mode OFF ON If you have multiple feed trays installed in which the media is the same size and type you can enable continuous paper mode When one tray runs...

Страница 52: ...k Menu Network Setup TCP IP Disable Enable Enables or disables this network protocol IP Version IPv4 IPv4 IPv6 Set up the IP version Display condition TCP IP protocol must be enabled NetBEUI Disable E...

Страница 53: ...Disable Enable Enables or disables SNMP of FTP TCP IP or NetWare Display condition TCP IP protocol must be enabled Network Scale Small Normal Normal Can work effectively even when connected to a HUB...

Страница 54: ...d Set a password for the POP3 server LDAP Server Setting Server Setting LDAP Server user defined Set the host name for the LDAP server Port No 00001 00389 65535 Set the port number Timeout 010 030 120...

Страница 55: ...er All Group01 Group32 Numeric List ABC DEF GHI JKL MNO PQRS TUV WXYZ Symbol Maximum of three destination tabs can be registered to display on the standby screen Auto Reset Time Copy screen Reset Time...

Страница 56: ...articular job type is completed Press Test to hear sound demo Transmission Completed OFF TYPE1 TYPE2 TYPE3 Test Rx Completed OFF TYPE1 TYPE2 TYPE3 Test Rx Print Completed OFF TYPE1 TYPE2 TYPE3 Voice T...

Страница 57: ...cknowledgment width ACK BUSY Timing ACK In Busy ACK While Busy Specify acknowledgment timing I PRIME Disable 3 Micro Sec 50 Micro Sec Specify I PRIME setting Parallel PS Protocol ASCII Raw Select data...

Страница 58: ...cancel Condition for display Storage Maint Setup Initial Lock must be set to Disable Format Partition PCL Common PS Making changes will automatically restart the system Press Yes to continue or No to...

Страница 59: ...Ready Mode Specify the reception mode Dial Tone Detection OFF ON Enable disable dial tone detection Busy Tone Detection OFF ON Enable disable busy tone detection Monitor Control OFF Type 1 Type 2 Spe...

Страница 60: ...med Edit Title User defined Select the macro number and use the on screen keyboard to edit the title NOTE This item should always be selected before switching the printer off to ensure that no hard di...

Страница 61: ...ting any text in the field of Login name and Password for the unit On the other hand if the HTTP server does not allow an anonymous account for authentication of connection to the web page the user wi...

Страница 62: ...s 4 In the X cabinet dialogue box select the Directory security tab and click Edit for Anonymous Access and Authentication Control Make sure Anonymous Access is selected in the Authentication Methods...

Страница 63: ...rectory as per the network settings for sharing in MS Windows Under the User level mode of Windows 2000 use the account and password with the privilege of write as the login name and Password for the...

Страница 64: ...e Zone and using the on screen arrows or keypad set the correct time differential 6 If required press Set Daylight Saving and select ON 7 Select Time Setup and using the on screen arrows or keypad set...

Страница 65: ...in the fax number destination name then press Enter 8 If required select Group No then select the group number to assign the fax number to Press Enter 9 Press Enter to save the speed dial entry or pr...

Страница 66: ...touch screen press Address Book 3 Press Speed Dial From here you can enter edit delete sort insert and assign group dial numbers 4 Press the Delete button If you wish to delete the entry and shift th...

Страница 67: ...refix digits the unit will wait until the outside line is available secondary dial tone detected before dialling the rest of the number 1 Press the Setup button on the control panel 2 From the touch s...

Страница 68: ...9 Use the on screen arrow buttons and keypad to enter the required redial interval between 0 and 5 minutes then press Enter 10 Press Close on four screens to store the new setting and exit the menu R...

Страница 69: ...en press the Admin Setup button 3 Using the on screen keyboard enter the administrator password and press Enter 4 From the touch screen press the Fax Setup button 5 From the touch screen press the Oth...

Страница 70: ...displayed on the touch screen press the PIN No field and use the numeric keys to enter your PIN then press Enter Press the Log in button 2 If the User Password screen is displayed on the touch screen...

Страница 71: ...x pages from books newspaper clippings or paper with wrinkles or curls place them on the glass Placing Document s in the ADF Before using the ADF please make sure that your paper meets the following s...

Страница 72: ...Guides 1 to centre the document in the ADF Placing Document s on the Scanner Glass 1 Open the document cover 2 Place your document with the text face DOWN on the glass and align it to the upper left c...

Страница 73: ...es select the number of copies with the numeric keypad To increase the copy count 1 If required press the Copy button on the control panel to prompt the Copy Ready screen 2 Enter number of copies requ...

Страница 74: ...s see Continuous Scan Mode on page 109 Repeat OFF x2 x4 x8 Allows you to print multiple images of an original document on a single sheet Book Copy OFF Left Right Allows you to select how book copies a...

Страница 75: ...ut different length in the ADF The following document sizes can be set concurrently A3 and A4 LEF B4 and B5 LEF A4SEF and A5 LEF When enabled the tray setting is automatic you cannot specify a tray ma...

Страница 76: ...4 5 High sTHR Allows you to block out the color background of the image assuming document has a color background such that the background color is not printed Use Show Through when copying documents t...

Страница 77: ...and buttons Enlarge 141 A4 A3 B5 B4 122 A4 B4 A5 B5 115 B4 A3 B5 A4 Reduce 86 A3 B4 A4 B5 81 B4 A4 B5 A5 70 A3 A4 B4 B5 6 Sort OFF ON ON prints 1 entire copy set of the multiple copy document at a tim...

Страница 78: ...er from the speed dial list Refer to Assigning Fax Numbers to the Address Book on page 65 for details pressing the Others button on the touch screen then pressing Group Tx and selecting from the group...

Страница 79: ...truct a single scan job from multiple individual sheets or originals Refer to Continuous Scan Mode on page 109 for details TTI OFF ON Prints TTI information on the header of the transmitted fax TTI Se...

Страница 80: ...o 20 F code boxes can be registered Up to 30 documents can be stored in one box Note Polling and FPolling must be OFF Memory Tx OFF ON Select OFF to enable real time transmission i e fax transmission...

Страница 81: ...dial number 3 Doc Type Normal Fine Ext Fine Photo Background Allows you to specify the type of images on the document 4 Density Lightest Lighter Normal Darker Darkest Adjust density Dark Keep color i...

Страница 82: ...ted Others Doc Type Selection options as above Density TTI TTI Select MCF Report PreFix Add dialling prefix to speed dial number Flash Add if required to access outside lines Speed Dial 001 500 Enter...

Страница 83: ...a document that needs a security protection Refer to Transmission using a Sub Address F Code Transmission on page 87 Printing Stored Documents on page 89 F Code Bulletin Box Communication When the F c...

Страница 84: ...Press Password b Using the numeric keypad enter a password c Press Enter 6 If required specify a retention period a Press Hold Time b Using the on screen arrows or numeric keypad enter the number of...

Страница 85: ...is between 0 and 31 days When 0 is set documents are retained for an indefinite period NOTE A sub address can be registered using up to 20 digits Numbers and can be registered If you make a mistake wh...

Страница 86: ...ID Code a Press I D Code b Enter an ID Code number 4 digits using the numeric keypad c Press Enter NOTE When Auto Print is set to ON a document received in the notice board is printed NOTE When OverWr...

Страница 87: ...nt s with text face UP in the ADF or face DOWN on the glass 2 Press the Fax button on the control panel to prompt the Fax Ready screen 3 Press Others 4 Press F Code Tx 5 Using the numeric keypad enter...

Страница 88: ...e scanner glass 2 Press the SETUP button on the control panel 3 Press Store Doc Setting 4 Press Store 5 Press Bulletin Box Doc 6 Select the F code box in which to store the document 7 If an ID code is...

Страница 89: ...Setting 3 Press Delete 4 Press Bulletin Box Doc 5 Select the F code box storing the document you want to delete 6 If an ID code is set enter the number 4 digits using the numeric keypad 7 Select the...

Страница 90: ...n to the list of fax jobs Fax Job Reports and Listings Refer to Reports and Listings on page 112 Fax Receiving Your MFP is set to receive faxes automatically if you wish to change this to manual recei...

Страница 91: ...tion quality to Fine Normal or Fast c Set the orientation to Portrait or Landscape 5 On the Cover Sheet tab a Set the cover sheet usage settings as appropriate b Select a cover sheet format 6 On the S...

Страница 92: ...list e If you need to remove a number from the recipient list highlight the appropriate name and then press the Delete button f Once you have completed your list press the OK button to close the Sele...

Страница 93: ...required type in a Comment 9 Press the OK button to save Adding New Groups to the Phone Book To add a new group to the phone book 1 From your application s File menu select Print 2 In the Select Print...

Страница 94: ...2 Right click your machine icon and select Printer Preferences 3 In the Setup tab click the Phone Book button 4 From the pull down menu click Tool Export 5 In the Export File screen enter a name for...

Страница 95: ...mail USB Memory Local PC Network PC Remote PC 4 Set your scanning options as required For further details refer to the following sections 5 Press Mono 2 to scan your document s in black and white or C...

Страница 96: ...and text templates Use the on screen keyboard to edit the subject text or touch the on screen button to select the subject text templates File Name User defined Use the on screen keyboard to enter an...

Страница 97: ...the bigger the file size EdgeErase OFF ON Adjust the width settings using the arrow buttons Input range 5 to 50mm EraseCentr OFF ON Adjust the width settings using the arrow buttons Input range 1 to...

Страница 98: ...32 LDAP Simple Search Advanced Search Press the Adv button on screen to prompt the Advanced search Search the LDAP address book by User Name and or E mail address 3 Doc Type Doc Type Text Text Photo...

Страница 99: ...allows you to send scanned document s to multiple e mail addresses Simply press the Destination button to add and enter another address Up to 80 characters can be entered in the Destination Reply to a...

Страница 100: ...screen press the USB Memory option 5 Using the options available on the touch screen you can enter a file name and alter the scan output to suit your needs 6 Press the Mono button to scan your docume...

Страница 101: ...can in accordance with your settings for Scan to Application1 The scanned image data is opened in the application specified by the Actkey Utility for Application 1 b Folder When the Folder function is...

Страница 102: ...canned image data is saved in the specified folder and is ready for the software to send as an attachment Complete the data on screen and send Actkey Interface Double click the Actkey Icon on your des...

Страница 103: ...ers SubFolder User defined Enter the subdirectory where the scanned document will be stored DuplexScan OFF Right Left Top Select the bound originals binding position Cont Scan OFF ON Allows you to con...

Страница 104: ...ettings using the arrow buttons Input range 1 to 50mm Contrast 3 2 1 0 1 2 3 Adjust contrast setting High Enhance brightness Low Reduce brightness Hue R 3 2 1 0 1 2 3 G Adjust R G balance settings G E...

Страница 105: ...wspaper This function removes the reverse image and characters 3 Density 3 2 1 0 1 2 3 Adjust density Darker Enhance image sharpness and color Lighter Reduce hue and color 4 Resolution 75dpi 100dpi 15...

Страница 106: ...ofile name 6 Press Enter to assign the name and proceed to the profile screen 7 Update the profile parameters as necessary refer to Profile on page 32 8 Press Enter to save the profile entry or press...

Страница 107: ...t to choose another scanner 6 Select a profile Choose from a B W Document b Grayscale Document c Color Document d Color Photograph NOTE This feature is only available when you connect to your MFP via...

Страница 108: ...ions 8 Press the required scan button 1 to start scanning 9 Press Quit to continue a Press Scan More Pages 2 to continue scanning further documents b Press Scan Other Side 3 to scan the reverse side o...

Страница 109: ...the Others button 4 Press the Cont Scan button 5 Select ON and press Enter 6 Press Close to exit the menu and return to the Fax Ready screen 7 Using the touch screen set your send properties as requi...

Страница 110: ...a Press the Copy button on the control panel b Press the Others button on screen c Press the DuplexCopy button on screen d Press the 1 2 sides button on screen e Press the Enter button on screen f Pre...

Страница 111: ...exit Changing the Key Speed To help you monitor the operation of each step you can alter the speed at which each step is performed To alter the key speed 1 Press the Setup button on the control panel...

Страница 112: ...ton to display the information report and listing options 2 Select required report or list File List Demo Page Error Log Scan to Log MFP Usage Report Network Info 3 MFP Usage Report only use the on sc...

Страница 113: ...ress the SCAN button 2 Press the E mail Address button 3 At the prompt press Yes to print the list of e mail addresses or press No to cancel the operation Print 1 Press the PRINT button to display the...

Страница 114: ...s approx for 1 page per job Transfer belt Approximately 80 000 Letter pages Fuser Approximately 100 000 Letter pages Consumable Order Details Only use genuine Oki Original consumables to ensure the be...

Страница 115: ...ons etc which may be in force concerning waste recycling If you do spill any toner powder lightly brush it off If this is not enough use a cool damp cloth to remove any residue Do not use hot water an...

Страница 116: ...that they go back in the same order 5 Pull the colored toner release lever 1 on the cartridge to be replaced fully towards the front of the MFP WARNING If the MFP has been powered on the fuser may be...

Страница 117: ...n and distribute the toner evenly inside the cartridge 10 Remove the wrapping material and peel off the adhesive tape from the underside of the cartridge 11 Holding the cartridge by its top centre wit...

Страница 118: ...of the cartridge down onto the image drum unit 13 Pressing gently down on the cartridge to ensure that it is firmly seated push the colored lever 1 towards the rear of the MFP This will lock the cartr...

Страница 119: ...1 Pull the lever a firmly to release the lock and then gently raise the scanner b 2 Press the cover release a and open the top cover b fully CAUTION Static sensitive devices handle with care WARNING I...

Страница 120: ...cartridge and the image drum cartridge 8 Lift the right hand end of the cartridge and then draw the cartridge to the right to release the left hand end as shown and withdraw the toner cartridge out of...

Страница 121: ...new image drum cartridge as shown Push the left end in first and then lower the right end in It is not necessary to fit a new toner cartridge at this time unless the remaining toner level is very low...

Страница 122: ...llow the fuser to cool for about 10 minutes before opening the cover 2 Pull the lever a firmly to release the lock and then gently raise the scanner b NOTE If you need to return or transport this prod...

Страница 123: ...e the positions of the four cartridges It is essential that they go back in the same order WARNING If the MFP has been powered on the fuser will be hot This area is clearly labelled Do not touch 1 Cya...

Страница 124: ...8 Pull the lifting bar 2 upwards so that belt tilts up towards the front and withdraw the belt unit from the MFP CAUTION The green image drum surface at the base of each cartridge is very delicate an...

Страница 125: ...the belt unit flat inside the MFP 10 Turn the two fasteners 1 90 to the right until they lock This will secure the belt unit in place 11 Replace the four image drums complete with their toner cartrid...

Страница 126: ...e cover 2 Pull the lever a firmly to release the lock and then gently raise the scanner b 3 Press the cover release a and open the top cover b fully WARNING If the MFP has recently been powered on som...

Страница 127: ...If the fuser is still warm place it on a flat surface which will not be damaged by heat 7 Remove the new fuser from its packaging and remove the transit material 8 Holding the new fuser by its handle...

Страница 128: ...tenance 128 10 Push the retaining lever 2 towards the rear of the MFP to lock the fuser in place 11 Close the top cover and press down firmly so that the cover latches closed 12 Gently lower the scann...

Страница 129: ...e MFP the ADF From time to time the pad assembly and feed rollers may become contaminated with ink toner particles or paper dust In this case the scan module may not feed documents smoothly If this oc...

Страница 130: ...ers forward with your finger and repeat step 2 until the rollers are clean 4 Carefully lift inner cover 4 5 Wipe rollers 5 6 by moving the cloth from side to side 6 Rotate the rollers forward with you...

Страница 131: ...cloth and gently wipe the document glass 2 and the white sheet 3 on the under side of the document cover to remove dust or any toner particles 3 Close the document cover 1 the Touch Screen To clean th...

Страница 132: ...not come out clearly has white lines or when text is blurred There is no need to switch the MFP off to clean the lens 1 Pull the lever a firmly to release the lock and then gently raise the scanner b...

Страница 133: ...th and gently wipe the LED head surface 4 Close the top cover and press down firmly so that the cover latches closed 5 Gently lower the scanner CAUTION Do not use methyl alcohol or other solvents on t...

Страница 134: ...Pull open the access panel on the side of the machine 3 Carefully remove the new memory board from its wrapping Try to handle the board only by its short edges avoiding contact with any metal parts as...

Страница 135: ...l it out of the slot b Place the removed memory board into the antistatic bag which originally contained the new memory board 6 Hold the new memory board by its short edges so that the edge connector...

Страница 136: ...ner control panel b On the touch screen touch the Configuration button 2 c At the prompt touch Yes to print the report 11 Examine the first page of the configuration report Near the top of the page ab...

Страница 137: ...for configurations A and B WARNING Do NOT install any other configuration as this will result in the machine being unstable REF DESCRIPTION CONTENT 1 Configuration A Model No N34234A One paper tray T...

Страница 138: ...cable 2 Place additional paper tray s cabinet assembly at the desired location NOTE For illustration purposes two additional trays and the short cabinet is shown The procedure for installing one tray...

Страница 139: ...for opposite side b Locate rear stabilizing foot 6 and secure in position using screws 7 as shown Repeat for opposite side 4 Observing safety rules for lifting and using locating guides place MFP on t...

Страница 140: ...emaining plates 7 Position side panels as shown matching up the locating lugs and sockets and then push the panel firmly into place 8 Clip stabilizing foot covers into position ensuring you align loca...

Страница 141: ...river must be adjusted on each user s computer Windows 1 Access the driver s Properties window a Open the Printers window called Printers and Faxes in Windows XP via the Start Menu or from the Windows...

Страница 142: ...Mac OS X Print Fax Preferences 2 Click Printing 3 Click Set Up Printers 4 Ensure your machine is selected and click Show Info 5 Click the menu and choose Installable Options 6 Select all hardware opt...

Страница 143: ...on the status panel informs you of the event If the Paper Jam Alert feature is enabled then an alarm also sounds The touch screen displays a message giving the location of the jam If printing multiple...

Страница 144: ...Printer 1 Pull the lever a firmly to release the lock and then gently raise the scanner b 2 If a sheet is well advanced out of the top of the printer simply grip it and pull gently to draw it fully o...

Страница 145: ...advanced far enough grip it and pull it gently out If necessary rotate roller 1 to advance the paper and aid removal WARNING If the MFP has been powered on the fuser may be hot This area is clearly la...

Страница 146: ...niture and to avoid damaging the green drum surface 7 Repeat this removal procedure for each of the remaining image drum units 1 Cyan cartridge 3 Yellow cartridge 2 Magenta cartridge 4 Black cartridge...

Страница 147: ...surface and withdraw the sheet c To remove a sheet just entering the fuser 3 separate the trailing edge of the sheet from the belt lift the fuser pressure release levers 4 up and press towards the re...

Страница 148: ...l protect the drums from excessive exposure to room lighting while you check the remaining areas for jammed sheets 6 Open the rear exit tray and check for a sheet of paper in the rear path area Pull o...

Страница 149: ...he cover 11 Pull out the paper tray and ensure that all paper is stacked properly is undamaged and that the paper guides are properly positioned against the edges of the paper stack When satisfied rep...

Страница 150: ...oubleshooting 150 13 Gently lower the scanner When the jam has been cleared if Jam Recovery is set to enabled in the Printer Adjust menu the MFP will attempt to reprint any pages lost due to paper jam...

Страница 151: ...commended paper Printing is light The toner cartridge is not properly seated Reinstall the toner cartridge The toner is low Open the top cover and tap the cartridge a few times to evenly distribute an...

Страница 152: ...blem is not resolved White area of paper is lightly stained Paper contains static Use paper stored in proper temperature and humidity conditions Too thick paper is used Use thinner paper The toner is...

Страница 153: ...eck the local MFP Faxing is possible but the image of the document printed by the remote machine is very poor If the faxed document has small type complex illustrations photos or is very light or very...

Страница 154: ...x is entered before the telephone number for each number dialled or programmed into the MFP see PreFix on page 40 MFP always answers before its possible to use the external telephone If an external te...

Страница 155: ...error occurs when writing NIC download data DLCODE 1 Memory allocation error 2 Download file error 3 Device allocation error 4 No device space 5 File writing failure 6 CU F W mismatch Restart the mac...

Страница 156: ...nit Near Life Indicates transfer belt is near the end of it s life Order replacement transfer belt Warning Please Change Fuser Unit Notifies the life of the fuser This is a warning only Warning Please...

Страница 157: ...A job received from a user who is denied PC faxing Contact your network administrator for help Warning File Erasing Indicates that a secure file is being erased Warning Deleting encrypted job Indicat...

Страница 158: ...obsolete 21 Deleted 22 No block device 23 Bad seek 24 Internal error 25 Write only Warning PUFLASH Flash Error PUFLASH PU Tray 2 Tray 3 Duplex Warning Received invalid data Press Stop key A job has b...

Страница 159: ...ID entered is not authorised to perform the function Function copy copy in color fax ScanToMail ScanToUSB ScanToLocalPC ScanToNetworkPC Error TRAY Media Mismatch On TRAY Please Set paper MEDIA_SIZE M...

Страница 160: ...ror Wait a moment Network Initializing Diplays when the NIC initialisation occurs as the setting is changed Error No Paper On TRAY Please set paper MEDIA_SIZE To cancel Select Cancel Printing request...

Страница 161: ...ct distribution channel group Replace with genuine toner cartridge Error 614 Y Error 615 M Error 616 C Error 617 K Error 620 621 622 623 COLOR Toner Regional Mismatch ERRCODE OEM mismatch Incompatible...

Страница 162: ...ing cover Paper jam occurred during paper feeding from MP tray See Clearing Paper Jams If the code still appears contact your dealer Error 391 392 393 Paper jam Open check the flashing cover Open the...

Страница 163: ...life alarm Error 350 Y Error 351 M Error 352 C Error 353 K Warning status takes effect at cover open close Error 560 561 562 563 Please install New COLOR Image Drum The toner empty error occurs after...

Страница 164: ...1 Front cover If the code still appears contact your dealer Error 316 Cover Open Close the flashing cover Close the duplex cover If the code still appears contact your dealer Error Cover Open Close th...

Страница 165: ...3 Device allocation error 4 No device space 5 File writing failure 6 CU F W mismatch Error Shutdown screen Initializing screen Controller unit is rebooting CODE 0 Reboot due to a reason other than th...

Страница 166: ...ax job Maximum number of delayed fax registration has already been met Error File Transmission Error Press Stop key File sending has failed due to file server problems network cable disconnected or ne...

Страница 167: ...t the data transfer type is not supported in the FTP server Change the data transfer type in FTP server Error File Writing Failed Press Stop key Failed to save image file in file server during Scan to...

Страница 168: ...Others Fatal Error Fatal 126 Power Off and Wait for a while ERRCODE Condensing Error Water vapor has condensed into liquid droplets in the MFP Turn off the MFP and wait for a while If a fatal code sti...

Страница 169: ...RH Scanning Image sensor Colour CCD Light source Cold Cathode Fluorescent Lamp CCFL Optical resolution 600 x 600 dpi Output data Type Device RGB Resolution 600 x 600 dpi 600 x 300 dpi Data bit depth 2...

Страница 170: ...es per minute monochrome Number of copies Up to 999 Resolution Text Text Photo Photo 300 x 300dpi Extra Fine 600 x 600 dpi Doc Type Text Text Photo Photo Extra Fine Density 7 levels Zoom 25 to 400 Inp...

Страница 171: ...ATP PAP IEEE802 1X IEEE802 1X EAP TLS PEAP Supported browsers Microsoft IE 4 1 or higher Netscape Navigator 4 0 or higher Configuration requirement IP address Subnet mask Gateway SMTP server POP3 ser...

Страница 172: ...sing ITU standard sub address and pass code Polling Yes F code polling Yes using ITU standard sub address and pass code E mail Specification Communication protocol SMTP MIME POP3 File formats B W Grey...

Страница 173: ...0 dpi 600 x 1200 dpi Optical 600 x 600 dpi Memory 512 MB standard upgradeable to 768 MB max Paper capacity at 20 lb US Bond 75 g m 300 sheets in main tray 100 sheets in multi purpose tray 530 sheets i...

Страница 174: ...is not intended for use at visual display workplaces in compliance with BildscharbV Image drum life 20 000 pages at 3 pages per job Belt life 80 000 letter pages at 3 pages per job Fuser life 100 000...

Страница 175: ...uch screen press Admin Setup c Enter the administrator password and press Enter d Press User Install e Press the arrow symbol twice to view page 3 of the User Install screen f Press Mirror Carriage mo...

Страница 176: ...onfirm shutdown 2 Turn off the MFP and disconnect or remove the following Power cord earth wire Printer cable Paper in the paper cassette 3 Move the MFP to the new location WARNING This product is hea...

Страница 177: ...the User Install screen f Press Mirror Carriage mode g At the prompt press Yes to confirm h If necessary remove plugs 1 from the scanner lock locations as shown WARNING Your MFP is a precision machin...

Страница 178: ...r k Press the SETUP button on the control panel l On the touch screen press Shutdown m On the touch screen press Yes to confirm shutdown 2 Turn off the MFP and disconnect or remove the following Power...

Страница 179: ...mage drum units back into the MFP 8 Close the top cover and press down firmly so that the cover latches closed WARNING If the MFP has been powered on the fuser will be hot This area is clearly labelle...

Страница 180: ...it in a box NOTE It is recommended that you use the original box and packaging if available WARNING This product is heavy a minimum of three people are required to lift it safely NOTE Be sure to unloc...

Отзывы: