background image

Loading paper > 16

3.

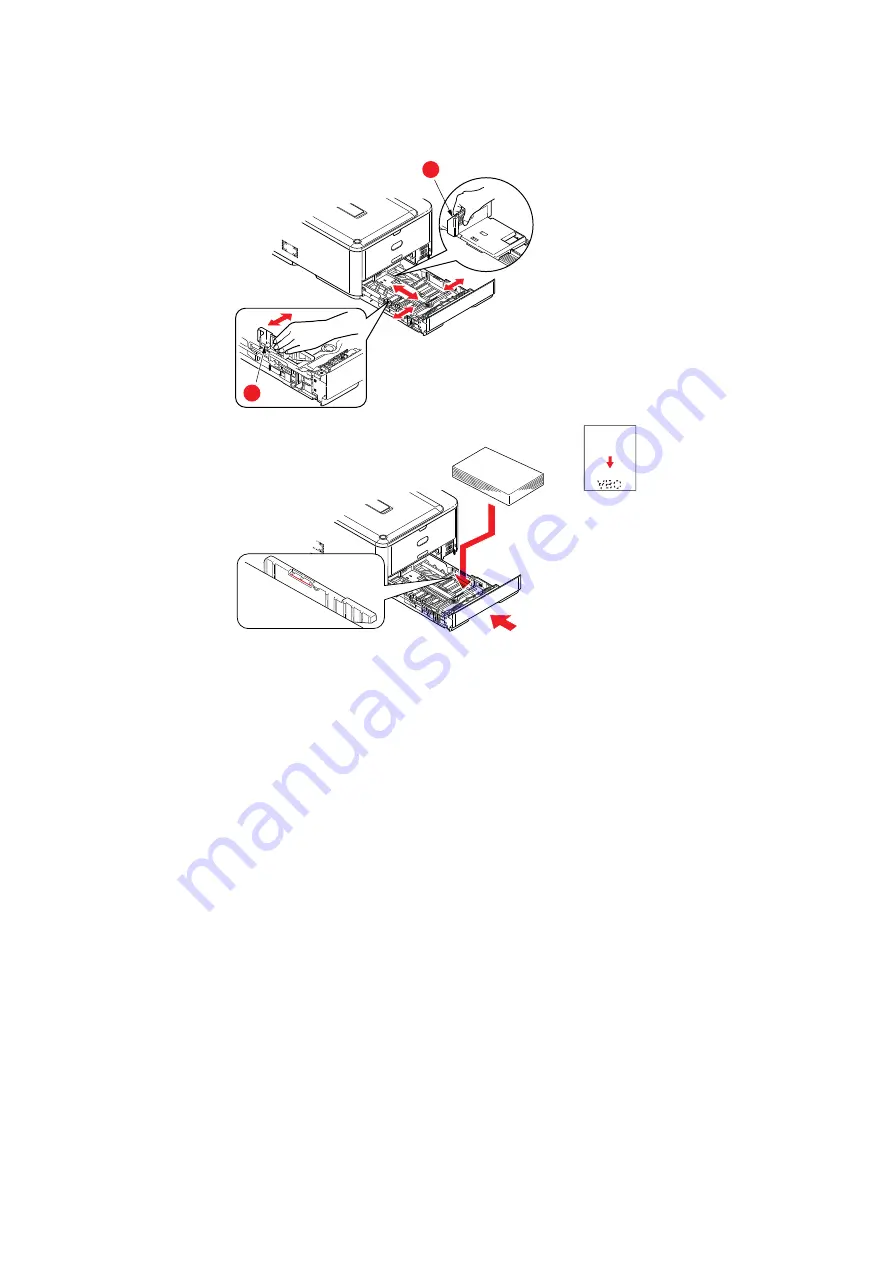
Load paper (letter headed paper face down and top edge towards the front of the 

printer), as shown.

4.

Adjust the rear stopper (a) and paper guides (b) to the size of paper being used.

5.

Close the paper tray gently.

To prevent paper jams:

>

Do not leave space between the paper and the guides and rear stopper.

>

Do not overfill the paper tray. Capacity depends on the type of paper stock.

>

Do not load damaged paper.

>

Do not load paper of different sizes or types at the same time.

>

Close the paper tray gently.

a

b

Содержание C301

Страница 1: ...User s Guide C301 C321 C331 C511 C531 ES5431...

Страница 2: ...ered trademark of Oki Electric Industry Company Ltd Oki is a trademark of Oki Data Corporation Energy Star is a trademark of the United States Environmental Protection Agency Microsoft MS DOS and Wind...

Страница 3: ...ge amounts of water for at least 15 minutes keeping eyelids open Seek medical attention Spillages should be treated with cold water and soap to help reduce risk of staining skin or clothing MANUFACTUR...

Страница 4: ...te trays 13 Multi purpose tray 14 Face down stacker 14 Face up stacker 14 Duplex 14 Loading paper 15 Cassette trays 15 Multi purpose tray 18 Operation 19 C301 and C511 19 C331 19 C531 ES5431 19 Printi...

Страница 5: ...6 Menu functions 37 Operator panel 37 How to change the settings user 39 How to change the settings administrator 39 Menus 40 Print jobs menu C531 ES5431 only 40 Information menu 41 Shutdown menu 42 P...

Страница 6: ...c OS X 79 Troubleshooting 81 Major printer components and paper path 81 Paper sensor error codes 82 Clearing paper jams 83 Dealing with unsatisfactory printing 88 Specifications 90 Index 91 Oki contac...

Страница 7: ...s compatible and if it does work your product s performance and print quality may be degraded Use of non genuine products may invalidate your warranty Specifications subject to change without notice A...

Страница 8: ...eshooting and maintenance to ensure that it performs at its best Additionally information is provided for adding optional accessories as your printing needs evolve Network Guide helps you become famil...

Страница 9: ...k on the topic of interest to jump to the required topic If the bookmarks are not available use the Contents on page 4 In the list of bookmarks click on Index to jump to the Index If the bookmarks are...

Страница 10: ...s up to 250 sheets of 80g m paper 4 Multi purpose tray Used for feeding heavier paper stocks envelopes and other special media Also for manual feeding of single sheets when required a The display lang...

Страница 11: ...SWITCHING ON 1 Plug the power cable into the power socket of your machine 2 Plug the power cable into the electric socket 3 Press the power switch ON Switching off SWITCHING OFF Hold down the power s...

Страница 12: ...he Power Save button on the control panel NOTE By default the time interval to enter power saving mode is set to 30 minutes You can change the time interval by pressing the Setting button on the contr...

Страница 13: ...led in the driver settings When printing from other systems this function is enabled in the Print Menu See AUTO TRAY SWITCH on page 42 CAUTION Envelopes should be free from twist curl or other deforma...

Страница 14: ...n stacker on the top of the printer can hold up to 150 sheets of 80g m standard paper and can handle paper stocks up to 176g m Pages printed in reading order page 1 first will be sorted in reading ord...

Страница 15: ...TRAYS 1 Remove the paper tray from the printer 2 Fan the paper to be loaded at the edges 1 and in the middle 2 to ensure that all sheets are properly separated then tap the edges of the stack on a fla...

Страница 16: ...ides b to the size of paper being used 5 Close the paper tray gently To prevent paper jams Do not leave space between the paper and the guides and rear stopper Do not overfill the paper tray Capacity...

Страница 17: ...or face down printing make sure the face up rear stacker a is closed the paper exits from the top of the printer Stacking capacity is approximately 150 sheets depending on paper weight For face up pri...

Страница 18: ...er For two sided duplex printing on headed paper load the paper with pre printed side down and top edge away from the printer Envelopes should be loaded face up with top edge to the left and short edg...

Страница 19: ...olour printing C301 and C511 only on page 33 C331 For full details of how to use the machine and any optional accessories to print jobs efficiently and effectively please refer to the Printing Guide a...

Страница 20: ...on are only those which you may want to change for specific applications or documents Settings you change here will usually only last for as long as the particular application program is running SETUP...

Страница 21: ...for all but the most discerning applications The Normal setting prints at 600 x 600dpi and is suitable for most draft documents where print quality is less critical 2 You can print watermark text beh...

Страница 22: ...otograph taken on a digital camera might require different colour matching to a business graphic created in a spreadsheet application Again for most general purpose use automatic is the best choice 3...

Страница 23: ...ation programs Changes you make here however will become the new default settings for all Windows applications 3 This button prints a test page to ensure that your printer is working ADVANCED TAB 1 Yo...

Страница 24: ...e spooler should favour documents which have completed spooling when deciding which document to print next even if completed documents are lower priority than documents which are still spooling If no...

Страница 25: ...To change the paper size or page orientation select File Page Setup For a description of each option see Page setup options on page 26 3 Close the Page Setup dialog box 4 Select File Print 5 Select y...

Страница 26: ...ences 2 Click the Print Fax icon 3 Select your printer in the Selected Printer in Print Dialog drop down menu 4 Select your required paper size in the Default Size in Page Setup drop down menu PAGE SE...

Страница 27: ...o enter the number of copies to print If you select Collate all pages of the document will print before the next copy prints Pages You can select whether to print all pages of a document or just a sec...

Страница 28: ...ormal page order 1 2 3 or reverse order 3 2 1 Print This option allows you to choose whether to print only odd or even numbered pages This is useful if you are using manual duplex for which you first...

Страница 29: ...fy your printed document in a large pile of paper This is useful in a busy office with many people sharing the printer DUPLEX Choosing duplex allows you to print on both sides of the paper to save pap...

Страница 30: ...tographic images and processes them to improve the overall appearance This setting cannot be used together with the ProQ2400 print quality setting Toner Saving Toner saving uses less toner when printi...

Страница 31: ...hickness or type of paper in the printer It is important to set this correctly as it affects the temperature at which the toner is fused to the paper For example if you are printing on normal A4 paper...

Страница 32: ...0 black K toner Select this option if you want the printer to always use only black K toner when printing pure black RGB 0 0 0 This is effective even when Composite Black CMYK is selected in the colou...

Страница 33: ...Red Green and Blue RGB phosphors or LCDs a printer uses Cyan Magenta Yellow and Black CMYK toner or ink A monitor can display very vivid colours such as intense reds and blues and these cannot be easi...

Страница 34: ...ve good colour output from your printer PRINTING PHOTOGRAPHIC IMAGES Use the Monitor 6500k Perceptual setting If the colours look too dull try the Monitor 6500k Vivid or Digital Camera settings PRINTI...

Страница 35: ...S 1 On the Colour tab select Advanced Colour 1 for colour matching 2 Choose the Manual colour setting 2 and select from the following options a Monitor 6500k Perceptual Optimised for printing photogra...

Страница 36: ...B values and change the logo to that colour The RGB colour displayed on your monitor may not necessarily match what was printed on the colour swatch If this is the case it is probably due to the diffe...

Страница 37: ...or reverses the menu item displayed Press for 2 secs or longer to fast forward or reverse 4 ON LINE Button Switches between ONLINE and OFFLINE Exits the menu and goes ONLINE when pressed in the Menu m...

Страница 38: ...eceived when pressed for two seconds or longer Deletes the data when pressed for two seconds or longer with WRONG PAPER SIZE RUN OUT OF PAPER TRAY 1 IS OPEN or TRAY 1 IS NOT FOUND is displayed Exits t...

Страница 39: ...to move up and down through the available settings for the sub menu item When the item you want to change is displayed press OK to display the setting An asterisk will appear next to the setting indi...

Страница 40: ...Encrypted Job stored in the SD card After inputting a password SEARCHING JOB is displayed until a job appropriate to the password is found Searching time increases in proportion to the number of jobs...

Страница 41: ...k configuration information PRINT FILE LIST EXECUTE Prints a list of overlays macros fonts and other files stored on the printer s SD card if installed PRINT PCL FONT EXECUTE Prints complete list of a...

Страница 42: ...y 2 lower if installed or MP Tray multi purpose tray AUTO TRAY SWITCH ON OFF If two trays contain identical paper the printer can switch to an alternative source when the current tray runs out in the...

Страница 43: ...ochrome print speed Prints at the most appropriate speed for page process if Auto is set Prints always at the color print speed if Color is set Prints always at the monochrome print speed if Normal is...

Страница 44: ...at its ink does not offset Note USERTYPEn are displayed only if registered in the host PC Server TRAY1MEDIAWEIGHT LIGHT MEDIUM LIGHT MEDIUM HEAVY ULTRA HEAVY1 Adjusts the printer for the weight of pap...

Страница 45: ...RECYCLED CARD STOCK ROUGH GLOSSY USER TYPE 1 USER TYPE 2 USER TYPE 3 USER TYPE 4 USER TYPE 5 Selects the type of media to be fed from the multi purpose tray so that the printer can adjust its interna...

Страница 46: ...DARK Y HIGHLIGHT Y MID TONE Y DARK K HIGHLIGHT K MID TONE K DARK 3 0 3 3 0 3 3 0 3 3 0 3 3 0 3 3 0 3 3 0 3 3 0 3 3 0 3 3 0 3 3 0 3 3 0 3 Adjusts image density for each colour component cyan magenta ye...

Страница 47: ...e printer automatically switches into sleep mode AUTO PW OFF TIME 1 HOUR 2 HOURS 3 HOURS 4 HOURS 8 HOURS 12 HOURS 18 HOURS 24 HOURS Sets the time to switch from idle state to Off mode PERSONALITY AUTO...

Страница 48: ...10 00CPI 99 99CPI Sets the width of the PCL default font in characters inch CPI Default font is the fixed pitch scalable font The value is displayed to the second decimal place Displayed only when th...

Страница 49: ...20CPI 12CPI TO 12CPI Specifies 12CPI pitch for Condense Mode CHARACTER SET SET 1 SET 2 Specifies a character set SYMBOL SET IBM 437 Default Symbol Set only shown Specifies a symbol set LETTER 0 STYLE...

Страница 50: ...th a zero ZERO CHARACTER NORMAL SLASHED Sets the zero to be slashed or unslashed LINE PITCH 6 LPI 8 LPI Specifies the line spacing WHITE PAGE SKIP OFF ON Selects whether blank pages are printed or not...

Страница 51: ...ION TCP IP ENABLE DISABLE Enables or disables this network protocol IP VERSION IP v4 IP v4 v6 IP v6 Applies to C331 and C531 ES5431 only Sets up the IP version Operates with IPv4 only not valid with I...

Страница 52: ...network size When NORMAL is selected printer can work effectively even when connected to a HUB that has a spanning tree feature However printer start up time gets longer when computers are connected...

Страница 53: ...of Administrator menu This menu sets the conditions of memory allocated to the buffer and resource ITEM SETTINGS EXPLANATION RECEIVE BUF SIZE AUTO 0 5MB 1MB 2MB 4MB 8MB 16MB 32MB Sets the size of the...

Страница 54: ...izontally in 0 25 mm increments Any parts of the print image that are outside the printable area as a result of this shift will be cropped DUPLEX Y ADJUST 2 00MILLIMETER 0 00MILLIMETER 2 00MILLIMETER...

Страница 55: ...is enabled however the printer will not turn off the power under the following conditions An Ethernet cable is plugged to the network interface connection A telephone cable is plugged to the line con...

Страница 56: ...Menu functions 56 K TONER n nK REMAINING C TONER n nK REMAINING M TONER n nK REMAINING Y TONER n nK REMAINING Cartridge size and current toner level ITEM EXPLANATION...

Страница 57: ...pear SHUTDOWN MENU ENABLE DISABLE Set up ENABLE DISABLE condition for SHUTDOWN MENU category If DISABLE is selected SHUTDOWN MENU category of USERS MENU will not appear PRINT MENU ENABLE DISABLE Set u...

Страница 58: ...ll not appear USAGE MENU ENABLE DISABLE Set up ENABLE DISABLE condition for USAGE MENU category If DISABLE is selected USAGE MENU category of USERS MENU will not appear CONFIG MENU NEARLIFE STATUS ENA...

Страница 59: ...s selected the display will return to the previous menu If Yes is selected the printer will be automatically rebooted and the encoding function will become effective Display Conditions SD Card is inst...

Страница 60: ...RE YOU SURE YES NO If NO is selected the display will go back to the source menu If YES is selected the printer will automatically reboot and execute SD card initialisation This item is displayed only...

Страница 61: ...printer will restart This item is displayed only if the SD card option is installed SD CARD ERASE EXECUTE Deletion of all data stored in the SD Card Data cannot be recovered DoD 5220 22 M sanitizing f...

Страница 62: ...2 ID No FX PPR Emu in CSF control command ESC EM Pn SIDM MP TRAY ID 0 4 9 Set up Pn specified TRAYO MP Tray by MP Tray ID No FX PPR Emu in CSF control command ESC EM Pn SIDM TRAY1 ID 0 1 9 Set up Pn...

Страница 63: ...E REPORT ENABLE DISABLE Enables Disables the printing of the Usage Report When changing a setting value the printer is rebooted GROUP COUNTER ENABLE DISABLE Specifies if the Group counter is displayed...

Страница 64: ...do spill any toner powder lightly brush it off If this is not enough use a cool damp cloth to remove any residue Do not use hot water and never use solvents of any kind They will make stains permanen...

Страница 65: ...nter b Lift the right hand end of the cartridge and then draw the cartridge to the right to release the left hand end as shown and withdraw the toner cartridge out of the printer 3 Put the cartridge d...

Страница 66: ...nto the printer over the image drum unit from which the old cartridge was removed 9 Insert the left end of the cartridge into the top of the image drum unit first pushing it against the spring on the...

Страница 67: ...Maintenance 67 11 Gently wipe the LED head surface with a clean lint free cloth 12 Finally close the top cover and press down firmly at both sides so that the cover latches closed...

Страница 68: ...the assembly in a safe place away from direct sources of heat and light WARNING If the printer has been powered on the fuser will be hot This area is clearly labelled Do not touch CAUTION The green i...

Страница 69: ...drive gear into the gear inside the printer by the rear right corner of the unit and lower the belt unit flat inside the printer 7 Push the locking levers towards the rear of the machine This will sec...

Страница 70: ...ew fuser from its packaging and remove the transit material 6 Holding the new fuser by its handle make sure that it is the correct way round The retaining levers b should be fully upright and the two...

Страница 71: ...enance 71 8 Push the two retaining levers b towards the rear of the printer to lock the fuser in place 9 Finally close the top cover and press down firmly at both sides so that the cover latches close...

Страница 72: ...hen text is blurred There is no need to switch off the printer to clean the lens 1 Press the cover release and open the printer s top cover fully 2 Gently wipe the LED head surface with a clean lint f...

Страница 73: ...EMORY UPGRADE C331 AND C531 ES5431 ONLY The basic printer models comes equipped with the following main memory C331 128MB C531 ES5431 256MB This can be upgraded with an additional memory board of 256M...

Страница 74: ...M expansion slot in the printer 7 If the RAM expansion slot already contains a memory upgrade board that board will have to be removed before you can install the new one To remove it proceed as follow...

Страница 75: ...ess the Menu down button then the OK button to select the INFORMATION MENU c Press the OK button to select PRINT MENU MAP d Press the OK button once more to execute e When the Configuration map is pri...

Страница 76: ...ros fonts and secure or proof documents waiting to be printed 1 Switch the printer off and disconnect the AC power cable 2 Remove the outer access cover and place it safely to one side 3 Turn locking...

Страница 77: ...menu map as follows a Press the OK button b Press the Menu down button then the OK button to select the INFORMATION MENU c Press the OK button to select PRINT MENU MAP d Press the OK button once more...

Страница 78: ...d location 3 Observing safety rules for lifting and using locating guides place printer on top of the additional paper tray 4 Fit retaining clips as shown 5 Re connect the AC power cable and switch th...

Страница 79: ...ne WINDOWS 1 Access the driver s Properties window a Open the Printers window called Printers and Faxes in Windows XP via the Start Menu or from the Windows Control Panel b Right click the icon for th...

Страница 80: ...Mac OS X Print Fax Preferences 2 Click Printing 3 Click Set Up Printers 4 Ensure your machine is selected and click Show Info 5 Click the menu and choose Installable Options 6 Select all hardware opti...

Страница 81: ...tray or at any point on the paper path through the printer When a jam occurs the printer immediately stops and the Attention LED on the control panel informs you of the event If printing multiple pag...

Страница 82: ...OCATION CODE LOCATION 370 Duplex 390 MP Tray 371 Duplex 391 Paper Tray 372 Duplex 392 2nd Paper traya a If fitted 380 Paper feed 400 Paper size 381 Paper path 409 Face up stacker sensor not shown 382...

Страница 83: ...down gently onto a piece of paper to prevent toner from marking your furniture and to avoid damaging the green drum surface and cover WARNING If the printer has been powered on the fuser will be hot T...

Страница 84: ...drum cavity and withdraw the sheet b To remove a sheet from the central area of the belt b carefully separate the sheet from the belt surface and withdraw the sheet c To remove a sheet just entering...

Страница 85: ...front of the machine to release the fuser Withdraw the fuser unit using the handle f e Press release lever g and pull the trapped paper from the fuser f Replace fuser unit into the machine and move lo...

Страница 86: ...y part of the paper path Pull out any sheets found in this area d Lower the belt unit into place with the drive gear towards the rear of the printer Locate the drive gear into the gear inside the prin...

Страница 87: ...s case raise the top cover reach around and press down on the fuser pressure release lever d 10 If you are not using the rear exit tray close it once any paper has been removed from this area 11 Pull...

Страница 88: ...se recommended paper Printing is light The toner cartridge is not properly seated Reinstall the toner cartridge The toner is low Open the top cover and tap the cartridge a few times to evenly distribu...

Страница 89: ...per temperature and humidity conditions Too thick paper is used Use thinner paper The toner is low Open the top cover and tap the cartridge a few times to evenly distribute any remaining toner If symp...

Страница 90: ...ION C301 C321 C331 C511 C530 ES5431 Dimensions 410 x 504 x 242mm W x D x H Weight 21Kg approx Power supply 220 to 240VAC 50 60 Hz 2 Operating environment Operating 10 to 32 C 20 to 80 RH optimum 25 C...

Страница 91: ...nu 49 print jobs menu 40 print menu 42 print statistics menu 63 resetting 54 shutdown menu 42 system adjust menu 54 system configuration menu47 usage menu 55 USB menu 51 Multi purpose tray how to use...

Страница 92: ...com pl E mail oki oki com pl Hotline 0800 120066 E mail tech oki com pl Oki Systems Ib rica S A Sucursal Portugal Edif cio Prime Av Quinta Grande 53 7 C Alfragide 2614 521 Amadora Portugal Tel 351 21...

Страница 93: ...ontakta Oki Systems Sweden AB Borgafjordsgatan 7 Box 1191 164 26 Kista Tel 46 0 8 634 37 00 e mail info oki se f r allm nna fr gor om Oki produkter support oki se f r teknisk support g llandes Oki pro...

Страница 94: ...Oki Europe Limited Blays House Wick Road Egham Surrey TW20 0HJ United Kingdom Tel 44 0 208 219 2190 Fax 44 0 208 219 2199 www okiprintingsolutions com...

Отзывы: