background image


-

7

-


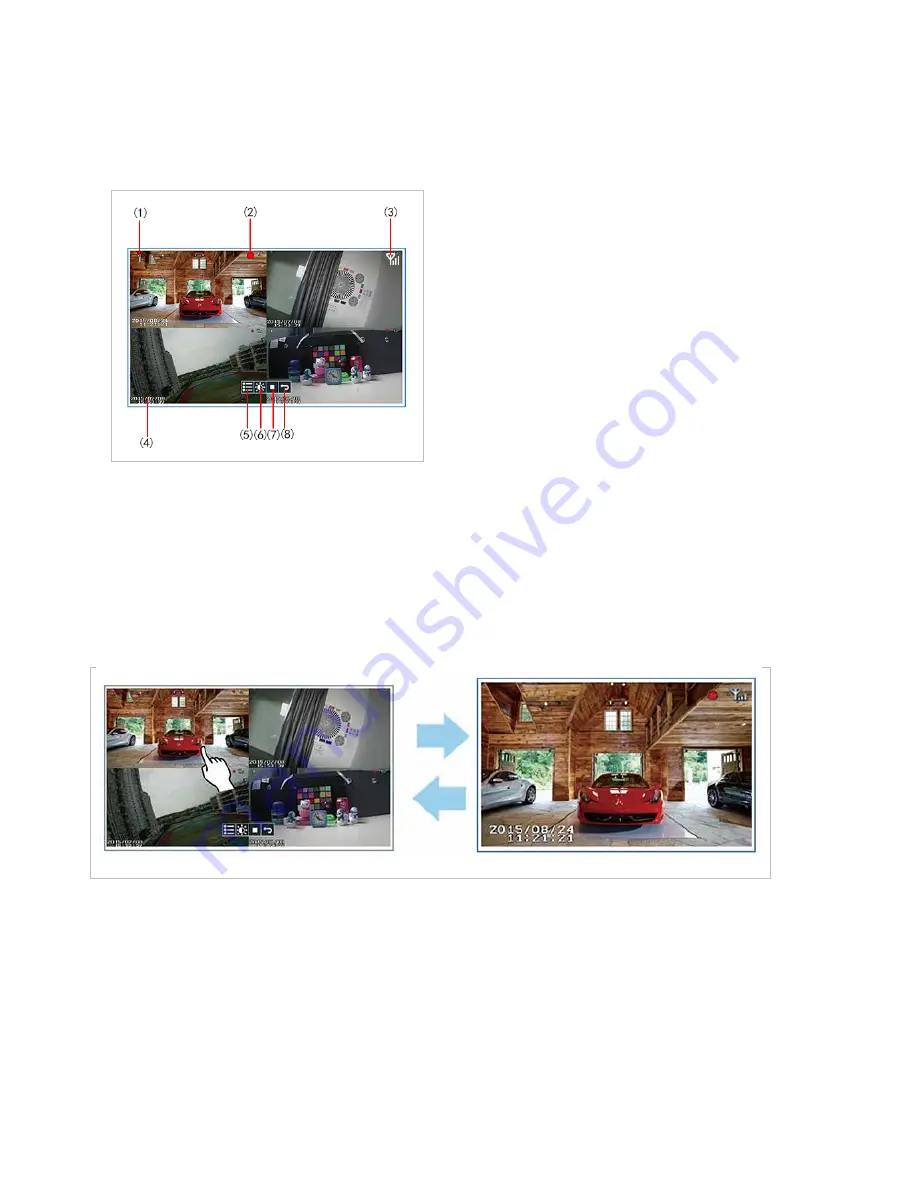
4.3 Live View Video Monitoring 

4.3.1


On

Screen


Display


(1) Camera channel No# 

(2) Recording in progress 

(3) Wireless signal 

(4) Time / Date Stamp 

(5) Main menu 

(6) Brightness 

(7) Record (

# No hard drive

can not 

record

(8) Return 

 (A) 1-Channel ZOOM In 



 4-Channel Preview 

*In Live View mode / Record mode / Video file playback mode, point & click LEFT mouse button  

to zoom in single channel.   In zoom-in mode, LEFT-click mouse again to restore 4-channel 
view.  

*In front panel keypad and IR remote controller, press [CH] button to display single channel & 4T 

mode in sequence. 

      4T mode 

 CH1 

 CH2 

 CH3 

 CH4 

 4T mode 

 CH1 …..  


Note:  


Zoom-in function is not available when playback  file during recording. 


 (B)Start/Stop Recording


      In live view mode, Press [ENTER] button or use mouse toolbar to start video recording. A 

RED dot Appears in top right-hand corner of each camera channel. Press the button again to 
stop video recording 

Содержание CWB604

Страница 1: ... 1 Digital Wireless Camera Model CWB604 ...

Страница 2: ...ord Setting 14 5 3 1 Record Time 14 5 3 2 Date Stamp 15 5 3 3 Loop Recording 15 5 3 4 HDD Format 15 5 4 Record Trigger Setting 16 5 5 System Setting 17 5 5 2TV Output Analog Video Mono Audio Out 18 5 5 3 Power Saving Turn OFF video Out put 18 5 5 5 Language Setting 19 5 5 6 Set password 19 5 6 Event List 20 5 6 1 Browse video files 21 5 6 3 Export video file to TF Card 23 5 6 4 Format TF card 23 5...

Страница 3: ...VR Note There is only one button on the top of the monitor which can be used as POWER key and SCREEN key Press 1 second the screen will turn on off Keep pressing 3 seconds the power will turn on off 1 2 Bracket Optional 1 3 Camera ...

Страница 4: ... unworkable 3 SPECIFICATIONS 2 4G Wireless NVR KW16N4 L09 Items Parameters Values LCD Panel Screen type 9 TFT LCD Display Area 196 61 114 15mm Resolution 1024 H RGB 600 V System Main processor ARM9EJ S Operating system RTOS Video Video compression H 264 Video input mode IP 4 720P Video Outputs HDMI Analog Video Display Resolution Max 720p HD Audio Audio compression Audio32 Intercom Option ...

Страница 5: ...rt x 1 1 3 AV Output None SD Card video files export 32GB AVI Format USB Port Yes 2 0 External Controller Panel Key N A IR Remote N A Touch Key N A Touch Screen Yes General Power Supply DC12V 2A Working Environment 0 55 10 90 RH 86 106kpa Dimension 24 5 16 5 3 0mm Weight 0 68kg Camera CWB604 Items Parameters Values Sensor and lens Image Sensor 1 4 OV9712 1Megapixel progressive scan CMOS Focal Leng...

Страница 6: ...d clear image from the cameras 4 2 Connect the Camera a Install the antenna to cameras b Connect all cameras to AC DC adapter plug the AD DC adapter into wall AC outlet Signal LED in front of the camera indicates signal condition 1 BLUE steady ON Signal is high 2 BLUE flashing Signal is medium 3 RED steady ON Signal is low Note All LEDs will be turned OFF after 1 minute a Install the antenna to LC...

Страница 7: ...on to zoom in single channel In zoom in mode LEFT click mouse again to restore 4 channel view In front panel keypad and IR remote controller press CH button to display single channel 4T mode in sequence 4T mode CH1 CH2 CH3 CH4 4T mode CH1 Note Zoom in function is not available when playback file during recording B Start Stop Recording In live view mode Press ENTER button or use mouse toolbar to st...

Страница 8: ...er can still use the following MENU functions Menu Icon Description Functions Accessible Camera Setting Activation Camera ON OFF only Change brightness Change motion detect sensitivity Record Setting Change record file duration 1 2 5 minutes Set date stamp ON OFF Set HDD Loop recording ON OFF Event Trigger Setting Edit trigger events System Setting Change power saving time No saving 2 5 10 minutes...

Страница 9: ...ect to view current brightness level bar Move the mouse cursor up down the bar to adjust brightness and Left Click again to confirm changes Start Stop Recording Left Click once to toggle Recording Mode on or off Return 5 MENU OPERATION 5 1 Main Menu a Use UP DOWN LEFT RIGHT buttons to select functions then press ENTER button b Move mouse cursor to function icon left click mouse button to enter men...

Страница 10: ...mera to NVR to transmit Live Video Label under camera icons This camera channel is available for pairing This camera channel is registered with a camera Pairing in progress Pairing failed Please check camera and try again Pairing the camera 1 Press ENTER button to start By default camera channel 1 is selected RED colour ...

Страница 11: ...Pairing button See section 1 camera image to pair with the NVR 7 When pairing succeeds label changes to 8 If paring fails label changes to Then user has to check again the camera and the NVR condition Note During first pairing the camera registered to channel 1 will be camera 1 to channel 2 will be camera 2 and so on If camera is paired to replace existing camera the existing camera will become no...

Страница 12: ...Press ENTER button to start 2 1 Press ENTER button to start 3 a Activate disable camera Use LEFT RIGHT button to select channel Press ENTER button to toggles between ON and OFF Channels disabled will NOT video to NVR LEFT RIGHT select ENTER toggles channel ON ...

Страница 13: ... Motion Detect Sensitivity level 4 Press ENTER button to start Camera channel 1 is selected 5 Use UP DOWN LEFT RIGHT buttons to select target camera with level bar turns RED 6 Press ENTER button to change level from 1 to 5 Default level is 3 5 2 6 MD Area Motion Detect Area Select motion detection region By default the sensor will evaluate full screen pixels to calculate potential movement To chan...

Страница 14: ... storage management Default value is 5 minutes for each file 1 Press ENTER button to start 2 Use UP DOWN LEFT RIGHT button to select file length 3 Press ENTER button to confirm or MENU button to exit Select target camera Default FULL screen check for Disable motion detect by highlighting area to WHITE Default duration 5 minutes Change duration and press ENTER to confirm ...

Страница 15: ...u Default value in ON marked with RED tick under the ON label 2 Use LEFT RIGHT button to select turn ON or OFF loop recording press ENTER again to confirm changes 3 Press MENU to exit 5 3 4 HDD Format This function formats the internal hard disk drive a Press ENTER button to go into HDD Format menu b Select Confirm press ENTER button to start formatting the hard disk drive Note 1 MUST format a new...

Страница 16: ...and TRIGGER mode step by step to activate event trigger video recording 1 By default the first top event slot is selected All 3 columns of the event slot in RED 2 Press ENTER to start setting first column START time is highlighted in RED Use UP DOWN button to adjust record start time in one hour step Use LEFT RIGHT to move between columns For example move right to STOP time 3 Use UP DOWN button to...

Страница 17: ...ollowed by ENTER button to confirm deletion 5 5 System Setting a Time Setup b TV Output c Power Saving d Default Setting e Language Setting f Set Password 5 5 1 Time Setup 1 Press ENTER button entering Time Setup menu 2 Use LEFT RIGHT button to adjust value and UP down button to select Year Month Day Hour Minute 3 Press ENTER to confirm change and exit ...

Страница 18: ...lt is NO POWER SAVING 2 Use UP DOWN LEFT RIGHT button to select screen off time 3 Press ENTER button to confirm When video signal is disabled user can press any key to enable video output again 5 5 4 Default Setting This option restores factory setting 1 Press ENTER button start setting Default value is CANCEL 2 Use LEFT RIGHT to select Confirm 3 Press ENTER button to confirm factory setting resto...

Страница 19: ...g 2 Use LEFT RIGHT button to select target language 3 Press ENTER button to confirm change and MENU to exit 5 5 6 Set password Create change password to control access to Main Menu Default password is 00000000 Select Confirm and press ENTER button to restore factory settings 2 Select Set Password and press ENTER button 1 Press ENTER button to start By default PASSWORD function is disabled ...

Страница 20: ...n the event list 3 Select Old password and press ENTER button 4 Enter previous password For first time setting the default password is 00000000 then move the selection cursor to ENTER icon on the right side press ENTER button to confirm PAGE NUM calendar day listed in descending order SD SIZE xxxxx MB Available capacity in micro SD card 5 Next enter the NEW password 6 Finally enter the NEW passwor...

Страница 21: ...OR MENU to exit 2 Next menu is hourly time slot list a Use LEFT RIGHT button to select day b Use UP DOWN button to select hour in a day Highlighted in RED c After selection press ENTER to file list OR MENU to exit 3 Next menu is video file list d Use LEFT RIGHT button to select hour in a day e Use UP DOWN button to select file Highlighted in RED f After selection press ENTER to start playback OR M...

Страница 22: ... 22 Video file name format SNMMDDhhmmss avi SN file name header MM Month 1 to 12 e g 04 April DD Day 1 to 31 hh Hour in a day 00 to 23 mm Minutes 00 to 59 ss Seconds 00 to 59 avi file extension ...

Страница 23: ...ht side of the filename Click to start file export Note Video files are exported in AVI format in 4 separate files corresponding to 4 camera channel File suffix 1 2 3 4 are added to the files indicating camera channel e g SN1231090000 1 avi December 31 09 00 00am Camera 1 Support maximum 32GB micro SD card FAT32 format 5 6 4 Format TF card 1 Go to EVENT LIST menu 2 USE MOUSE TOOLBAR Move the mouse...

Страница 24: ...stimated remaining recording time Note Recording time depends on various factors the remaining time may differs during actual operations 2 When hard disk drive file system is not recognized it shows CHK FRMT means to check HDD format a Try to reboot the NVR or b Reformat the hard disk H HDD OUT CHK FRMT ...

Страница 25: ...will not be able to remote access NVR 5 8 2 Firmware Update To update the firmware of NVR or camera unit 1 Insert a Micro SD card containing new firmware BIN format into the card slot at the back panel of the Receiver Name Description _TX BIN Camera Unit firmware _RX BIN NVR firmware _98600 B IN Network firmware 2 Press ENTER to go into the Firmware Update menu Firmware version information will be...

Страница 26: ...the first time to register the NVR to the P2P server connect the smartphone s WIFI to the same router iii Make sure P2P connection is not blocked by router setting network flow control firewall etc iv For better user experience recommend to close other smartphone background applications 1 Go to Apple AppStore or Android Google Play and download Kalay Cam 2 After installation click Kalay Cam icon t...

Страница 27: ...LIVE mode 2 Click CAMERA to Camera mode screen 3 Then click sign to add NVR Maximum allow user to add 4 NVRs 4 Scan QR code containing UUID 5 Enter the password User may also change the name of the NVR for easy identification Note Default password is 888888 Default name is Camera Start Up Screen Main Page ...

Страница 28: ... Camera 1 of NVR is displayed by default 8 Rotate smartphone 90 to view in landscape mode Full Screen 9 Zoom Pan In both portrait landscape mode user can zoom and pan video Zoom Use 2 points finger slide motion to zoom in out video screen Pan After zoom in swipe on the display to pan the video 6 2 More functions in CAMERA mode ...

Страница 29: ...click to STOP video recording Record duration is shown on screen Video are stored locally in smartphone s memory storage with directory named as Record Snapshot Click to take a snapshot Toast message box indicates snapshot taken OK Photos are stored locally in smartphone s memory storage with directory named as Snapshot Video Quality Click to select video quality Select HIGH for 1280x720 or Select...

Страница 30: ...ll occupied new page is automatically created swipe LEFT RIGHT to see windows in other pages Add NVR to LIVE mode window 1 Each time user adds a new NVR Kalay Cam automatically adds the camera to the first available window For example in above image windows 2 is empty when user adds a new NVR it will be added to windows 2 2 Manually adds a NVR s camera a Click on an empty window for the Camera Lis...

Страница 31: ... 31 Remove NVR from APP 1 In LIVE or CAMERA mode click EDIT at TOP RIGHT corner 2 Select one of the window or camera 3 Click the recycle bin icon 4 Click OK to remove Live Mode Camera Mode ...

Страница 32: ... the Camera Window Menu Change Camera Click for the Camera List NVR list Click on the Camera icon Top right corner of the desired NVR Select desired camera channel then click OK to change Note User may assign the current window i To another camera of the same NVR OR ii To a camera of another NVR ...

Страница 33: ...cons bottom bar 2 video files search option are available slide up or down to select 1 Time search File list is filtered for time period a Within an hour b Within a day c Within a week d User specified time frame 2 Channel search File list is filtered per camera channel basis a Channel 1 b Channel 2 c Channel 3 d Channel 4 e ALL channels T C ...

Страница 34: ...click thumbnails to view photos or video clips Video clips can be played back both in landscape portrait mode Camera Settings Review NVR information and various options i Camera information UID camera name password hidden ii Change password 1 Simply enter Old password New password New password again 2 Click OK to confirm changes iii Notification Interval ...

Страница 35: ... Recording Mode i Off no recording ii Full Time Always record iii Alarm Record after motion trigger v Event Settings Turns Motion Detection On or Off Set Motion Detection sensitivity LOW MEDIUM HIGH MAX vi Camera Information Click to display NVR information ...

Страница 36: ...ace HDD remaining capacity vii Reconnect Display NVR online status ONLINE or OFFLINE If OFFLINE just click to reconnect again viii Remove this camera Delete NVR registration in the APP Click Remove and OK to confirm deletion of NVR Side bar Menu Click side bar menu icon at TOP LEFT corner to activate the menu ...

Страница 37: ...rowse video file list b Click on filename to playback video clips 2 Album Browse media files photos videos stored in smartphone a Photos stored in Snapshot directory b Video stored in Record directory Simply click thumbnails to view photos or video clips Video clips can be played back both in landscape portrait mode ...

Страница 38: ... 38 3 About Display Kalay Cam version information 4 Exit Click to close Kalay Cam ...

Страница 39: ... relocate the receiving antenna Increase the separation between the equipment and receiver Connect the equipment into an outlet on a circuit different from that to which the receiver is connected Consult the dealer or an experienced radio TV technician for help Caution Any changes or modifications to this device not explicitly approved by manufacturer could void your authority to operate this equip...

Отзывы: