Okamura 865JAD Скачать руководство пользователя страница 1

Okamura Corporation

International Sales and Marketing Division

Address: 2-14-27 Akasaka, Minato-ku, Tokyo 107-0052 Japan

Phone : +81-3-5561-4085

Fax  : +81-3-5561-4086

Website: http://www.okamura.co.jp/

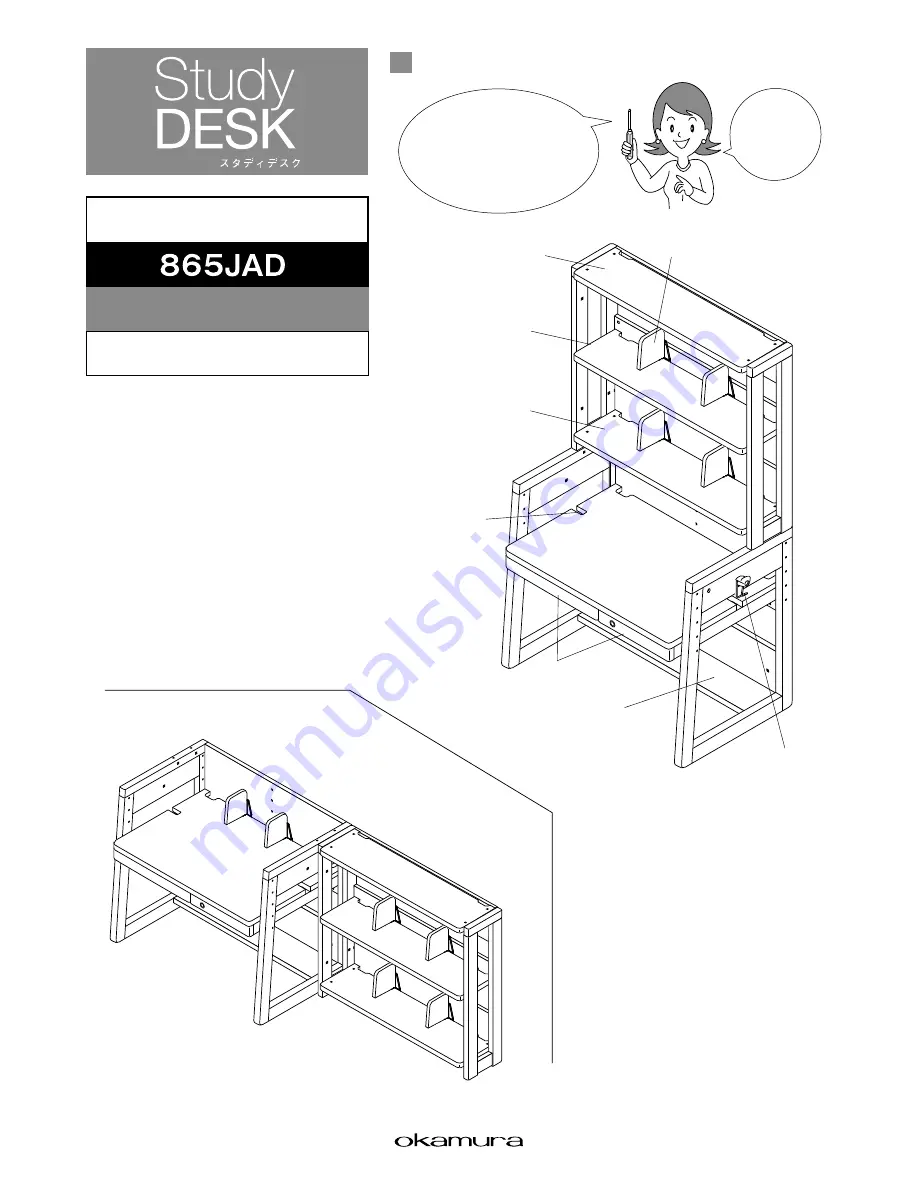
Assembly Final Drawing

(Name of each part)

Two 

persons should 

assemble this 

product.

A cross slot 

screwdriver is required for 

assembly. Please have one available.

* Do not use an electric screwdriver 

because it may damage the 

product.

Assembly Instruction Manual

Special Edition

Desk

Thank you very much for purchasing the 
OKAMURA Study DESK. Before using this 
product, carefully read this Assembly 
Instruction Manual in order to fully under-
stand and correctly assemble the product.

Movable shelf plate

Movable divider

Fixed shelf plate

Movable shelf plate

Notch for mounting

illumination

Lower shelf plate

Swing hook

Desktop

Drawer

 Parallel placement example of 

     desk and bookshelf

Содержание 865JAD

Страница 1: ... Instruction Manual Special Edition Desk Thank you very much for purchasing the OKAMURA Study DESK Before using this product carefully read this Assembly Instruction Manual in order to fully under stand and correctly assemble the product Movable shelf plate Movable divider Fixed shelf plate Movable shelf plate Notch for mounting illumination Lower shelf plate Swing hook Desktop Drawer Parallel pla...

Страница 2: ...nd do not write with a writing instrument such as a ball point pen with a hard tip without using a desk mat It may result in deformation or flaws Periodically inspect for looseness of the bolts and connecting parts of the members and securely re tighten them when there is any looseness Use while there is looseness may result in risks of deformation breakage and turnover Do not allow the product to...

Страница 3: ...screw positions of desk desktop and chair backrest seating face Backrest No 6 No 5 No 4 No 3 No 2 No 6 No 5 No 4 No 3 No 2 No 6 No 5 No 4 No 3 No 2 Seating face This table shows standard reference dimensions Make certain to determine the height and the depth of the desk and the chair according to the body height and the body size of your child Check before assembling Draw a circle around the No ap...

Страница 4: ...wo locations of the rear panel lower Turn clockwise to screw in Actual size Use a cross slot screwdriver for assembly An electric screwdriver or electric tool may damage the product therefore use a manual screwdriver About screw type connector Screw type connector The screw type connector is tightened by turning clockwise The screw type connector is loosened by turning counterclockwise Screw type ...

Страница 5: ... panel upper to the right side panel and then install the left side panel and securely tighten the screw type connector When storing the two stage wagon at desktop heights of JIS No 2 3 it is necessary to separate the upper drawer unit upper drawer of the wagon Please refer to page 11 for installation method When not installing the upper unit of the two stage wagon under the desktop install the ca...

Страница 6: ... to the upper part of the side panel to complete installation The movable divider attached to the bookshelf can also be used for the desktop Insert the movable divider into the notch part of the desktop and slide laterally to install Desktop Swing hook Swing hook Proceed to the bookshelf assembly in a state that the desktop is installed When using the product in connection with the bookshelf proce...

Страница 7: ...e right and left side panels Use a cross slot screwdriver for assembly An electric screwdriver or electric tool may damage the product therefore use a manual screwdriver Left side panel About screw type connector Screw type connector The screw type connector is tightened by turning clockwise The screw type connector is loosened by turning counterclockwise Screw type connector Single end connection...

Страница 8: ...l and then install the right side panel and securely tighten the screw type connec tor Assemble so that the seal is at the upper side rear face A When only using the bookshelf proceed to A 4 B When using in connection with the desk proceed to B 4 Bookshelf Installation of movable shelf plate with drawer and movable shelf plate For installation of the movable shelf plate after installing the shelf ...

Страница 9: ...tch part Tighten counterclockwise Tighten counterclockwise When tightening from above Tighten Completion Loosen When tightening the bolt from above the shelf plate turn counterclock wise Page11 Proceed to Two stage drawer unit and illumination Installation of both side connecting bolt to desk Desk bookshelf Insert the both side connecting bolt of into the hole on the upper part of the desk side pa...

Страница 10: ... bookshelf The bolts for the movable shelf plate with drawer and the movable shelf plate can be tightened from both of above and below however tighten clockwise from below and tighten counterclockwise from above When tightening from below When tightening from above When tightening from below Tighten When tightening the bolt from below the shelf plate turn clockwise Loosen Tighten clockwise Tighten...

Страница 11: ...ual attached to the illumination Lighting installing position When you purchased the dedicated two stage wagon it is necessary to separate the drawer unit upper drawer when the desktop height is JIS No 2 and No 3 The separated unit can be stored in the fixed lower shelf plate as shown in the diagram Separate the wagon and remove the drawer unit and the single end connection bolts from the wagon bo...

Страница 12: ...Okamura Corporation International Sales and Marketing Division Address 2 14 27 Akasaka Minato ku Tokyo 107 0052 Japan Phone 81 3 5561 4085 Fax 81 3 5561 4086 Website http www okamura co jp ...

Отзывы: