background image

10 


7. OPERATION 

a. 

INITIAL SETUP


1. 

Connect hand-piece(s) to power unit output connector(s). 

2. 

Insert your selected cartridge into the hand-piece. 

3. 

Push the cartridge all the way until it seats. 


For TATC cartridges, align the flat side of the cartridge shaft with the 
opening in the handle. Push in the cartridge until it seats. The 
cartridge is fully seated when the insertion mark is flush with the 
handle. Do not push past this mark. Repeat for second cartridge. 

4. 

Place hand-piece(s) into associated workstand(s). 

5. Add 

distilled water

 to workstand sponge (sulfur free) if equipped. 

6. 

Plug the power cord into a grounded wall socket of the rated input line 
voltage. 

7.  To turn the unit “ON”, push the power switch. 

NOTE

: Unit must be 

grounded, otherwise it will not work. Unit will not work in an electrical 
network where an isolation transformer has been used. 

8. 

Select the desired output using the output selector/command button. The 
active output will display an animated box cursor ( ) to the left or right of 
the screen, respectively, to indicate the active output. 


b.  REPLACING ALL TIP CARTRIDGES  

1. 

Make sure the system is turned off.  

2. 

Pull out the cartridge using the Cartridge Removal Pad (MX-CP1). 

NOTE: 

THE TIP CARTRIDGE MAY BE HOT. DO NOT USE METAL TOOLS 
(PLIERS, ETC) TO REMOVE CARTRIDGES!  

3. 

Push a new cartridge into the handle. 

4. 

Place hand-piece(s) into associated work stand(s). 

5. 

Push the power switch “ON”. The new cartridge will heat up to temperature 
quickly.  


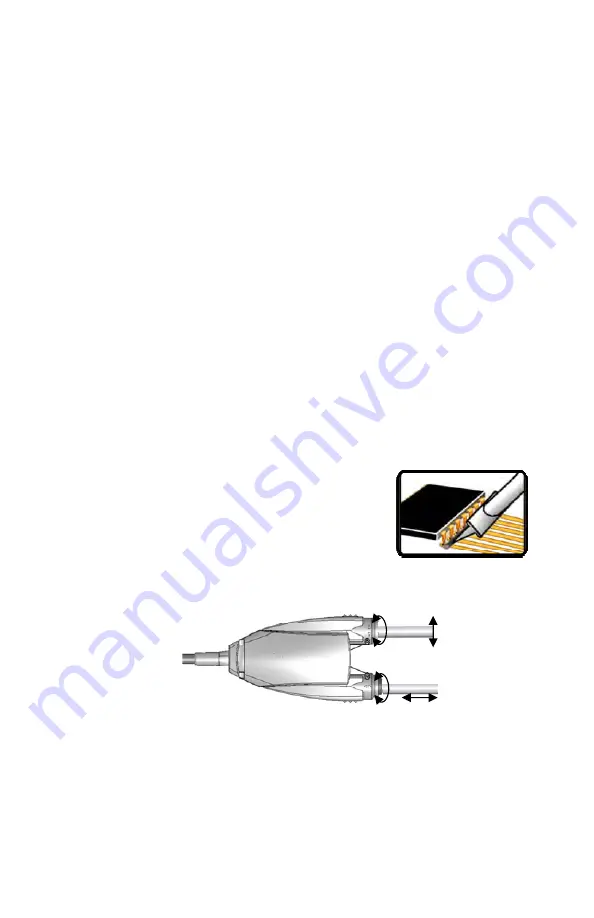
c. MX-PTZ 

AND 

TALON 

OPERATION 


1. 

Clean, and then tin tips well once heated. 

2. 

Ensure tips contact all leads on device, either 
the bevel or straight portion of the tip can be 
used. Use solder across the leads to create a 
Thermal Bridge. 

3. 

Squeeze tool. Wait for all leads to reflow.  

4. 

Maintaining pressure, lift component. 


d. MX-PTZ 

TIP 

ALIGNMENT 


e.  USER PROGRAMMABLE POWERSAVE MODE ADJUSTMENT 

1. 

With the system in the Ready or Power Modes, press and hold the Output 
Selector/Command Button for 3 seconds until the time flashes. 

2. 

Release the Output Selector/Command Button. 

3.  Press the Output Selector/Command Button until the desired time is 

achieved. The time will increment by 10 minutes with each press of the 
button. 

4.  Press and hold the Output Selector/Command button for 3 seconds to 

return to operation. 


Thermal Bridge 

Содержание Metcal MX-5000

Страница 1: ...MX 5000 Power Precision Performance Soldering Desoldering and Rework System User Guide 99 Washington Street Melrose MA 02176 Phone 781 665 1400 Toll Free 1 800 517 8431 Visit us at www TestEquipmentDe...

Страница 2: ...PTZ Tip Alignment 10 e User Programmable PowerSave Mode Adjustment 10 f User Selectable Power Graph 10 8 APPLICATION NOTES a Extending Tip Life 11 b Detinned Tips 11 9 BASIC TROUBLESHOOTING GUIDE 11 1...

Страница 3: ...onse and precise control a SMARTHEAT TECHNOLOGY No Calibration Required Each cartridge is equipped with a self regulating heater which senses its own temperature and closely maintains its pre set idle...

Страница 4: ...cal Advanced Soldering hand piece MX H1 AV workstand MX WS5DS workstand MX W1AV Upgrades MX UK1 Metcal Advanced Hand piece TipSaver workstand MX UK2 UltraFine hand piece TipSaver workstand MX UK4 Prec...

Страница 5: ...er Programmable PowerSave Mode The MX 5000 Series has a user programmable PowerSave Mode The time to enter PowerSave Mode is adjustable from 10 to 120 minutes Universal Power Supply The MX 5000 Series...

Страница 6: ...e SLEEP MODE 1 Hand piece in workstand 2 Power to the hand piece is reduced POWER MODE 1 Hand piece removed from stand 2 System is in use Power Meter displays power at tip POWERSAVE MODE 1 Hand piece...

Страница 7: ...pieces to meet the customer s application needs Each hand piece has its own range of cartridges with many choices available for tip geometry and temperature a Hand piece Selection Guide NOTE This is...

Страница 8: ...s for a complete up to date listing visit ZZZ WHVWHTXLSPHQWGHSRW FRP for more information These tip geometries cover a broad range of tasks from delicate precision work to heavy ground plane soldering...

Страница 9: ...e working with Start with a lower temperature going to a higher temperature only when necessary d Temperature Series Chart Application X Series STTC SMTC UFTC PTTC TATC STDC High Thermal Sensitivity 5...

Страница 10: ...int To change the configuration 1 Remove the two screws from the underside of the workstand base MX WB 2 Move the Workstand Sponge Holder MX WSH into the desired position 3 Replace the two screws into...

Страница 11: ...e the active output b REPLACING ALL TIP CARTRIDGES 1 Make sure the system is turned off 2 Pull out the cartridge using the Cartridge Removal Pad MX CP1 NOTE THE TIP CARTRIDGE MAY BE HOT DO NOT USE MET...

Страница 12: ...life 6 Use the minimum activation flux appropriate to solder type as necessary to do the job Higher activation flux is more corrosive to the tip plating 7 When making a solder connection apply fresh...

Страница 13: ...tion other than described in this manual Use only genuine Metcal replacement parts Use in a well ventilated area or with fume extraction Do not use the equipment with wet hands Connect only to properl...

Отзывы: