background image

6

ofs.com

imagine a place®

800.521.5381

Assembly instructions

Staks benching assembly

1. 

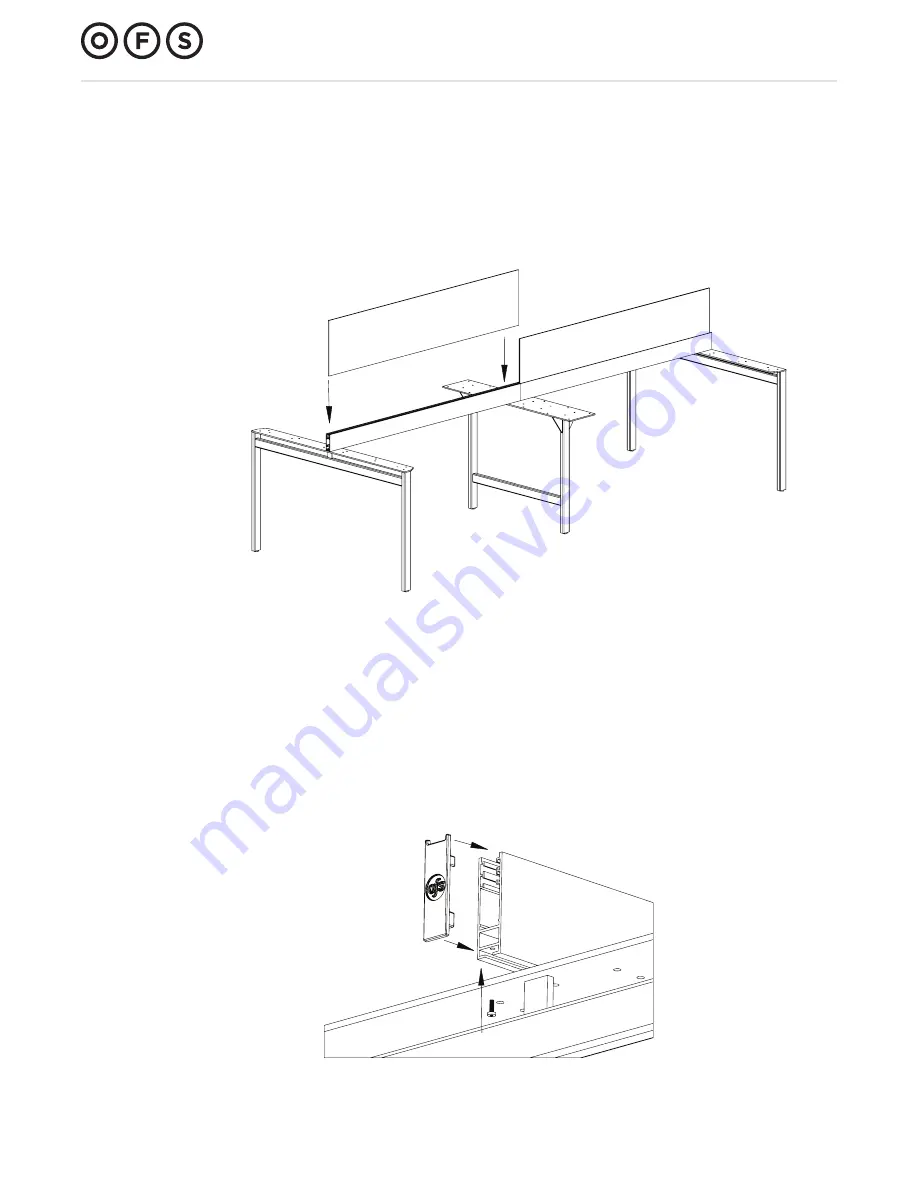
Install privacy screens into tool rails.

2.  Use a RUBBER MALLET to work screen all the way in until seated on the bottom extrusion.

Privacy screen installation

3.  Loosen T-nut screws and slide back H-base for access to bottom of toolbar.

4.  Insert end caps into outside ends of tool rails.

5.  Secure in place by threading set screw through the small hole in the end of the toolbar 

and into the flange on the inside face of the end cap.

6.  Reposition H-base and re-tighten T-nut screws.

7.  The toolbar will again be flush to the H-base. The end cap will extend past the H-base.

End caps ship with tool rail kit.

Part #: 1565102

Содержание Staks benching assembly

Страница 1: ...Staks benching assembly...

Страница 2: ...ntents Base assembly 3 Organizer installation 4 5 Privacy screen installation 6 Worksurface installation 7 Top strap installation 8 9 Power installation premium and basic kits 10 11 Power installation...

Страница 3: ...DO NOT tighten 4 Attach toolbar by sliding T nut into bottom grooved section of toolbar 5 Align H bases so they are perpendicular to the toolbars and all toolbars are in a straight line 6 Toolbars mu...

Страница 4: ...anchion into pre bored pilot holes 2 Remove extrusions from toolbar 3 Upper extrusions will not be present if wood privacy panels are to be installed 4 Take note of holes bored through toolbar 5 The h...

Страница 5: ...usions can be cut with a utility knife 8 Replace extrusions leaving space for stanchions 9 Drop organizers in place 10 Make sure the holes in the bottom of the stanchions are aligned with the holes in...

Страница 6: ...osen T nut screws and slide back H base for access to bottom of toolbar 4 Insert end caps into outside ends of tool rails 5 Secure in place by threading set screw through the small hole in the end of...

Страница 7: ...ace 6 from user edge in center of worksurface 3 Attach with 10 x 5 8 screws Worksurface installation Equal Distance Equal Distance 6 1 1 2 FLUSH Straightener rails ship with tool rail kit Model number...

Страница 8: ...enching assembly 1 Use M6 x 50mm screw to attach top strap to tool bar and stanchion Top strap installation 2 Secure top strap to bottom of worksurfaces with eight 8 8 x 1 screws for each top strap To...

Страница 9: ...inside of grooved bottom of toolrail 4 Use M6 x 16mm screw to attach top strap to T nut inside of tool bar 5 When tightening screw T nut should turn inside of groove and grip bottom of toolbar DO NOT...

Страница 10: ...lock up to bottom edge of toolbar so tabs are inserted into groove on bottom of toolbar 3 Power block should be centered on toolbar or centered in the work area if personal storage boxes are used 4 Ex...

Страница 11: ...acle block with clip pointing down and slide sideways into terminal until receptacle clicks in place 12 On premium power blocks replace end caps and face plates after duplex receptacles are installed...

Страница 12: ...n economy kit 3 Engage slotted grooves on top of double block system to flanges on block clips 4 Slide forward until each receptacle block snaps into place T nuts Block clip Part 1554819 1 Attach bloc...

Страница 13: ...521 5381 Assembly instructions Staks benching assembly 5 Plug in one jumper cable between two power blocks 6 Jumper cable end must be pushed in until it snaps into place 7 Install duplex receptacles...

Страница 14: ...o they are directly below the O rings on the power block 4 If the basket is on the end of a bench the clamps should be shifted if possible so the basket can be mounted towards the center of the bench...

Страница 15: ...ngs on power block using 60mm Hex head bolt and 1 3 4 standoff Toolbar mounted basket 1 Attach basket to T nut in tool bar using 6 Hex head bolt and 5 1 2 standoff 2 See T Nut installation instruction...

Отзывы: