background image

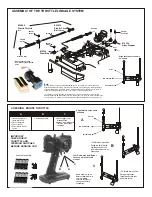
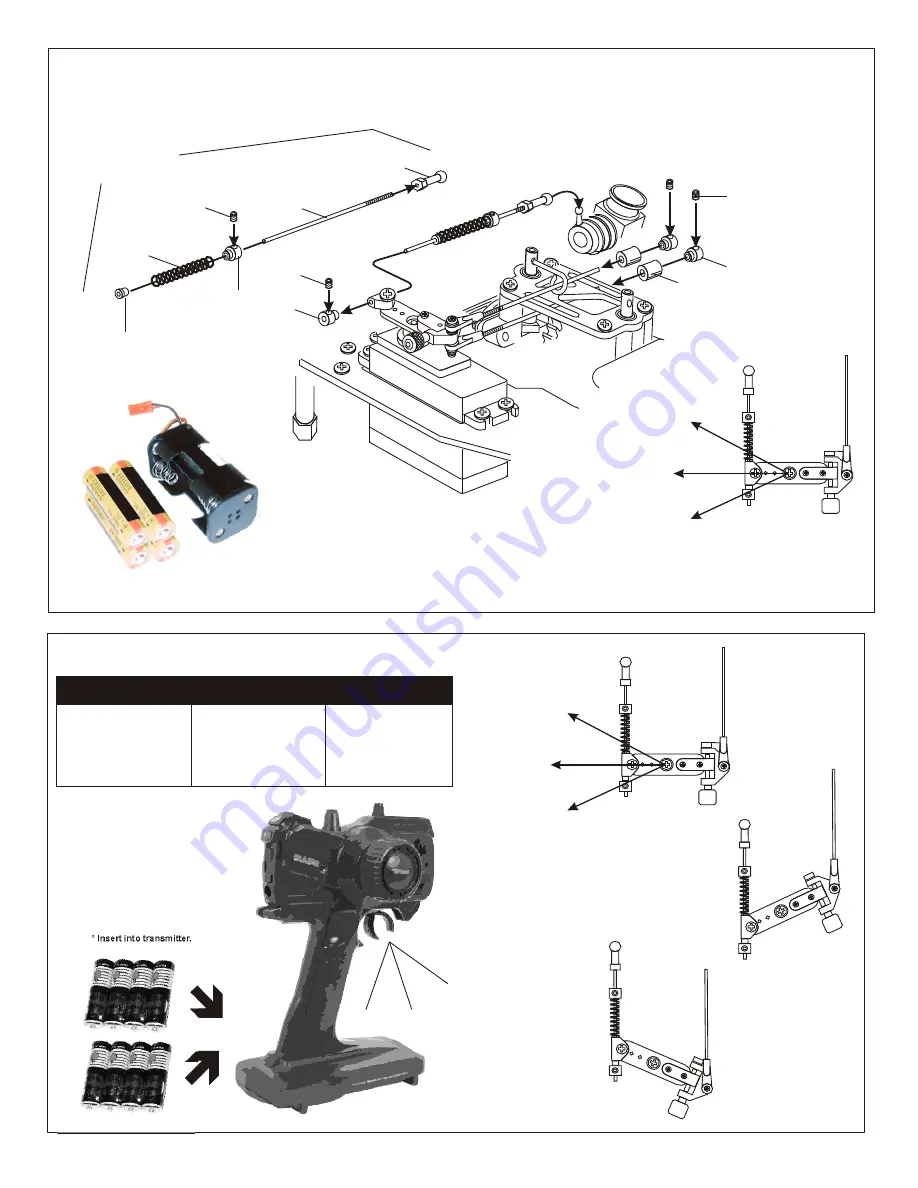
CHECKING  ENGINE THROTTLE

* Insert into transmitter.

1. Insert AA batteries into
    transmitter (8 Pcs).
2.Turn on transmitter.
3.Turn on receiver.
4.Center throttle  trims as 
    shown . 

A

B

C

1.  Pull Full Throttle.

1. Push trigger to full
    brake position.
2. Adjust  alum. Stopper to
    increase or decrease
    the brake.

Idle Position (A)

Brake (C) 

Full Throttle (B)

* Align throttle servo same 
   as shown.

ASSEMBLY OF THE THROTTLE LINKAGE SYSTEM

3X3mm
Set Screw

3X3mm
Set Screw

3X3mm
Set Screw

Plastic Collar

* Take the plastic collar
   from brake system plastic 
   parts.

Throttle
  Spring

#10300
Alum.Stopper

#10300
Alum.Stopper

* Snap On.

#30530
Plastic Throttle
Ball Joint

2mm Rod

Fuel
  Tube
  ( 6mm )

Idle Position

Brake

Full Throttle

* Align throttle servo same 
   as shown.

A

B

C

• Full brake arm position.  
Spring compresses 
forward and brake rods 
pull brake levers. 

• Full throttle arm position.  
Spring rod pulls throttle 
barrel open and brake 
rods release pressure on 
brake cams.

IMPORTANT
CHECK RADIO 
THROTTLE AND 
STEERING SWITCHES 
BEFORE RUNNING CAR

#30800
Plastic Throttle
kit

Note: 

Battery life is short when using Alkaline batteries.  For safety, we recommend using 
Alkaline batteries for only 30 minutes before testing; mostly changing.  Battery strength 
affects braking power and radio range.  If voltage drops while running the car, you will 
loose control and destroy your car!  This is NOT covered under warranty.

To increase run time, upgrade receiver battery to a 5-cell hump pack.  Also, install a 
battery fail safe (OFNA # 91002) to further protect your car.  But, the most important step 
you can make, “is to always use fully charged or fresh batteries when running your car”.

Radio shown, may be 
different from what is in 
your kit.  OFNA  
reserves the right to 
change upon stock 
availability.

A

B

C

Your Radio may be different 
than one pictured in this 
manual.

Содержание Ultra LXComp

Страница 1: ...INSTRUCTION MANUAL Ultra LX Comp2 Rev 01 New Arms Design New Bumper Uses Less E Clips 12mm X 1 Racer Shocks...

Страница 2: ...batteries Alkaline type batteries will work but braking will be reduced The best is to use a 5 cell hump pack for increased voltage Recommended Option You may want to upgrade the car battery pack to a...

Страница 3: ...healthy off Fuel contains Methanol and Nitro Methane and is flammable and poisonous Glow Fuel Glow fuel is poisonous Store fuel in cool ventilated location Refer the glow fuel Glow fuel is flammable...

Страница 4: ...brake levers Full throttle arm position Spring rod pulls throttle barrel open and brake rods release pressure on brake cams IMPORTANT CHECK RADIO THROTTLE AND STEERING SWITCHES BEFORE RUNNING CAR 308...

Страница 5: ...ge 30769 Diff Gear Large 30779 4x10mm Washer 30779 4x10mm Washer 30779 4x10mm Washer 30779 4x10mm Washer 30773 4mm Cross Pin 30773 4mm Cross Pin 30769 Diff Gear Small 30769 Diff Gear Small 30769 Diff...

Страница 6: ...HE CENTER DIFFERENTIAL 30773 4x27mm Cross Pin X2 30779 2x12 8mm X2 30779 4x10mm Washer X4 30779 P5 O Ring X2 94034 Set Screw X1 Put the differential gears same as picture shown Apply diff Gear grease...

Страница 7: ...35313 M3 Nylon Nut X4 X4 X4 30111 3x10mm Flat Head Hex Screw Center differential assembly ASSEMBLY OF THE SPUR GEAR 94033 M3x3 Set Screw 30171 Brake Lever 30213 Brake Cam ASSEMBLY OF THE BRAKE CAM 94...

Страница 8: ...0652 Center Diff Plate 94004 3X12mm Hex Screw 30211 5x8x2 5mm Plastic Bushing 94033 M3x3 Set Screw X2 X2 94005 3X15mm Hex Screw X4 94004 3X12mm Hex Screw X4 94033 M3x3 Set Screw 30171 Brake Lever Remo...

Страница 9: ...EARS ASSEMBLY OF THE FRONT GEAR BOX 94029 4x25mm Flat Head Hex Screw 94009 4x10mm Hex Screw 94022 3x18mm Flat Head Hex Screw 94022 3x18mm Flat Head Hex Screw 94009 4x10mm Hex Screw X2 X2 94029 4x25mm...

Страница 10: ...10mm Steering Ball 40104 10mm Steering Ball 40103 Knuckle Arm Right 40103 Knuckle Arm Left 34035 Front Lower Arm 34036 Front Lower Arm 36055 2 5x16 8mm Pin 36055 2 5x16 8mm Pin 36054 Wheel Hub 36054...

Страница 11: ...ASSEMBLY OF THE FRONT ARMS 40104 4x16mm Cap Screwl 90020 2 5mm E Ring 90020 2 5mm E Ring 30152 3mm Upper Arm Shaft 40104 4x16mm Cap Screwl 3mm E Ring 90021 3mm E Ring 30151 4mm Arm Shaft 90021 3mm E R...

Страница 12: ...Screw X2 X2 A B 94033 M3x3 Set Screw X2 94033 M3x3 Set Screw Cut the plastic as shown 34037 Caster Adjuster CLIP IN THE CASTER ADJUSTER Assembly of the right and left hand side are the same ASSEMBLY O...

Страница 13: ...hown in Fig 1 36730 Cap Joint 90026 5x5mm Set screw X1 90026 5x5mm Set screw 30630 6x13x5mm Ball Bearing 30010 Gear Box 30630 6x13x5mm Ball Bearing 30130 Bevel Gear Small Step 2 Step 1 90018 3X25mm Ca...

Страница 14: ...X4mm Screw 35313 M3 Nylon Nut 40065 Upper arm Plastic Rod End 40065 Upper arm Plastic Rod End 36055 2 5x16 8mm Pin 36082 Rear Wheel Axle Shaft 18mm ASSEMBLY OF THE REAR WHEEL HUB ASSEMBLY OF THE REAR...

Страница 15: ...4011 4X16mm Hex Screw 90019 3X25mm Cap Screw 1 High Position 2 Low Position 3 Bigger Angle The installing angle becomes bigger in order 1 to 3 3x8x0 8mm Washer 94002 3x8mm Screw 94006 3x18mm Screw 940...

Страница 16: ...ng 36740 Saver Saver Shaft Brass 36741 8x12mm Washer 36741 Servo Saver Spring 36740 Servo Saver Hom A 36740 Servo Saver Hom A 36700 7mm Steering Ball End 36850 7mm 36850 7mm 36700 7mm Steering Ball En...

Страница 17: ...mbly 94026 4x12mm Flat Head Hex Screw x2 94027 4x16mm Flat Head Hex Screw x8 94019 3x10mm Flat Head Hex Screw x2 ASSEMBLY OF THE GEAR BOX ONTO CHASSIS 94023 3x25mm Flat Head Hex Screw 94027 4x16mm Fla...

Страница 18: ...34080 Stone Guide 94027 4x16mm Flat Head Hex Screw X4 94023 3x25mm Flat Head Hex Screw 94019 3x10mm Flat Head Hex Screw X6 94019 3x10mm Flat Head Hex Screw 94019 3x10mm Flat Head Hex Screw 94019 3x10m...

Страница 19: ...Hex Screw 94003 3X10mm Hex Screw 94003 3X10mm Hex Screw 2X15mm Hex Screw 2X15mm Hex Screw 2X15mm Hex Screw X2 10280 Switch Cover Switch Receiver Battery 34026 Servo Washer 34026 Servo Washer 34026 Se...

Страница 20: ...94003 3x10mm Flat Head Hex Screw 94003 3X10mm Hex Screw X4 94003 3X10mm Hex Screw 94003 3X10mm Hex Screw 94019 3x10mm Flat Head Hex Screw 94004 3X12mm Hex Screw 94004 3X12mm Hex Screw X2 40109 Fuel T...

Страница 21: ...94004 3X12mm Hex Screw 10711 Servo Horn Adapter X2 94004 3X12mm Hex Screw 40104 4x12mm Flat Head Hex Screw X1 40104 4x12mm Flat Head Hex Screw 40199 Plastic Ball End 40199 Plastic Ball End ASSEMBLY O...

Страница 22: ...0 5x10x4mm Ball bearing 10400 Clutch Bell 14T 10099 3x10mm Cap Screw 31989 Manifold 1 3 9 M a n i f o l d S p r i n g 10068 Manifold Adapter 31990 Muffler 10180 Sillcone Tube Nylon Straps Middle 35313...

Страница 23: ...30800 10300 Alum Stopper 30800 30171 2X65mm Rod 30800 2X65mm Rod 30800 2X65mm Rod 30800 10300 Throttle Spring 30560 Antenna Pipe 94033 3x3mm Set Screw 10300 Alum Stopper Snap On 30800 10292 Throttle B...

Страница 24: ...er Push 6mm ball joint into ball end 40069 Shock Spring Black 40063 Spring Holder ASSEMBLY OF THE SHOCK Fit the o ring into groove Make 2 for rear Make 2 for front Be careful not to damage shock shaft...

Страница 25: ...THE REAR SHOCK ABSORBER 3mm Nylon Nut 40056 Plastic Bushing 3x20mm Cap Screw 35313 M3 Nylon Nut M3 Nylon Nut M3 Nylon Nut X2 X4 X2 X2 X4 X2 3X20mm Cap Screw 3X20mm Cap Screw 3X20mm Cap Screw Cut the s...

Страница 26: ...THE WING ASSEMBLY OF THE TIRES AND WHEELS Right ASSEMBLY OF THE TIRES AND WHEELS Left 86082 Comic Tires 86082 Comic Tires 81092 Inner sponge 81092 Inner sponge 86034 Wheel 86034 Wheel Make two tires...

Страница 27: ...Addendum Sheets...

Страница 28: ...buckle rod on the upper arms clockwise or anti clockwise We suggest use zero degree for the front and 1 5 degree for the rear negative Turnbuckle Turnbuckle FRONT TOE IN AND TOE OUT SETTING TOE IN TOE...

Страница 29: ......

Страница 30: ...rew 03 0 1 3 Brass Corn large hole 0 9 1 32 Br s Cor a s n hole sml 30481 3 x 20mm Hex Screw 30481 3 x 20mm Hex Screw 30481 3 x 20mm Hex Screw 30480 Engine Mount 10398 12T 10399 13T 10400 14T stock 10...

Страница 31: ...ake is not on Engine at idle Neutral Position Brake is on Brake Adjust Nut Braking Position Brake is not on Engine at full throttle Full Throttle Position Less Brake More Brake Tighten Loose Tighten o...

Страница 32: ...before starting full break in Break in the engine in the car by running the engine at a rich setting Run the car from a slow to fast speed with short bursts of speed You need to buildup a little heat...

Страница 33: ...OTTLE 2 95 52180 CAP THROTTLE NEEDLE OLD 2 95 52181 BALL END THROTTLE NEEDLE 5 95 52278 BARREL STOP SCREW 28 2 95 52279 LOW END NEEDLE 28 4 95 52276 WASHER LOWER ALUMINUM 1 PC 1 95 52274 WASHER UPPER...

Страница 34: ...Check low end needle factory set Needle are not correct Check needle settings SLOWTHROTTLE Fuel pressure in tank Check pressure line to tank and lid seal RESPONSE Linkage not opening Check that throt...

Страница 35: ...95 10270 CLIPS FUEL TUBING 3 95 10280 SWITCH COVER SILICONE 1 PC 3 95 10300 ALUMINUM STOPPERS W SPRING 4 95 10398 CLUTCH BELL WITH BEARINGS 12 TEETH 24 95 10399 CLUTCH BELL WITH BEARING 13 TEETH 19 95...

Страница 36: ...95 33993 PCR 7075 CNC REAR BRACE STIFFENER SET ULTRA COMP 62 95 33994 PCR 7075 CNC REAR BLOCK FRONT UPPER ARM PINS ULTRA COMP 32 95 33995 PCR 7075 CNC PLATE STEERING LINK ULTRA COMP 30 95 33996 PCR 70...

Страница 37: ...060 NYLOK NUT 2 5mm PISTON NUT 4 PCS 4 95 40065 BALL ENDS PLASTIC REAR UPPER 4 95 40069 SPRINGS 9 5 BLACK FRONT AND REAR SET 19 95 40070 SPRINGS 9 5 GREEN SOFT FRONT AND REAR SET 19 95 40071 SPRINGS 9...

Страница 38: ...BLANK...

Страница 39: ...complete or component parts are broken due to error in manufacturer contact your dealer from which you purchased the kit for replacement part or call OFNAat 949 586 2910 for your nearest dealer locati...

Отзывы: