Officine Gullo
12
CHECKING FUNCTIONING
The appliance contains the instructions necessary for use.
Check the appliances for gas leaks.
Check the lighting and flame of the main burner.
We urge the user to follow the instructions when using the appliance.
MAINTENANCE
With prolonged use of the appliance, it is essential to carry out regular maintenance for the safe functioning of the
appliance; we therefore recommend drawing up a contract for after sales service. Maintenance must be done only
by specialized personnel, observing the norms in force and our indications.
SPARE PARTS
Coup de feu:
It is possible to substitute the spark plug cock, thermocouple and burner after having removed the front panel.
Open rings:
The cocks can be changed by removing the front panel; to change the thermocouples and burners you have to
remove the rungs and trays.
USER MANUAL
INSTRUCTIONS FOR USE
Attention!
The appliance must only be used under surveillance.
LIGHTING AND ADJUSTING THE COUP DE FEU
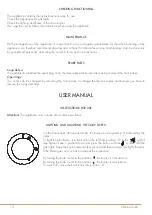
On the front panel, above each knob, the burner it corresponds to is indicated by the
index.
To light the pilot flame, turn the knob to the left from position “0” to the
symbol
(see figure); keep it pushed down and press the button with the
symbol until the
gas lights. Keep the knob pressed a few second and then let it go, this lights the pilot.
If the flame goes out you have to repeat the procedure.
By turning the knob round to the position the burner is at maximum.
By turning the knob round to the position the burner is at minimum.
To switch off, move the knob back into position " 0".
13
Officine Gullo
CLEANING AND MAINTENANCE
Attention! During cleaning, do not wash the external parts of the appliance with direct sprays of water or with high
pressure.
After every use, clean the appliance thoroughly. Daily cleaning after switching off the appliance ensures the perfect
functioning and long life of the appliance.
Before starting to clean the appliance, disconnect the power supply. The parts in steel must be washed with hot water
and neutral detergent, then rinsed thoroughly in order to eliminate all traces of detergent; after which, dried with a
dry cloth. Do not use abrasive or corrosive detergents.
The enamelled parts should be washed with soapy water.
Oven: Cleaning the oven is made easier by removing the support grill.
Important: As well as ordinary cleaning and maintenance, it is advisable to have the installation checked by an
installer at least once a year.
It is therefore suggested to draw up an after-sales assistance contract.
Cleaning burnished brass surfaces
No synthetic protective varnishes have been used to obtain the special burnishing effect on the burnished brass
details in order to avoid spoiling the beauty of the brass with an artificial patina. The antique finish of the surface
is the result of natural oxidation that has simply been accelerated. All the natural antique finish brass surfaces can
be cleaned with any kitchen degreasing detergent, accompanied by the use of an abrasive scouring pad (the
green colored type used for washing dishes). It is recommended that the metal be rubbed, uniformly applying light
pressure, until the desired effect is achieved.
The brass details should then be dried.
Do not use polish as this is suitable for maintaining the gloss but not the antique finish and could result in an effect
that is not compliant with our products. Any spots that may appear over time on the burnished brass surfaces should
be considered as a desirable and particular characteristic of our craft metal working processes.
Cleaning chromium-plated brass surfaces
No synthetic varnishes have been used to obtain the special polish on the chromium-plated brass details in order to
avoid spoiling the beauty of the chromium plating with an artificial patina. All the chromium-plated surfaces should
be cleaned, where necessary, with a soft, possibly micro-fiber cloth, combined with metal polishing products, if
required. Do not use abrasive pads.
Cleaning satin finish nickel-plated brass surfaces
No synthetic varnishes have been used to obtain the special nickel-plating on the satin finish nickel-plated brass
details in order to avoid spoiling the beauty of the nickel-plated, satin finished solid brass with an artificial patina. All
the nickel-plated and satin finished brass surfaces should be cleaned, where necessary, with a soft, possibly micro-
fiber cloth, combined with a neutral detergent, if required. Do not use abrasive pads.
Cleaning the varnished surfaces
All the varnished surfaces should be cleaned using a neutral detergent and, where necessary, a soft, possibly micro-
fiber cloth. Do not use abrasive pads or any other chemical products.
Cleaning brushed steel surfaces
All the brushed steel surfaces should be cleaned using degreasing products or products specifically designed to be
used on steel and, where necessary, extra-fine steel wool or extra-thin sandpaper.


