12
Officine Gullo
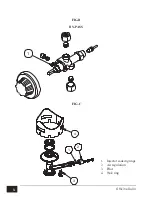
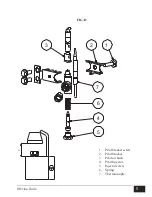
Pilot nozzles:
Take the rungs off, remove the burners and trays, with a size 8 spanner loosen the nozzle holder unit,
with a size 11 spanner unscrew the nozzle holder all the way, with a slotted screwdriver unscrew the
pilot nozzle and replace it with the appropriate one and tighten right down.
Put everything back in place and regulate the air by means of the adjusting bush until the pilot flame
stops sputtering and becomes an intense blue colour.
CHECKING FUNCTIONING
•
The appliance contains the instructions necessary for use.
•
Check the appliances for gas leaks.
•
Check the lighting and flame of the main burner.
•
We urge the user to follow the instructions when using the appliance.
MAINTENANCE
With prolonged use of the appliance, it is essential to carry out regular maintenance for
the safe functioning of the appliance; we therefore recommend drawing up a contract for
after sales service. Maintenance must be done only by specialized personnel, observing the
norms in force and our indications.
SPARE PARTS
The gas-cocks, control unit, ignition plugs, thermocouples and burners can be changed by
removing the grills and control panel.
INSTRUCTIONS FOR USE
Attention!
The appliance must only be used under surveillance.
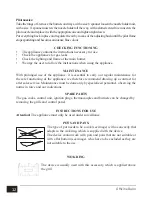
POTS AND PANS.
10
IT
CH
regolazione, fissare la vite, regolare il minimo girando la vite a destra o a sinistra finchè la potenza termica raggiunge
2,3 kW per il bruciatore da 10 kW.
Avviso:
Per il funzionamento con gas liquido, la vite di regolazione del minimo va bloccata a fondo.
Ugelli pilota (fig. D):
Togliere le griglie, i bruciatori e le bacinelle ; con una chiave da 8 allentare il blocchetto portaugello, con una chiave da
11 svitare il fondo del portaugello, con un cacciavite a taglio svitare l’ugello pilota e sostituirlo con quello appropriato,
avvitando fino a fine corsa.
Rimontare il tutto e regolare l’aria agendo sulla boccola di regolazione finché la fiamma pilota non borbotta e assume
un colore azzurro intenso
CONTROLLO DEL FUNZIONAMENTO
•
L’apparecchio contiene le istruzioni necessarie per l'uso.
•
Controllare gli apparecchi per le perdite del gas.
•
Esaminare l'accensione e controllare che la fiamma dei bruciatori sia regolare.
•
Si raccomanda all'esercente di usare l'apparecchio seguendo le istruzioni.
MANUTENZIONE
Con il prolungarsi dell’uso dell’apparecchio é indispensabile esercitare una regolare manutenzione per la sicurezza del
funzionamento, consigliamo perciò la stipulazione di un contratto di assistenza.
La manutenzione deve essere eseguita solo da personale specializzato che si attengano alle norme in vigore e alle nostre
indicazioni.
RICAMBI
Fuochi aperti:
è possibile la sostituzione dei rubinetti asportando il pannello anteriore; la sostituzione di termocoppie e bruciatori,
asportando le griglie e le bacinelle.
ISTRUZIONI PER L’USO
Attenzione:
- Usare l'apparecchio solo sotto sorveglianza!
PENTOLAME.
Il pentolame deve essere di tipo wok (vedi immagine), con una concavità che si
adatti all’anello wok, fornito in dotazione all’apparecchio.
L’apparecchio non può funzionare con pentole non adatte o a fondo piatto (vedi
immagine), che sono da considerarsi automaticamente escluse e non idonee all’uso.
ANELLO WOK
L’apparecchio va usato solamente con questo accessorio, applicato sopra la
griglia
The type of pot needs to be a wok (see image) with a concavity that
adapts to the wok ring, which is supplied with the device.
The device cannot work with pots and pans that are not suitable or
with a flat bottom (see image), which are to be excluded as they are
not suitable to the use.
WOK RING
10
IT
CH
regolazione, fissare la vite, regolare il minimo girando la vite a destra o a sinistra finchè la potenza termica raggiunge
2,3 kW per il bruciatore da 10 kW.
Avviso:
Per il funzionamento con gas liquido, la vite di regolazione del minimo va bloccata a fondo.
Ugelli pilota (fig. D):
Togliere le griglie, i bruciatori e le bacinelle ; con una chiave da 8 allentare il blocchetto portaugello, con una chiave da
11 svitare il fondo del portaugello, con un cacciavite a taglio svitare l’ugello pilota e sostituirlo con quello appropriato,
avvitando fino a fine corsa.
Rimontare il tutto e regolare l’aria agendo sulla boccola di regolazione finché la fiamma pilota non borbotta e assume
un colore azzurro intenso
CONTROLLO DEL FUNZIONAMENTO
•
L’apparecchio contiene le istruzioni necessarie per l'uso.
•
Controllare gli apparecchi per le perdite del gas.
•
Esaminare l'accensione e controllare che la fiamma dei bruciatori sia regolare.
•
Si raccomanda all'esercente di usare l'apparecchio seguendo le istruzioni.
MANUTENZIONE
Con il prolungarsi dell’uso dell’apparecchio é indispensabile esercitare una regolare manutenzione per la sicurezza del
funzionamento, consigliamo perciò la stipulazione di un contratto di assistenza.
La manutenzione deve essere eseguita solo da personale specializzato che si attengano alle norme in vigore e alle nostre
indicazioni.
RICAMBI
Fuochi aperti:
è possibile la sostituzione dei rubinetti asportando il pannello anteriore; la sostituzione di termocoppie e bruciatori,
asportando le griglie e le bacinelle.
ISTRUZIONI PER L’USO
Attenzione:
- Usare l'apparecchio solo sotto sorveglianza!
PENTOLAME.
Il pentolame deve essere di tipo wok (vedi immagine), con una concavità che si
adatti all’anello wok, fornito in dotazione all’apparecchio.
L’apparecchio non può funzionare con pentole non adatte o a fondo piatto (vedi
immagine), che sono da considerarsi automaticamente escluse e non idonee all’uso.
ANELLO WOK
L’apparecchio va usato solamente con questo accessorio, applicato sopra la
griglia
The device is usually used with this accessory, which is applied above
the grill.


