background image

34 


1. 

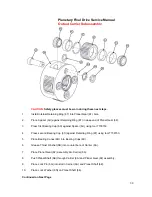
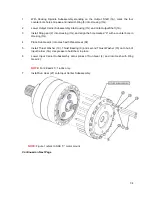
With  Housing  Spindle  Subassembly  standing  on  the  Output  Shaft  (1A),  mark  the  four 
counter-bore holes. Grease and install O-Ring (5) into Housing (1G). 

 
2. 

Lower Output Carrier Subassembly into Housing (1G) and onto Output Shaft (1A). 

 
3. 

Install Ring gear (2) into Housing 

(1G), and align the hole marked “X” with a counter bore in 

Housing (1G). 

 
4. 

Place Sun Gear (4) into mesh with Planet Gear (6F). 

 
5. 

Install Thrust Washer (10), Thrust Bearing (9)  and second Thrust Washer (10) onto  hub of 
Input Carrier (3A). Use grease to hold them in place. 

 
6. 

Lower  Input  Carrier  Subassembly  onto  splines  of  Sun  Gear  (4)  and  into  mesh  with  Ring 
Gear (2). 


NOTE:


For 29 and 40 :1 ratios only. 

 
7. 

Install Sun Gear (27) onto Input Carrier Subassembly. 


NOTE:


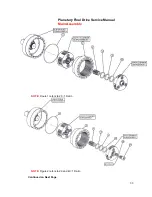
Figure 1 refers to 

SAE “C” motor mount 


Continued on Next Page


Содержание S16A2

Страница 1: ...1 Torque Hub Planetary Final Drive S16A1 2 Series Service Manual Rev 9 3 13...

Страница 2: ...ssumes no liability with respect to the use of the documentation described herein or for any act or omission of Fairfield Manufacturing Co Inc concerning this documentation Torque Hub is a registered...

Страница 3: ...n Disassembly 11 Cover Disassembly 14 Output Carrier Disassembly 16 Input Carrier Disassembly 17 Housing Spindle Disassembly 20 Assembly Instructions Cover Subassembly 24 Input Carrier Subassembly 26...

Страница 4: ...the Assembly Tools section Users should familiarize themselves with the procedures for roll and leak testing as well as bolt tightening and torquing found on the following three pages before starting...

Страница 5: ...m table below or something equivalent to apply constant rotational force to the input of the gearbox If more drag is felt in the gears only at certain points then the gears are not rolling consistentl...

Страница 6: ...blies with lip seals The unit has a leak if the pressure gauge reading on your leak check fitting starts to fall after the gearbox has been pressurized and allowed to equalize Leaks will most likely o...

Страница 7: ...how to tighten and torque bolts or socket head cap screws in a bolt circle 1 Tighten but do not torque bolt A until snug 2 Go to the opposite side of the bolt circle and tighten bolt B until equally...

Страница 8: ...nded viscosities for various ambient operating temperatures These recommendations are based on temperature rise of 50 to 100 F at normal operating conditions Continued on Next Page Differential Planet...

Страница 9: ...continuous operation and no higher than 200 F for intermittent operation For special applications high horsepower high speeds or wide temperature changes please consult Oerlikon Fairfield Oil Fill Lev...

Страница 10: ...10 DISASSEMBLY...

Страница 11: ...11 Planetary Final Drive Service Manual Main Disassembly NOTE Figure 1 refers to SAE C motor mount NOTE Figure 2 refers to SAE D motor mount Continued on Next Page...

Страница 12: ...ondition and volume of the oil 3 Remove four of Shoulder Bolts 18 followed by sixteen of Hexagonal Bolts 15 from Cover Subassembly 4 Lift the Cover Subassembly off of the unit NOTE For 29 and 40 to 1...

Страница 13: ...r Subassembly 8 Remove the Sun Gear 4 from Output Carrier Subassembly 9 Lift out the Ring Gear 2 from Housing Spindle Subassembly 10 Remove Output Carrier Subassembly from the unit from the Housing Sp...

Страница 14: ...14 Planetary Final Drive Service Manual Cover Disassembly NOTE Figure 1 refers to SAE C motor mount NOTE Figure 2 refers to SAE D motor mount Continued on Next Page...

Страница 15: ...hrust Bearing 9 from Cover 17 3 Remove Thrust Washer 8 from the Cover 17 4 Remove Thrust Washer 19 from counter bore in Cover 17 NOTE For SAE C cover skip steps 5 and 6 5 Remove Adaptor Mount 29 from...

Страница 16: ...assembly from the window of the Carrier 6A 5 Remove Thrust Washer 6B from counter bore in Carrier 6A 6 Remove both Bearing Cones 6D from bore of Planet Gear 6F 7 Remove both Bearing Cups 6C from bore...

Страница 17: ...emove Thrust Washer 3B from window of Carrier 3A NOTE Bearing 3C is a matched assembly and must be kept as a set 6 Remove both Bearing Cones 3C from bore of Planet Gear 3F NOTE Do not remove the beari...

Страница 18: ...ly from the window of the Carrier 3A 5 Remove Thrust Washer 3B from window of Carrier 3A NOTE Bearing 3C is a matched assembly and must be kept as a set 6 Remove both Bearing Cones 3C from bore of Pla...

Страница 19: ...teps 9 Remove Retaining Ring 11 from Coupling 12 Slide coupling from Sun Gear 3J 10 Remove Retaining Ring 25 from Coupling 12 11 Remove Sun Gear 3J from Carrier 3A through one of the planet carrier wi...

Страница 20: ...20 Planetary Final Drive Service Manual Housing Spindle Disassembly 1 Set the unit on bench such that Housing 1G small diameter end is facing down Continued on Next Page...

Страница 21: ...the Housing 1G down 7 Use a dead blow hammer on the Housing 1G flange to drive the inboard Bearing Cone 1D off of the Spindle 1A 8 Lift the Spindle 1A out of the Housing 1G 9 Remove Lip Seal 1B from t...

Страница 22: ...22 THIS PAGE INTENTIONALLY LEFT BLANK...

Страница 23: ...23 ASSEMBLY...

Страница 24: ...24 Planetary Final Drive Service Manual Cover Subassembly NOTE Figure 1 refers to SAE C motor mount cover NOTE Figure 2 refers to SAE D motor mount cover Continued on Next Page...

Страница 25: ...d install Bearing 9 on top of Thrust Washer 10 5 Grease and install Thrust Washer 10 on top of Bearing 9 6 Grease and install Thrust Washer 19 onto Cover 17 The grease should hold washer in place for...

Страница 26: ...846 and Install both the Bearing Cups 3C with wide face outside into bore of the Planet Gear 3F Ensure that the Bearing Cups 3C has seated fully against the Retaining Ring 3C 3 Install Bearing Cone 3C...

Страница 27: ...E 8 Install Lock Pin 3D into lock pin slot in Carrier 3A and Planet Shaft 3E 9 Install Tanged Lock Washer 3H onto Planet Shaft 3E 10 Clean Planet Shaft 3E and Bearing Nut 3G threads using ethanol Appl...

Страница 28: ...into the groove of Planet Gear 3F 3 Use tool T147846 and Install both the Bearing Cups 3C with wide face outside into bore of the Planet Gear 3F Ensure that the Bearing Cups 3C has seated fully again...

Страница 29: ...net Shaft 3E 10 Install Tanged Lock Washer 3H onto Planet Shaft 3E 11 Clean Planet Shaft 3E and Bearing Nut 3G threads using ethanol Apply Loctite 263 to the Bearing Nut 3G and planet shaft threads Us...

Страница 30: ...earing Cup 6C against Spacer 6U using tool T158150 4 Press second Bearing Cup 6C against Retaining Ring 6T using tool T158150 5 Place Bearing Cones 6D into Bearing Cups 6C 6 Grease Thrust Washer 6B in...

Страница 31: ...6E to make sure Bearings 6D are properly seated Measure Rolling torque of Planet Gear 6F using Fish Scale Using tool T 119240 tighten Bearing Nut 6P until a torque of 1 5 2 lbs is attained when rollin...

Страница 32: ...onto Output Shaft 1A 6 Press Bearing Cone 1D onto Output Shaft 1A using pressing tool T158049 Rotate Housing 1G while pressing the Cone 1D Stop pressing when Cone 1D is snug against the Cup 1C CAUTION...

Страница 33: ...33 Planetary Final Drive Service Manual Main Assembly NOTE Figure 1 refers to 20 1 Ratio NOTE Figure 2 refers to 29 and 40 1 Ratio Continued on Next Page...

Страница 34: ...hole marked X with a counter bore in Housing 1G 4 Place Sun Gear 4 into mesh with Planet Gear 6F 5 Install Thrust Washer 10 Thrust Bearing 9 and second Thrust Washer 10 onto hub of Input Carrier 3A U...

Страница 35: ...k Washers 14 in these bolts by hand then torque to 35 45 ft lbs 10 Install sixteen Hexagonal Head Bolts 15 with Lock Washers 14 into Housing 1G Torque Bolts to 100 110 ft lbs 11 Install Pipe Plugs 20...

Страница 36: ...36 Planetary Final Drive Service Manual Assembly Drawing...

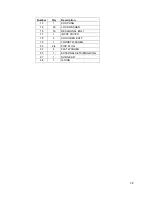
Страница 37: ...ING GEAR 3A 1 CARRIER 3B 3 THRUST WASHER 3C 3 TAPERED BEARING ASSY 3D 3 LOCK PIN 3E 3 PLANET SHAFT 3F 3 PLANET GEAR 3G 3 BEARING NUT 3H 3 LOCK TANGED WASHER 3J 1 SUN GEAR 4 1 SUN GEAR 5 2 O RING 6A 1...

Страница 38: ...ty Description 12 1 COUPLING 14 20 LOCK WASHER 15 16 HEXAGONAL BOLT 17 1 INPUT COVER 18 4 SHOULDER BOLT 19 1 THRUST WASHER 20 2 4 PIPE PLUG 22 4 FLAT WASHER 25 1 EXTERNAL RETAINING RING 27 1 SUN GEAR...

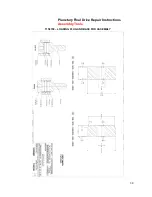
Страница 39: ...39 Planetary Final Drive Repair Instructions Assembly Tools T158150 LOADING PLUG AND BASE FOR ASSEMBLY...

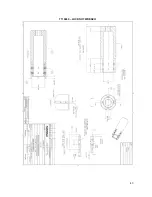
Страница 40: ...40 T158149 LOADING PLUG AND BASE...

Страница 41: ...41 T160764 BEARING CUP ASSEMBLY PRESSING TOOL...

Страница 42: ...42 T223131 LOCKNUT WRENCH...

Страница 43: ...43 T119240 LOCKNUT WRENCH...

Страница 44: ...44 T154563 ASSEMBLY PRESSING TOOL...

Страница 45: ...45 T139345 ASSEMBLY PRESSING TOOL...

Страница 46: ...46 T137786 TOOL TO PRESS IN SEAL...

Страница 47: ...47 T158049 BEARING CONE PRESSING TOOL...

Страница 48: ...48 T136184 TOOL TO PRESS BEARING ON SHAFT...

Страница 49: ...49 T159173 PRESSING TOOL TO INSTALL BEARING CONE...

Страница 50: ...50 T173814 LEAK TEST FIXTURE...

Страница 51: ...51 T220225 LEAK TEST TOOL...

Страница 52: ...52 T224477 ROLL TEST TOOL...

Страница 53: ...53 T223989 ROLL TEST TOOL...

Страница 54: ...54 T158149 LOADING PLUG AND BASE FOR ASSEMBLY...

Страница 55: ...lity that includes a full service heat treat department Our philosophy of synchronous engineering is a partnership that matches our best and brightest people with your people to evaluate your unique r...

Страница 56: ...56 Oerlikon Fairfield U S 52 South P O Box 7940 Lafayette IN 47903 USA 765 772 4000 www oerlikon com fairfield...

Отзывы: