background image


EN 

Viewing Photos 

Main screen 

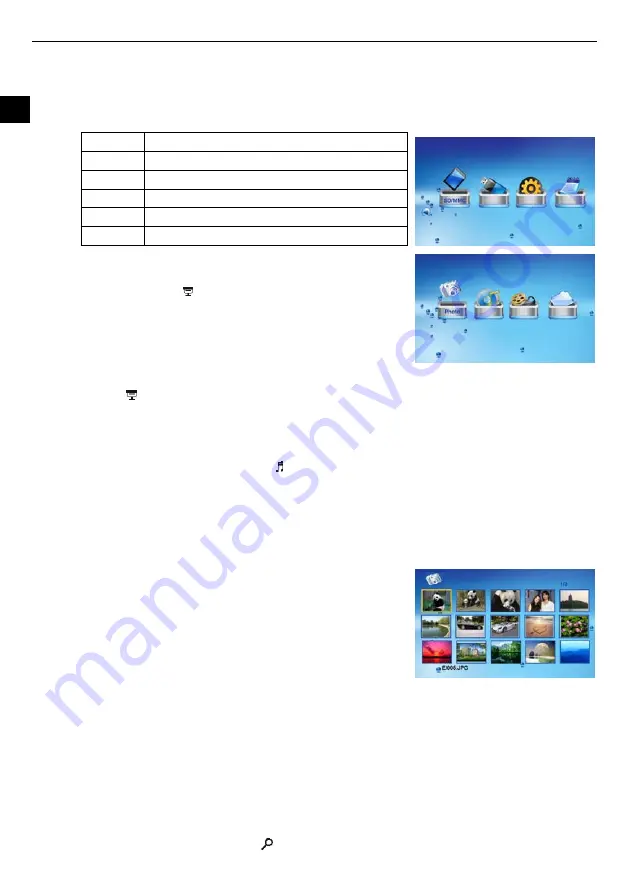
In the main screen, you can select connected source to view pictures, change frame settings, or display the calendar. 
1.


Press the [MENU] button on the remote control to access the main screen. All connected source, setup and calendar icons are displayed. 


USB driver 

Appears when you inserted a USB flash driver. 

SD/MMC 

Appears when you insert a SD or MMC card. 

MS 

Appears when you insert a MS card. 

CF 

Appears when you insert a CF card. 

SETUP 

To customize the settings of Digital Photo Frame. 


CALENDAR 

To display the Calendar on the screen. 

 
2.


Press the [

W

] or [

X

] button on the remote control to highlight a picture source. 

To start a slideshow, press the [ ] button. 
To display photo, music, movie or file individually, press the [OK] button. 


Running a slideshow 

In any mode, press the [ ] button to start slideshow. The music stored on the memory source will start playback on the background automatically 
during slideshow. 

y


To pause the slideshow and view a single picture, press the [OK] button. To resume the slideshow, press the [OK] button again. 

y


To increase or decrease the volume of background music, press the [VOL+] or [VOL-] button. 

y


To stop or start background music playback, press the [ ] button. 

Note:  

y


Press the [MENU] button to exit the slideshow and return to the main screen. 

y


Press the [

2

] button to exit the slideshow and view the pictures in thumbnail. 


Viewing thumbnails 

The pictures on the selected memory source can be displayed on the screen as thumbnails. Up 
to 15 pictures are displayed at a time. 
1.


Select a memory source (e.g. USB, SD/MMC) in the main screen and press the [OK
button. The mode menu appears. 

2.


Press the [

W

] or [

X

] button on the remote control to select Photo, and press the [OK

button. The pictures are displayed on the screen as thumbnails. 

3.


To navigate through the thumbnails, press the [

S

], [

T

], [

W

] or [

X

] on the remote 

control.  


Note: You can also press the [

2

] button from a slideshow or a single view to return to the thumbnails view. 

 
Browsing a single picture   

You can select a single picture to display on the screen, without a slideshow. 
1.


Select a picture in the thumbnail view, and press the [OK] button. The selected picture is displayed on the full screen. 

y


To view the previous or next photo, press the [

S

] or [

T

] button. 

y


To rotate a picture, press the [

W

] or [

X

] button. 

y


To magnify a picture up to 16X, press the [ ] button repeatedly. When a picture is magnified, press the [

S

], [

T

], [

W

] or [

X

] to 

Содержание DPF LOOK

Страница 1: ...ting a USB device 5 Viewing the first slideshow 5 Viewing Photos 6 Main screen 6 Running a slideshow 6 Viewing thumbnails 6 Browsing a single picture 6 Using OSD menu 7 Listening to Music 7 Watching V...

Страница 2: ...and tripod bracket or table The unit may fall resulting in possible damage or injury y Never place heavy or sharp objects on the LCD panel or frame y Only use the AC adapter included with Digital Phot...

Страница 3: ...usic on the background y Supports playback of MPEG 1 MPEG 4 and M JPEG y Supports multiple repeat mode of music video playback y Calendar display y Alarm setting y Support earphone connection y Compat...

Страница 4: ...Press to stop or start music playback during slideshow 18 VOL Press to decrease the volume Battery Recycling In order to ensure the environmently friendly disposal of batteries please do NOT dispose o...

Страница 5: ...d slot y To remove the cards pull out the card slowly Connecting a USB device You can view the pictures on your USB memory device by inserting it into the USB HOST slot Viewing the first slideshow Onc...

Страница 6: ...ground music press the VOL or VOL button y To stop or start background music playback press the button Note y Press the MENU button to exit the slideshow and return to the main screen y Press the 2 bu...

Страница 7: ...ure highlight and press the OK button When a picture is magnified press the S T W or X to view the other part of the picture Listening to Music If there are MP3 files on the memory device you can play...

Страница 8: ...the video list menu press the 2 button Managing Files In the File mode you can view all playable files and folders on the memory source You also can copy files from a memory device to another memory...

Страница 9: ...lable options include Random Fading Vexpand_Top Vexpand_Bottom Vexpand_Middle Hexpand_Left Hexpand_Right Hexpand_Middle Off Bottom_To_Top Top_To_Bottom Left_To_Right Right_To_Left Door_Close Door_Open...

Страница 10: ...s the S or T button to adjust the time 4 Press the OK button to confirm Setting alarm clock The Digital Photo Frame can also work as an alarm 1 Press the SETUP button The Setup Menu appears on the scr...

Страница 11: ...perating manual of your camera for specifics 3 Why do some pictures load faster than others Higher resolution pictures load slower Use pictures with lower resolution to speed up the loading time Note...

Страница 12: ...USB Host 2 0 USB device 2 0 Supports USB flash media Supported peripheral devices SD Secure Digital Card MMC MultiMedia Card MS Memory Stick CF Compact Flash Supported photo format JPEG Maximum resol...

Страница 13: ...ctivated do not cause the warranty period to be extended nor do they trigger a new warranty period The warranty period for any replacement parts installed ends with the warranty period for the entire...

Отзывы: