background image

10  Function

s

 of the Control Pad

22 / 92

Instruction Manual Myopia Master® (G/68100/EN Rev04 0820)

10.1 Touch Screen

If the function is not activated:

Enable the checkbox in "Setting 2/5"

(sec. 15.2, page 54)

In addition to the function keys, you can now also use the buttons on the 
screen, for example you can enable the respective button by gently 
pressing it on the touch screen.

10.1.1

Function Key

s

 on the Touch Screen

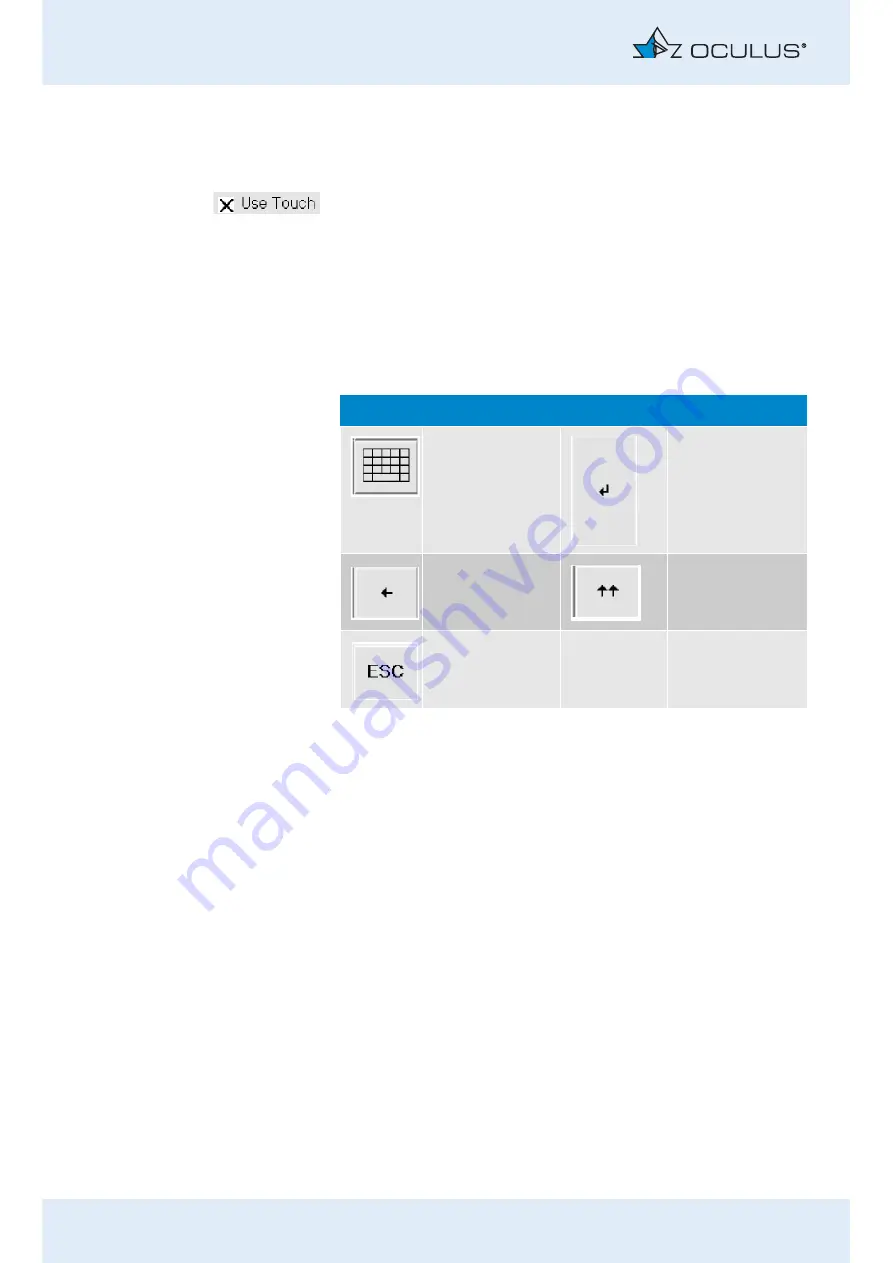
Use these function keys to work with the patient data management 
system.

Button

Function

Button

Function

Change keyboard

Enter

Delete character

Return to upper 
line

Escape

Содержание Myopia Master Advanced

Страница 1: ...OCULUS Myopia Master INSTRUCTION MANUAL...

Страница 2: ...fety instruc tions This instruction manual describes the measuring procedure how to manage the patient data and the settings in the Myopia Master program Due to ongoing development the diagrams shown...

Страница 3: ...rvice Purposes 19 9 Operation 20 9 1 Switching On 20 9 2 Switching Off 20 9 3 Daily Operation 20 10 Functions of the Control Pad 21 10 1 Touch Screen 22 10 1 1 Function Keys on the Touch Screen 22 11...

Страница 4: ...15 2 Settings 2 54 15 3 Settings 3 56 15 4 Settings 4 57 15 5 Settings 5 59 16 Display Options 60 17 Calculated correction of tonometrically measured IOP 62 17 1 IOP correction based on central corne...

Страница 5: ...umption of Liability for Functions and Damage 76 22 3 Manufacturer and Service Address 77 23 Technical Data 78 24 Annex 82 24 1 Electromagnetic Compatibility 82 24 2 Guidance and Manufacturer s Declar...

Страница 6: ...Table of Contents v v Instruction Manual Myopia Master G 68100 EN Rev04 0820...

Страница 7: ...anced with chin and head rest with Scheimpflug camera fully equipped Myopia Master Advanced without chin and head rest with Scheimpflug camera Myopia Master Basic with chin and head rest without Schei...

Страница 8: ...Manufacturer Protection class Keep dry Date of manufacturing IP XX Type of protection This way up Conformit europ enne Article number Fragile Follow instruction for use Serial number Limit of tempera...

Страница 9: ...the Patient Data Management system and all safety related instructions for use of the Myopia Master This manual describes the basic operation and the different features of the Myopia Master versions...

Страница 10: ...accident prevention 4 1 1 Pictograms Used in this Manual Warning Identifies a potentially dangerous situation which may cause irreversible injury Caution Identifies a potentially dangerous situation w...

Страница 11: ...fer to the notes in sec 20 page 74 Instructions for Setup and Connection Do not use or store the Myopia Master in rooms that are humid Keep the Myopia Master away from water that may drip splash or sp...

Страница 12: ...t use the Myopia Master with wireless technology for example with wireless USB Data responsibility The device itself is not designed to connect with the internet but only to a PC It does not require t...

Страница 13: ...devices such as for example a printer those devices become part of the ME system Make sure that all devices of the ME system meet the requirements of IEC 60601 1 IEC 60950 1 or 62368 1 Note that an o...

Страница 14: ...y into the laser beam To ensure satisfactory and reliable operation we recommend that you have the Myopia Master checked every two years by our service department or an authorized dealer If an error o...

Страница 15: ...ies with the requirements of IEC 60601 1 2005 section 16 Do not place the multiple socket outlet on the floor Do not use more than one multiple socket outlet Plug only the Myopia Master and the comput...

Страница 16: ...the option for the necessity of re entering the password when exit the screen saver Choose an adequate time setting for starting the screen saver if software session is inactive e g 10 minutes Adequat...

Страница 17: ...ometer measures the central radii of the cornea The integrated ophthalmic refractometer measures the refractive power of the eye The integrated interferometer measures the axial length of the eye The...

Страница 18: ...n cause condensation on the optical components Note Equipment damage due to incorrect transport and improper storage Avoid shocks and vibration Avoid contamination high temperatures and humidity Trans...

Страница 19: ...al Myopia Master G 68100 EN Rev04 0820 13 92 7 Device Description 7 1 Overview of Device Components 1 Gauge head 4 Control Wheel 7 Function keys 2 Printout slot 5 Sliding plate 3 Display 6 Joystick Fi...

Страница 20: ...Rev04 0820 8 Head rest 11 On Off Switch 14 USB port 9 Marking for the eye height 12 Control LED 15 Chin rest 10 Pachycam camera glass cover 13 Mains connection 16 Measuring ocular Patient eyepiece wi...

Страница 21: ...ws the central radii of the cornea to be determined Pachymeter optional The pachymetry principle uses Scheimpflug images of the cornea which are analysed by a built in computer 600 Absolute data point...

Страница 22: ...7 Device Description 16 92 Instruction Manual Myopia Master G 68100 EN Rev04 0820 Applied parts 1 Head rest 2 Chin rest Fig 7 3 Applied parts 1 2...

Страница 23: ...cess That way you can easily disconnect it from the power supply for any repairs or maintenance work Place the Myopia Master on a level surface Place the device so that direct light cannot affect the...

Страница 24: ...used with the unit if applicable into the multiple socket outlet Connect the device to the power supply using the power cable provided see sec 24 1 page 82 Note Risk of equipment damage due to incorr...

Страница 25: ...ction of additional items to the IT network disconnecting items from the IT network update of equipment connected to the IT network upgrade of equipment connected to the IT network If your computer is...

Страница 26: ...shock if the Myopia Master is not completely disconnected from the mains for transport cleaning maintenance disinfection and repair Turn the Myopia Master off Pull the power plug before cleaning When...

Страница 27: ...ctivates the selected parameter Turn the knob to the left or to the right The selected parameter is highlighted in blue Press the knob downwards The selected parameter is activated or deactivated Joys...

Страница 28: ...age 54 In addition to the function keys you can now also use the buttons on the screen for example you can enable the respective button by gently pressing it on the touch screen 10 1 1 Function Keys o...

Страница 29: ...re you conduct the measurement 11 1 Entering new Patients touch screen To input a new patient press the button Patient in the patient data menu The following screen appears Use the touch screen as des...

Страница 30: ...suring mode 11 2 Entering new Patients touch screen deactivated To input a new patient press the button Patient in the patient data menu The following screen appears Select each individual letter by t...

Страница 31: ...ivating the symbols and accordingly Enter the patient s first name and date of birth in the same manner After you have entered the date of birth confirm by pressing Enter You will now be asked whether...

Страница 32: ...or an Examination If you want to delete a patient or an examination Select the patient in question Press the button To delete a patient Select with the control wheel the button Patient Press the cont...

Страница 33: ...rinted out together these are also automatically saved together R L and in turn they are also reloaded together If the measurements were not printed out together the examinations are listed individual...

Страница 34: ...opia Master A measuring procedure consists of the following steps Selecting a measuring mode Preparing a measurement Performing a measurement Saving data Completing the measurement 12 1 Selecting a Me...

Страница 35: ...disinfected the head rest has been cleaned and disinfected after each ex amination sec 18 page 67 Do not touch the device and the patient simultaneously Ask the patient to place his or her head on the...

Страница 36: ...in the adjustment window To do this move or turn the joystick in the specified directions Example Turn the joystick counter clockwise When the position has been reached accurately enough a cross appea...

Страница 37: ...rthermore Eye tracking and Auto release are standardly activated At the bottom of the screen you can see whether measurements have already been taken and saved for the respective eye If the symbol app...

Страница 38: ...s belong to a complete myopia measurement central cornea radii K objective refraction ARK axial length AXL 12 3 1 Myopia Overview Display The measured values of the myopia examination are displayed in...

Страница 39: ...f axial length or the refraction The graph displays the axial length measurement values in accordance to the age of the patient The grey lines reflect the percentile curves You can set the risk of the...

Страница 40: ...f myopic parents gender time outdoors per week near work additional to school per day Answer the respective question by adjusting the slider to the corresponding value You can therefore use the contro...

Страница 41: ...as a yellow background 7 6 the measuring results are critical repeat the measurement if necessary If the field has a red background 6 repeat the measurement Keratometer Values 3 K1 K2 Horizontal verti...

Страница 42: ...ming the measurement the following display appears The axial length values for one or both eyes are shown in the table 2 The corresponding signal to noise ration SNR 3 is listed The axial length with...

Страница 43: ...n be measured independently Select the mode AR K The measurement AR K is executed for both eyes The following screen appears Print and or save the data sec 12 8 page 44 Fig 12 10 Measuring mode AR K 1...

Страница 44: ...easurement if necessary If the field has a red background 6 repeat the measurement Keratometer Values 3 K1 K2 Horizontal vertical radius of curvature in the center blue flat meridian red steep meridia...

Страница 45: ...ionally Select the mode P AR K If the measurement mode was executed the following overview screen appears for the examination of the right eye Print and or save the data sec 12 8 page 44 Fig 12 12 Mea...

Страница 46: ...ed lines Keratometer Values 5 Rh Rv Horizontal vertical radius of curvature in the center blue flat meridian red steep meridian Pupil Size of pupil Astig Astigmatism of cornea in the center WTW white...

Страница 47: ...be measured additionally Select the PARK AXL mode If the measurement mode were executed the following overview screen appears for the examination of the right eye Print and or save the data sec 12 8...

Страница 48: ...d 6 repeat the measurement AXL values 3 The axial length values for one or both eyes are shown The corresponding signal to noise ration SNR is listed Keratometer Values 6 K1 K2 Horizontal vertical rad...

Страница 49: ...appears for the examination of the right eye Print and or save the data sec 12 8 page 44 AXL Axial length measurement value The final result of the axial length is calculated just only from all feasi...

Страница 50: ...edure 44 92 Instruction Manual Myopia Master G 68100 EN Rev04 0820 12 8 Printing and Saving Examinations After performing the measurement of the myopia the following display appears Fig 12 18 Display...

Страница 51: ...ted out each measurement is automatically temporarily saved to the exam nr memory Saving data by Exam no memory page 46 The different measuring processes are outlined briefly in the chapter Chronology...

Страница 52: ...ta management If you want to retrieve a measurement again later you will find the examination in the exam nr memory under the exam number that was assigned to it and can thus reload it You can retriev...

Страница 53: ...a new patient after performing the measuring operation sec 13 2 page 48 3 You perform a measuring operation without saving the examination under a patient s name sec 13 3 page 49 13 1 Enter Patient M...

Страница 54: ...ring operation directly The following screen appears Select Start a new measurement anyway Conduct the measurement sec 12 page 28 When the measuring operation has been completed the overview screen ap...

Страница 55: ...patient and save the conducted measurement un der that patient s name Exit the character box for entering the patient s data Press the ESC button on the keyboard Select the patient and confirm by pres...

Страница 56: ...formed easily and quickly using the reference tool Required materials reference tool provided cleaning agent see sec 18 page 67 Measuring with the reference tool Prerequisite the Myopia Master must be...

Страница 57: ...14 Reference Measurement Instruction Manual Myopia Master G 68100 EN Rev04 0820 51 92 The system is now ready for operation Fig 14 2 Example Result on reference tool...

Страница 58: ...ymetry Refraction Keratometry PARK AXL Pachymetry Refraction Keratometry axial length AXL axial length measurement You also activate or deactivate the functions Eye tracking and Auto release here Eye...

Страница 59: ...s a radius of curvature in mm or as the curvature equivalent in diopters Step mode Select the increments in which the diopters of the refraction values are to be rounded Vertex distance Set the cornea...

Страница 60: ...ime and the date by turning and pressing the rotary knob Display You can adjust the brightness of the display here Startscreen When the option Measure mode is active you start with the measuring opera...

Страница 61: ...or deactivate the touch screen function in the Use Touch checkbox In the Kbd Layout field you select the keyboard layout QWERTZ stands for the German keyboard layout QWERTY stands for the American ke...

Страница 62: ...supported by Myopia Master Status December 2019 Fig 15 5 Parameters for phoropters supported by Myopia Master In the Device ID field you identify the Myopia Master that is connected to a phoropter As...

Страница 63: ...Rev04 0820 57 92 15 4 Settings 4 On the Settings 4 screen you can individually configure the printout Print AR Details Print Keratometer Details Fig 15 6 Settings 4 Print AR Details activated Print AR...

Страница 64: ...rinted out Footer in the printout If you want to include your business or office name on the printout Enter the appropriate information in the lines provided for that purpose and activate the checkbox...

Страница 65: ...15 Settings Instruction Manual Myopia Master G 68100 EN Rev04 0820 59 92 15 5 Settings 5 Fig 15 7 Settings 5...

Страница 66: ...ay Options In addition to the overview of the measuring results for an eye fig 12 5 page 32 you can also select other display settings To access the available press the Display button repeatedly Exami...

Страница 67: ...ression field on the touch screen The device shows you the exact location of the cornea at the selected spot You can move the pointer to the left or to the right on the touch screen with the rotary kn...

Страница 68: ...aster This can be done using any of the various correction formulas available for this purpose These formulas are described further below and some are illustrated with diagrams 17 1 IOP correction bas...

Страница 69: ...ven by the three formula Fig 17 1 Progression diagram Each formula gives a different way of calculating the IOP correction summand as follows Ehlers IOP change 0 071 545 m corneal thicknessmeasured Sh...

Страница 70: ...re in calculating the corrected IOP This yields a factor with which the true IOP can be estimated from the measured IOP In contrast to those quoted above this formula includes the measured IOP as a pa...

Страница 71: ...ment sec 12 page 28 The results screen appears for the examined eye The IOP change value is displayed in the IOP change field 1 Depending on the formula which is used the IOP change value is either a...

Страница 72: ...xample myopic post LASIK you can select it on the screen of the IOP correction Enter the IOP value by pressing and turning the control wheel Confirm the IOP value with the button Save The corrected IO...

Страница 73: ...opia Master is not completely disconnected from the mains for the cleaning Turn the Myopia Master off sec 9 2 page 20 Pull the power plug before cleaning When disconnecting electrical connections pull...

Страница 74: ...g the head rest and chin rest During the measuring process sweat cosmetics etc from the patient can get on the head and chin rest Clean these parts before examining the next patient Use a lint free da...

Страница 75: ...atic cleaning agent Make sure that no liquid gets into any of the openings of the Myopia Master Wipe off any residue from painted surfaces with the mixture for painted surfaces Cleaning the Touch Scre...

Страница 76: ...urface of the device if it is sprayed directly on it Spray the disinfectant solution onto a cleaning cloth do not spray it directly on the device 18 3 Maintenance The Myopia Master is designed so that...

Страница 77: ...ectly into the laser beam 18 4 Attaching Paper to the Chin Rest If you want to attach new chin rest paper follow these instructions Pull the two pins 1 out of the chin rest Put the chin rest paper 2 i...

Страница 78: ...paper Remove the feed roller from the holder and pull out the middle metal pin Push the metal pin into a new feed roller and insert the feed roller into the holder Slide the paper from below through...

Страница 79: ...e device cause by improper operation Never plug in or unplug the cable or plug while the PC and or the Myopia Master are switched on This could destroy the individual units Error Possible Cause Remedy...

Страница 80: ...ginal packaging 20 2 Transport and Storage Information This device cannot withstand the temperature conditions for storage and transport specified in ISO 15004 1 Storage Transport 20 3 Transport and S...

Страница 81: ...acing near heaters and moisture 21 Disposal In accordance with Directive 2012 19 EC of the European Parliament and the Council and in accordance with German law governing the marketing return and envi...

Страница 82: ...ss and Shipping Terms on the date of purchase apply 22 2 Assumption of Liability for Functions and Damage OCULUS will only accept responsibility for the safety reliability and serviceability of the My...

Страница 83: ...r Service Department or from our authorized representatives Manufacturer and Service address OCULUS Optikger te GmbH M nchholzh user Stra e 29 35582 Wetzlar GERMANY Tel 49 641 2005 0 Fax 49 641 2005 2...

Страница 84: ...0 1 steps Measuring range pupil diameter 1 up to 8 mm in 0 1 steps Auto Position Positioning the height automatically y direction Auto Release Automatic release Measuring range 200 1200 m Measured poi...

Страница 85: ...14 40 mm Protection against electric shock Protection class 2 Insulation of applied parts Type Type B Protection against foreign objects contact and water IP20 Temperature 10 35 C Humidity 30 90 Air...

Страница 86: ...42 EEC Annex II without section 4 Netzteil GSM60B15 P1J 05150725 AC input 80 264 VAC Frequency 47 63 Hz DC output 15 V DC 4 A 60 W max Fuses Integrated overcurrent shut off Dimensions height x width...

Страница 87: ...00 EN Rev04 0820 81 92 Classification according to DIN EN 60825 1 2015 and DIN EN 60825 1 2001 The unit contains a Class 1 laser Maximum output of the laser radiation 0 7 mW Single pulse duration Puls...

Страница 88: ...uced in the consideration of permissible deterioration during or caused by t7he EMC testing without affecting the essential perfor mance criteria Caution The use of accessories transducers and cables...

Страница 89: ...fully equipped 68110 Myopia Master Advanced without chin and head rest with Scheimpflug camera 68120 Myopia Master Basic with chin and head rest without Scheimpflug camera 68130 Myopia Master Basic w...

Страница 90: ...electromagnetic environment specified below The user of the Myopia Master should ensure that it is being used in such an environment Emissions test Compliance Electromagnetic environment guidance RF e...

Страница 91: ...ion frequency 1 kV for input output lines 2 kV 1 kV Mains power quality should be that of a typical commercial or hospital environment Surge IEC 61000 4 5 1 kV kine s to line s 2 kV line s to earth 1...

Страница 92: ...tic site survey a should be less than the compliance level in each frequency range b Interferences may occur in the vicinity of equip ment marked with the following symbol Note 1 Note 2 At 80 Hz and 8...

Страница 93: ...nt Rated maximum output pow er of transmitter W Separation distance according to frequency of transmitter m 150 KHz to 80 Mhz d 1 2 P 80 MHz to 800 MHz d 1 2 P 800 MHz to 2 5 GHz d 2 3 P 0 01 0 12 0 1...

Страница 94: ...x 88 92 Instruction Manual Myopia Master G 68100 EN Rev04 0820 24 3 Description of the Connection Y cable Computer PC Laptop Power supply adapter 05150725 Mains connection 05200600 Myopia Master USB i...

Страница 95: ...nual Myopia Master G 68100 EN Rev04 0820 89 92 24 4 Data Sheet GSM60B15 P1J 05150725 0 1 2 3 0 3 1 1 4 1 52 1 67 28 9 7 1 3 1 1 9 52 5 7 1 9 2 6 1 3 A 2 1 B 67 28 C D 1 1 1 1 3 7 8 3 E 60 1 1 1 1 2 1...

Страница 96: ...3 2 34 02 34 0 2 34 7 2 8 B 3 1 D 1 G 2 8 G BE 7 H 7 G 0 0 D 2 3 1 1 1 0 1 2 3 455 6 78 9 9 9 9 9 9 9 9 5 5 5 5 5 5 5 5 1 2 6 9 9 7 9 7 9 5 1 6 9 4 7 2 2 4 5 2 2 5 2 2 5 5 A5 4 B 5 A5 4 A 5 5 5 9 7 B...

Страница 97: ...24 Annex Instruction Manual Myopia Master G 68100 EN Rev04 0820 91 92 67 8 9 17A FAL C6 6 6 L J 4 A C A G A 87 76 6 4 0 A M 4 7 B K 2 L 6 6 68 4 455 5 3 5 5...

Страница 98: ...holzh user Stra e 29 35582 Wetzlar GERMANY Tel 49 641 2005 0 Fax 49 641 2005 295 E Mail export oculus de www oculus de USA OCULUS Inc 17721 59th Avenue NE Arlington WA 98223 Tel 1 425 670 9977 Fax 1 4...

Отзывы: