Issue
Possible Cause
What to Do
Machine produces “scraping”
sound when in use.
Pedal arm rubbing against
rocker arm.
If the scraping noise is metallic, inspect
the space between the pedal arm and
the rocker arm on each side of the
machine while moving the pedals. This
can be viewed through the slots in the
back shroud. You may see where paint
has been rubbed off of the arms. This
inspection may need to be performed with
a user on the pedal, as load on the pedal
may cause contact between the links.
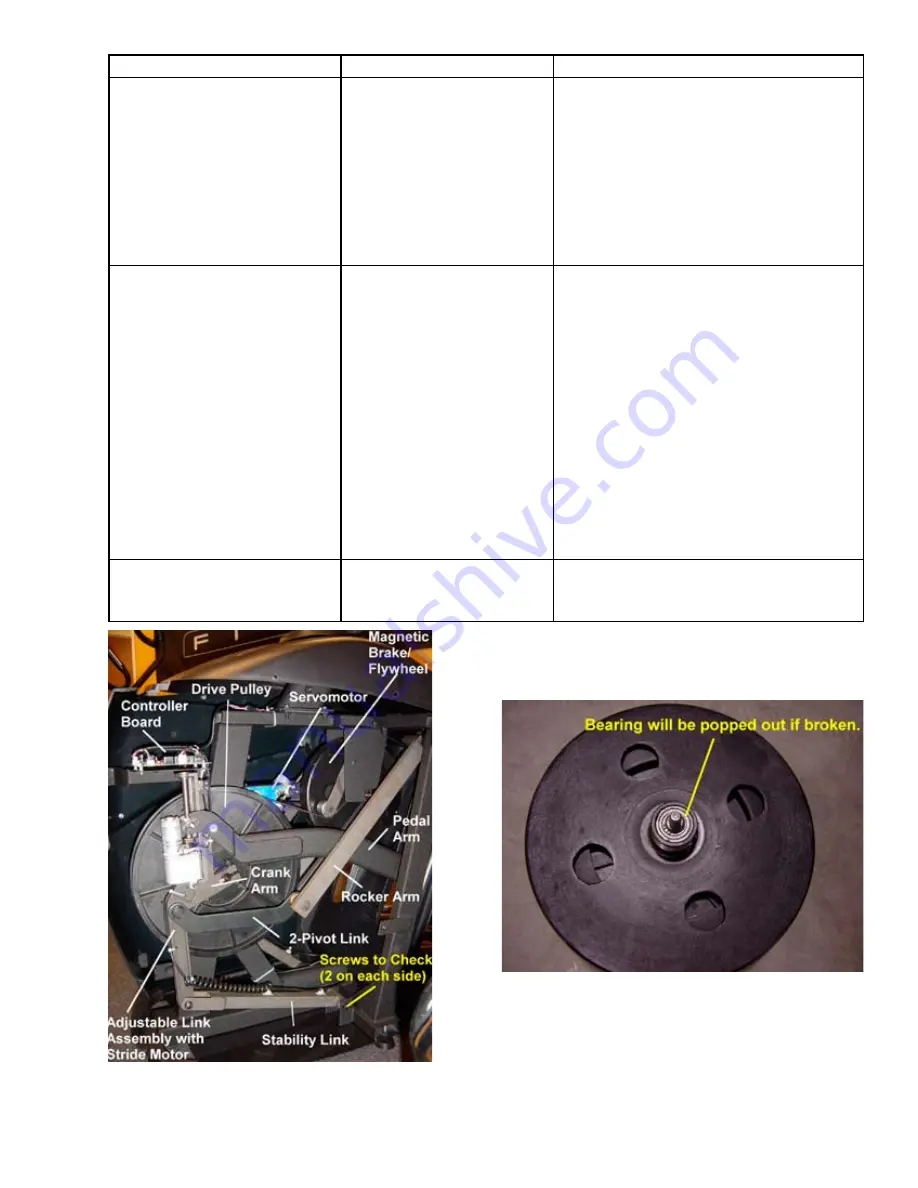
Loose screws on stability
links.
Check and tighten the four socket head
screws (17mm) attaching the stability links
to the frame (Figure 2.36).
Try the machine at slow and fast pace,
forward and backward to see if the noise
is still present.
If the noise is still present, check the
2-pivot links and the adjustable link
assembly for looseness and side-to-side
motion. A slight side-to-side motion is
normal at the rocker arm and 2-pivot link
connection. No side-to-side motion should
be seen in the adjustable link assembly.
Section III provides directions for replacing
links if necessary.
Broken bearing or magnetic/
flywheel assembly.
Inspect the brake pulley. If it is broken,
replace the brake assembly following the
directions in Section III.
Q45 2.4
Figure 2.36
Figure 2.37
Содержание Q45
Страница 1: ...Q45 Q45e Q45ce ...
Страница 2: ......
Страница 4: ......
Страница 5: ...Notes ...
Страница 6: ...Figure 1 1 Figure 1 3 Right Clevis Notice step orientation to outside of machine Figure 1 2 ...
Страница 8: ...Q45 1 2 Figure 1 4 ...
Страница 12: ...Figure 2 2 Figure 2 3 Figure 2 1 Q45 2 1 ...
Страница 14: ...Figure 2 5 Q45 2 2 Figure 2 6 ...
Страница 16: ...Figure 2 7 Q45 2 2 Figure 2 8 Nylock nut Clevis bushing Figure 2 9 ...
Страница 18: ...Q45 2 2 Figure 2 11 Figure 2 12 Figure 2 10 ...
Страница 20: ...Q45 2 2 Figure 2 13 Figure 2 14 Figure 2 16 Figure 2 15 ...
Страница 22: ...Q45 2 2 Figure 2 20 Figure 2 19 Figure 2 17 Figure 2 18 ...
Страница 24: ...Figure 2 22 Q45 2 3 Figure 2 21 Speed Speed Sensors Sensors ...
Страница 26: ...Q45 2 3 Figure 2 27 Figure 2 25 Figure 2 23 Figure 2 24 ...
Страница 28: ...Figure 2 28 Figure 2 27 Figure 2 29 ...
Страница 30: ...Figure 2 30 Figure 2 32 Figure 2 31 ...
Страница 38: ...Q45 2 5 Figure 2 41 ...
Страница 40: ...Q45 2 5 Figure 2 42 ...
Страница 42: ...Q45 3 1 Figure 3 1 ...
Страница 44: ...Q45 3 1 Notes ...
Страница 46: ...Q45 3 2 Notes ...
Страница 48: ...Figure 3 7 Q45 3 4 Figure 3 6 Stability Link 18mm Bolt ...
Страница 54: ...Q45 3 6 Notes ...
Страница 56: ...Q45 3 8 Figure 3 14 Figure 3 15 ...
Страница 58: ...Figure 3 16 Figure 3 17 Figure 3 18 Q45 3 9 ...
Страница 60: ...Q45 3 9 Notes ...
Страница 62: ...Q45 3 11 Figure 3 21 Figure 3 20 Figure 3 22 Older units Newer units ...
Страница 64: ...Q45 3 12 Figure 3 24 Figure 3 23 ...
Страница 66: ...Figure 3 26 Figure 3 25 Speed Sensors Q45 3 13 ...
Страница 68: ...Notes Q45 3 13 ...
Страница 70: ...Q45 3 15 Figure 3 29 Figure 3 28 ...
Страница 72: ...Q45 3 15 Notes ...
Страница 74: ...Q45 3 17 Figure 3 31 Figure 3 32 Figure 3 33 ...
Страница 76: ...Q45 3 18 Figure 3 34 Figure 3 35 Figure 3 36 ...
Страница 78: ...Q45 3 19 Figure 3 37 Figure 3 38 ...
Страница 80: ...Q45 3 20 Figure 3 39 Figure 3 41 Figure 3 40 ...
Страница 82: ......
Страница 83: ...SECTION IV Supporting Documentation Q45 Q45e Q45ce Assembly Instructions Q45 Q45e Q45ce Operations Manual ...


