3
Octane Fitness Confidential
1-800-68-634
3.5
3-Pivot Link Replacement
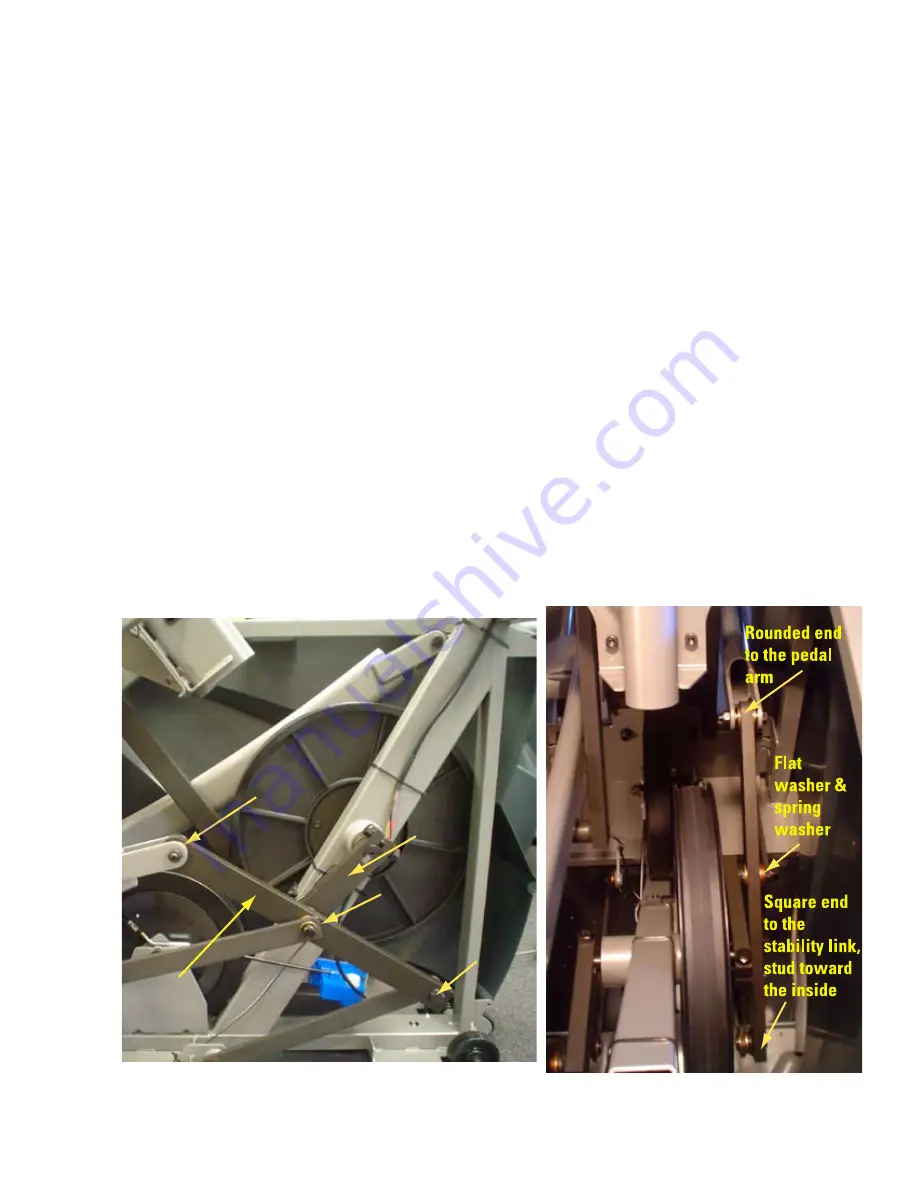
1. Unplug the unit and remove the shrouds to access the inside. Follow the directions below for each side of the
machine (left and right 3-pivot links). Figure 3.6 identifies the links and bolts.
2. Use two 17mm wrenches to remove the bolt and nut that attach the pedal arm to the 3-pivot link and lower the
pedal arm.
3. Use a 17mm wrench to remove the center bolt, flat washer, and spring washer connecting the 3-pivot link to the
crank arm.
4. Use snap ring pliers to remove the retaining ring that attaches the stability link to the 3-pivot link stud.
5. Remove the 3-pivot link and replace it with a new 3-pivot link. Make sure that the end of the 3-pivot link that is
rounded is attached to the pedal arm and that the stud at the bottom of the 3-pivot link points toward the inside
of the machine (Figure 3.7).
6. Re-install the retaining ring that attaches the stability link to the 3-pivot link stud.
7. Position the crank arm to the center pivot of the 3-pivot link and re-insert the center bolt, making sure the flat
washer and spring washer are installed between the bolt head and the 3-pivot link.
8. Lift the pedal arm into position and re-insert the bolt that attaches the pedal arm to the 3-pivot link; secure with
the nut and tighten.
9. Tighten all the connections.
10. Use the pedal arms to move the machine through its motion forward and backward several times to test.
,
Figure 3.6
Figure 3.7
Crank
Arm
3-Pivot
Link
Stability Link/
3-Pivot Link Stud
Center
Bolt
Pedal
Arm
Bolt
Содержание Q35
Страница 1: ...Q35 ...
Страница 7: ... 1 800 628 2634 Octane Fitness Confidential Window 1 Matrix Window 2 Window 3 Window 4 Figure 1 6 ...
Страница 19: ...19 1 800 628 2634 Octane Fitness Confidential 1 8 Approx Magnet Speed Sensor Figure 2 13 ...
Страница 25: ... 25 1 800 628 2634 Octane Fitness Confidential Bolts to check both right and left sides Figure 2 21 ...


