15
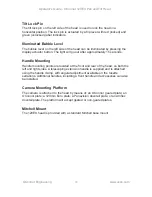
4. Make sure that the tilt lock pin is engaged.
5. Set the tilt fluid drag adjustment knob to 0.
WARNING!
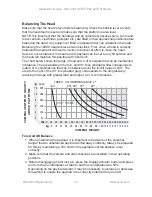
Be prepared to prevent the head falling away suddenly. In the
event of the head falling away violently, increase the setting on
the balance adjustment knob.
6. Holding the handle to steady the platform, disengage the tilt lock pin.
7. Tilt the platform forwards and backwards and determine if camera package is
front or back heavy.
8. If it is not in balance, re-engage the tilt lock pin.
9. Release the safety latch and disengage the platform release lever. The next
step will depend on the type of mounting plate:
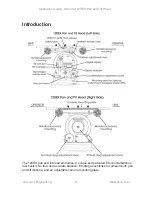
a. OConnor Geared Plate: Press in and turn the platform adjustment knob to
move the geared plate forwards or backwards until the payload is balanced
fore and aft. The "pop up" gear will engage the plate gear rack. Pull out the
knob if needed to disengage.
b. Other Mounting Plates: With the help of an assistant, carefully slide the
camera payload and plate forwards or backwards until the payload is
balanced fore and aft.
10. The horizontal balance is correct when no perceptible tilting force can be felt on
the handle with the platform level and with the tilt lock pin disengaged.
11. Fully engage the platform release lever to secure the payload in position. The
red safety button should engage the platform hook.
12. If there is insufficient movement in the sliding plate to achieve balance,
determine which direction the mounting plate needs to be moved to achieve
correct balance. Remove the payload from the head, reattach the mounting
plate to the camera in the required position, remount the load and repeat the
horizontal balancing procedure.
13. The sliding plate is marked and the platform has graduations. Make a note of
the "balanced" position to simplify re-balancing this particular payload.
Operator's Guide - OConnor 120EX Pan and Tilt Head
www.ocon.com
OConnor Engineering


