Oce WP20 Скачать руководство пользователя страница 94

Appendix B  Option Units

B-3

The printer is equipped with 16 MB memory as standard. By 
installing the expansion memory, you can increase RAM disk 
capacity and speed up the printing process of multiple copies 
using the electronic sorting function. Expanded printer 
memory also enables you to print more complex pages, 
download more fonts, and define more macros.

The main circuit board of the printer is equipped with a 
socket for memory expansion. Expansion memory is available 
in the form of DIMMs. By installing option expansion memo-
ry in the slot, you can expand the total of printer memory up 
to 144 MB (when 128 MB of expansion memory is installed).

Printer memory can be expanded up to 144 MB.
See your Kyocera Mita dealer for purchasing information of 
the DIMMs that are best suited for use with this printer.

The following instructions are intended for the technician only.

Notes on Handling the Main Circuit Board and DIMM


Static electricity could easily damage such semiconductor 
products as memory. Take these precautions when you han-
dle the main circuit board and DIMM.

•Keep DIMM in an antistatic bag. Take it out only when you

install it.

•Before touching the main circuit board and DIMM, touch a

water pipe or other large metal object to discharge yourself
of static electricity. While doing the work, it is recommend-
ed that you wear an antistatic wrist strap.

•Touch the main circuit board and DIMM only at the edges.

Installing DIMMs

The DIMM is installed in the socket of the main circuit board. 
Install the DIMM into the board as follows.

Turn off the printer and disconnect the power cord 
and printer cable.

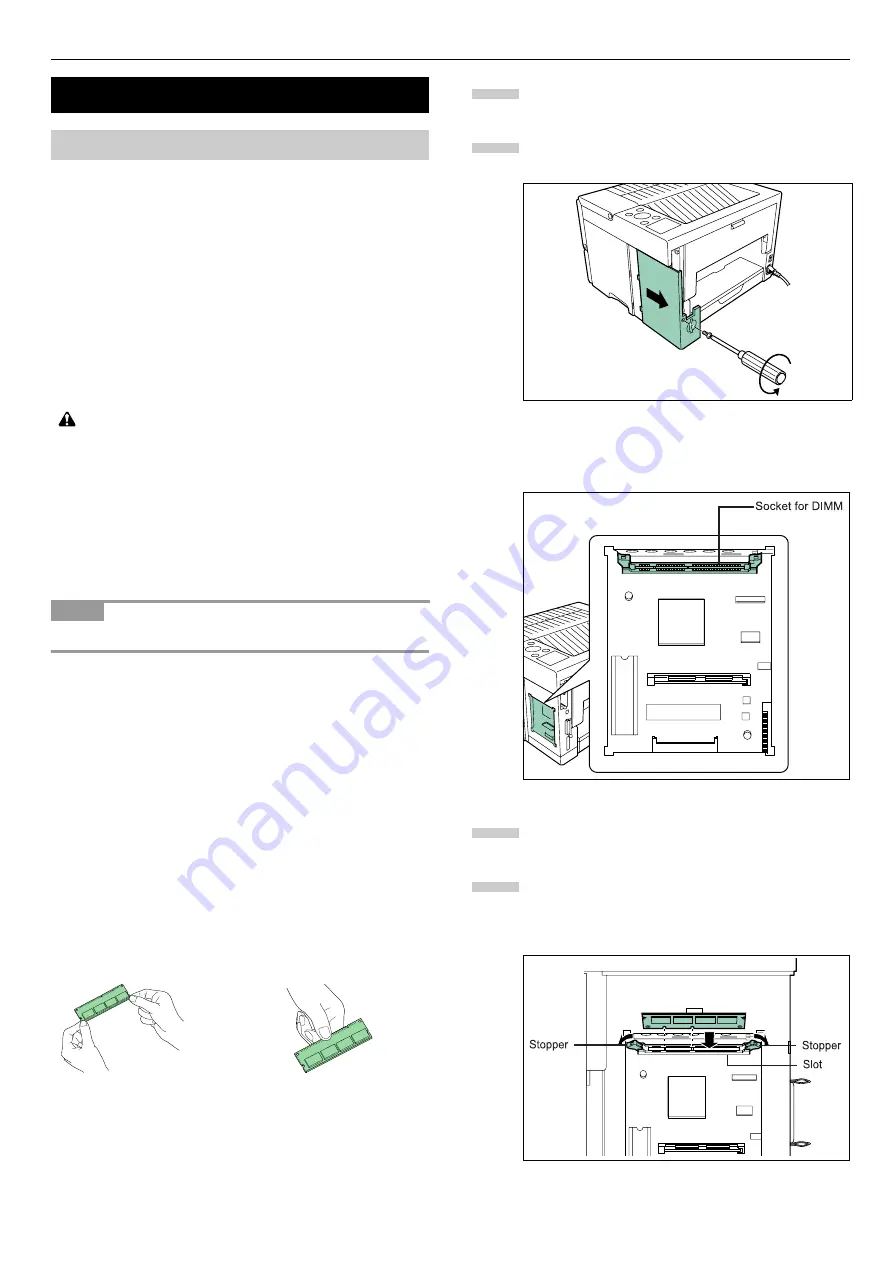
Remove the screw from the printer's right side cover 
and pull the side cover.

Make sure that there is a dedicated socket on the
main circuit board.

Remove the DIMM from its package.

Open the stoppers on both ends of the DIMM socket, 
then insert the DIMM into the socket, so that the 
notches on the DIMM align with the corresponding 
protrusions in the socket.

Installing Option Units

Expansion Memory

CAUTION

The expansion memory should be installed only by a Kyocera
Mita authorized dealer or Kyocera Mita certified technician. Ky-
ocera Mita shall not be liable for damage due to improper in-
stallation of the expansion memory.

NOTE

YES

NO

1

2

3

4

Содержание WP20

Страница 1: ...1 1 1 Oc WP20 Operation Guide Education Services Oc Operation Guide English version...

Страница 2: ...may be inserted in future editions The user is asked to excuse any technical inaccuracies or typographical errors in the present edition No responsibility is assumed if accidents occur while the user...

Страница 3: ...any incidental damages or other economic consequential damages even if IBM or its authorized supplier has been advised of the possibility of such damages IBM will not be liable for any damages claime...

Страница 4: ...E AND MERCHANTABILITY ARE EXCLUDED 8 Your exclusive remedy and the sole liability of Agfa Japan in connection with the Software and Typefaces is repair or replacement of defective parts upon their ret...

Страница 5: ...Alternative Emulation for KPDL Emulation 1 26 Printing KPDL Errors 1 26 Setting Default Font 1 27 Selecting the Default Font 1 27 Changing Type for Courier Letter Gothic 1 28 Changing the Font Size 1...

Страница 6: ...nt Interval 3 1 Replacing the Toner Container 3 1 Cleaning 3 3 Cleaning the Internal Parts of the Printer 3 3 Cleaning the Charge Wire 3 4 Chapter 4 Troubleshooting 4 1 General Guide 4 1 Print Quality...

Страница 7: ...ilable options using with the printer Appendix C Host Computer Interface This appendix explains the pin assignment and specifications for the printer s parallel interface USB interface and serial inte...

Страница 8: ...E SUFFICIENTLY CAREFUL to avoid fire or electric shock when removing a paper jam or when replacing toner Label inside the printer Laser radiation warning This label is attached to the scanner unit ins...

Страница 9: ...onditioned room recommended room tempera ture around 20 C humidity around 65 RH and avoid the following locations when selecting a site for the printer Avoid locations near a window or with exposure t...

Страница 10: ...an extended period of time vaca tions etc remove the power plug from the outlet for safety purposes during the time the printer is not in use For safety purposes ALWAYS remove the power plug from the...

Страница 11: ...erator Panel Printing Test Page Paper Handling Pagenation e MPS Interface Operating the Storage Device Configuration The operator panel has an LCD message display indicators and eight keys Understandi...

Страница 12: ...wait The printer is warming up and is not ready When the printer is switched on for the first time after the toner container is installed Adding toner also appears Ready The printer is ready to print...

Страница 13: ...t Cancel appears in the message display followed by the in terface to be cancelled Parallel USB Serial appears only when the option al serial interface board IB 11 is in stalled Option appears only wh...

Страница 14: ...ress the or key to display desired menu If the selected menu has sub menu is displayed after the menu Press the key to move to the sub menu or key to go back is displayed before the sub menu Indicates...

Страница 15: ...y Private Stored Print VMB Data Print Menu Map List of Code JOB e MPS Configuration Quick Copy 32 Temp Code JOB Size 0500MB Perm Code JOB Size 0500MB VMB Size 0500MB Continued on next page e MPS NetWa...

Страница 16: ...Page Set Copies 001 Orientation Portrait Page Protect Auto LF Action LF only Ignore CR CR and LF CR Action CR only On Wide A4 Off I000 Option Font Select Internal Emulation Line Printer Emulation PCL...

Страница 17: ...elete Data Format Partitions RAM Disk Mode On RAM Disk Mode Off RAM Disk Size Read Data Write Data Delete Data List of Partitions Read Fonts Read Data Write Data Delete Data Format List of Partitions...

Страница 18: ...Mode None Override A4 LT On Override A4 LT Off Heavy Thick Paper Weight Normal Reset Type Adjust Life Counters Total Print 0123456 New Toner Installed Type Adjust Custom 1 Disable Duplex Path Enable P...

Страница 19: ...ec Sleep Timer 015 min Print HEX DUMP Printer Reset Permanent Resource Prot Off Off Buzzer On Service Print Status Page Mode Off Auto Continue Mode On Auto Continue Timer 030sec Off Sleep Mode On Deve...

Страница 20: ...current status including memory available and option settings you can find the infor mation you need on the status page Press the MENU key Press the or key repeatedly until Print Status Page appears...

Страница 21: ...types of errors listing them in the order of their occurrence KPDL error memory related error or memory card re lated error The most recent error is displayed on the top line of the Error Log For erro...

Страница 22: ...or the network interface Press the MENU key Press the or key repeatedly until Interface appears Press the ENTER key A blinking question mark appears Press the or key repeatedly until Option ap pears P...

Страница 23: ...pears Press the key Press the or key repeatedly until List of Internal Fonts or List of Option Fonts ap pears Internal Fonts Optional Fonts Press the ENTER key A question mark appears Internal Fonts...

Страница 24: ...again Processing appears for a second and then Waiting appears Send data to be dumped to the printer The message Processing will be displayed during receiving the data Once the dumped data you requir...

Страница 25: ...cassette from the printer and turn the paper size dial to the paper size you set Adjust the paper guides and paper stopper inside the paper cassette to the size of the paper to be used and load the pa...

Страница 26: ...NTER key A blinking cursor _ appears Press the or key to increase or decrease the value of the figure where the cursor is blinking and display the desired width The width can be set be tween 148 and 2...

Страница 27: ...ade on the correct size paper when automatic paper size selection is made by the application printer driver The default set ting is A4 size For more details about the paper sizes that can be fed from...

Страница 28: ...lled option paper feeders in descending order from the bottom of the printer Press the ENTER key A blinking question mark appears Press the or key to display the desired cassette paper type The displa...

Страница 29: ...gistered any of these may be called up when setting the paper type for a paper source The paper weight and duplex path can be set see Setting the Paper Weight below and Setting the Duplex Path on page...

Страница 30: ...thickness displayed press the ENTER key Press the MENU key The message display returns to Ready If the paper type is set to Custom and the option du plexer is installed on the printer duplex printing...

Страница 31: ...djusted in five steps from 01 light to 05 dark The default setting is 03 Press the MENU key Press the or key repeatedly until Paper Handling appears Press the key Press the or key repeatedly until Typ...

Страница 32: ...which paper source printing will be per formed If no option units are installed the only selections are the paper cassette and MP tray of the printer If option paper feeders are installed they can al...

Страница 33: ...printing Depending on the binding type and print orientation the du plex unit provides four types of binding setups These are 1 portrait long edge 2 portrait short edge 3 landscape long edge and 4 lan...

Страница 34: ...ither A4 or Letter size paper is loaded in the paper source even if the actual paper size differs from the paper size formatting the jobs Press the MENU key Press the or key repeatedly until Paper Han...

Страница 35: ...e sets vary depending on the current emulation KC GL Pen Width The KC GL emulation mode enables you to set the pen widths in dots for pen numbers 1 to 8 and the KC GL page size Press the MENU key Pres...

Страница 36: ...lected using the operator panel The default alternative emu lation is PCL 6 Press the MENU key Press the or key repeatedly until Emulation appears Press the ENTER key A blinking question mark appears...

Страница 37: ...ault Font Press the MENU key Press the or key repeatedly until Font ap pears Press the key to select an internal font press the or key repeatedly until Internal appears To select an option font press...

Страница 38: ...e size of the default font If the default font is a fixed pitch font such as Courier or Letter Gothic the character pitch can be changed instead of the font size Press the MENU key Press the or key re...

Страница 39: ...1 character per inch incre ments You can use the and keys to move the cursor right and left When the desired size is displayed press the ENTER key Press the MENU key The message display returns to Rea...

Страница 40: ...rns to Ready You can print with the reduced size This menu is used to set the source paper size and the paper size to use after reduc tion Printed results when making reductions differ from equivalent...

Страница 41: ...To make a reduced print press the or key to se lect the target size Press the ENTER key Press the MENU key The message display returns to Ready Source size indicator Target size indicator CS Current c...

Страница 42: ...Printed Pages on page 1 52 You can monitor the KIR test pattern the last line on a status page to make the optimum KIR mode setting Look at the check line the last line on a status page to make the op...

Страница 43: ...The factory default setting is Off When the EcoPrint mode set to On the toner con sumption is reduced and the print density becomes lighter The EcoPrint setting has no effect on the print speed Press...

Страница 44: ...KPDL auto emulation Press the MENU key Press the or key repeatedly until Print Quality appears Press the key Press the or key repeatedly until Resolution appears Press the ENTER key A blinking questi...

Страница 45: ...in one of these mailboxes you assign a numbered mailbox on the printer driver when printing Up to 255 virtual mailboxes can be used and the number of jobs stored in each box is not limited You can sto...

Страница 46: ...TER key A blinking question mark appears before the user name Press the or key to display the desired user name Arlen in this example Press the ENTER key The job name entered in the printer driver Rep...

Страница 47: ...number of copies to be printed can be set To increase the copy count press the key to decrease the copy count press the key Press the ENTER key to finalize the copy count The printer prints the specif...

Страница 48: ...Agenda in this example press the ENTER key En ter the four digit access code entered in the printer driver and press the ENTER key Press the key repeatedly until Delete appears for the number of copi...

Страница 49: ...the or key repeatedly until List of Code JOB appears Press the ENTER key A question mark appears Press the ENTER key again The printer prints a Code Job list as shown below You can store a job in the...

Страница 50: ...ck copy proof and hold jobs Maximum space assigned to temporary code jobs Maximum space assigned to permanent code jobs Maximum space assigned to virtual mailboxes The total amount of storage areas sp...

Страница 51: ...the and keys to move the cursor right and left You can change the maximum space from 0 to 9999 megabytes Press the ENTER key Press the MENU key The display returns to Ready Maximum Space Assigned to...

Страница 52: ...until e MPS appears Press the key Press the or key and select e MPS Configuration Press the key Press the or key and select VMB Size To change the maximum size press the ENTER key The message display...

Страница 53: ...estion mark appears If Parallel is not displayed press the or key repeatedly until Parallel appears Press the ENTER key again Press the key The message display changes to the communication mode menu P...

Страница 54: ...face names shown below appears indicating the current interface Parallel default USB Serial when a serial interface board kit is installed Option when a network interface card is installed Press the E...

Страница 55: ...the ENTER key For DHCP a question mark appears For IP Ad dress Subnet Mask and Gateway the cursor blinks For DHCP select On or Off using the or key For IP Address Subnet Mask and Gateway ad dresses p...

Страница 56: ...printer from a memory card proceed as follows Press the MENU key Press the or key repeatedly until Memory Card appears Press the key Press the or key repeatedly until Read Fonts appears Press the ENT...

Страница 57: ...s written onto the memory card given a destination name also referred to as a partition name which the printer automatically assigns one after another as follows DataS001 first data DataS002 second da...

Страница 58: ...Format ap pears Press the ENTER key A question mark appears Press the ENTER key Processing appears and for matting of the memory card starts When the formatting is successfully completed the printer...

Страница 59: ...t is host data Data or font data Font When the list of file names partition list for the memory card is printed the message display returns to Ready Installing the option hard disk into the printer al...

Страница 60: ...f data names partitions The operations of the RAM disk are the same as those of the memory card See the relevant sections in Operating Memory Card on page 1 46 RAM disk can not be used when an option...

Страница 61: ...he ENTER key A blinking question mark appears Press the or key repeatedly until Auto ap pears Press the ENTER key Press the MENU key The message display returns to Ready This procedure instructs the p...

Страница 62: ...repeatedly until Wide A4 ap pears Press the ENTER key A blinking question mark appears Select On or Off using the or key Press the ENTER key Press the MENU key The message display returns to Ready You...

Страница 63: ...il Others ap pears Press the key Press the or key repeatedly until MSG Language appears The default message language is English To change the language press the ENTER key A blinking question mark appe...

Страница 64: ...display returns to Ready The printer has a sleep timer to conserve power when the printer is not printing processing or receiving data You can adjust the timer value the length of time the printer wai...

Страница 65: ...u change the emulation back to PCL 6 You can select either of the following two resource protection modes to enable this function Permanent You can store such permanent PCL resources as fonts macros a...

Страница 66: ...errun Press GO KPDL error Press GO File not found Press GO RAM disk error Press GO MemoryCard err Press GO and Hard disk err Press GO the next received data is automatically printed after a set period...

Страница 67: ...s Press the or key to increase or decrease the val ue of the figure where the cursor is blinking and set the desired time The time must be set between 000 and 495 seconds in 5 second increments If set...

Страница 68: ...oduce high quality results when the wrong paper is used Low priced paper is not economical in the long run if it causes printing problems Paper in each grade is available in a range of basis weights d...

Страница 69: ...22 inches each In the metric system the standard quantity is 1 square meter Paper that is too light or too heavy can cause misfeeding jams and premature wear of the printer Uneven paper weight can ca...

Страница 70: ...amp Paper Grain When paper is manufactured it is cut into sheets with the grain running parallel to the length long grain or parallel to the width short grain Short grain paper can cause feeding probl...

Страница 71: ...er to give trouble during printing No liability will be assumed if moisture etc given off in printing on special paper causes harm to the machine or operator Before purchasing any type of special pape...

Страница 72: ...he printer Before purchasing envelopes for use with the printer test a sample to verify the envelope s suitability Do not use envelopes that have an encapsulated liquid adhesive Avoid long printing ru...

Страница 73: ...1 19 The following types of paper can be set Yes Can be stored No Cannot be stored This is a paper type defined and registered by the user Up to eight types of user settings may be defined For detail...

Страница 74: ...of copies that can be printed will be ap proximately 5 000 Toner Kit Contents Toner container Wiper cloth Cap for disposal of the used toner container Plastic bag for disposal of the used toner contai...

Страница 75: ...ner Collection Request Form enclosed in the toner kit or the Kyocera Mita homepage http www kyocer amita co jp support Take a new toner container out of the toner kit Shake the new toner container as...

Страница 76: ...the internal parts periodically once a month The Replace toner message will change to Clean printer after you replace the toner container This message will be cleared when you press the GO key after...

Страница 77: ...clean the charger wire Clean the internal charger wire by sliding the charg er cleaner green colored located on the top of the process unit to the right and left two or three times as shown in the fi...

Страница 78: ...enance message appears in the message display See Maintenance Messages on page 4 4 Print quality is not good See Print Quality Problems on page 4 2 Paper is jammed See Correcting a Paper Jam on page 4...

Страница 79: ...oving the charger cleaner green colored to the right and left two or three times See Cleaning on page 3 3 Black or white vertical streaks Check the operator panel If the Toner low message is displayed...

Страница 80: ...Toner Container Replacement on page 3 1 Check the process unit installation Open the printer top and front covers Check that the process unit is correctly installed Dirt on the top edge or back of the...

Страница 81: ...layed paper cassette MP tray or optional paper feeder Messages indicating the printer status Ready Please wait Processing Waiting and FormFeed Time Out are displayed alternately These messages will no...

Страница 82: ...the key the paper type settings menu appears After setting the correct paper type press the ENTER key and printing starts Load path error The load path is open Close the path Missing paper cassette T...

Страница 83: ...d disk space Delete unnecessary files etc to free up space 05 The specified file does not exist in the hard disk 06 There is no memory available to the hard disk system Increase the available memory 1...

Страница 84: ...is not installed Recheck the requirements for using the memory card 04 The capacity of the memory card is insufficient Clean up files 05 Specified file not on memory card 06 No memory for use by memor...

Страница 85: ...act your service representative When pulling the paper pull it gently so as not to tear it Torn pieces of paper are difficult to remove and may be easily overlooked deterring the jam recovery Online h...

Страница 86: ...using the procedure given below The process unit contains such precise parts as a sensitive drum Do not give it a shock or do not touch the green drum Exposing the process unit to direct sunlight or...

Страница 87: ...ver by grasping the green lever Remove the jammed paper at the roller Take care not to leave any small pieces of paper in the printer when removing paper jams as this may result in fire Return the fee...

Страница 88: ...ored remove the jammed paper as shown in the figure Return the left lever to green colored its original po sition Close the rear cover Paper is jammed at the MP tray Remove the jammed paper using the...

Страница 89: ...supplied Kyocera Mita Digital Library CD ROM and Kyocera Mita Network Library CD ROM spacing pitch height style stroke weight and typeface family List of Fonts This section contains a full list of the...

Страница 90: ...Appendix A Fonts A 2 PCL Scalable and Bitmap Fonts...

Страница 91: ...Appendix A Fonts A 3 KPDL Fonts...

Страница 92: ...llowing options available For instructions on installing individual options see the following section on page B 3 and documentation included with the option Available Options It is recommended that yo...

Страница 93: ...nd job retention functions This is installed into the slot designed for it on the main circuit board of the printer See your dealer for purchasing information regarding the hard disk units that are be...

Страница 94: ...n you han dle the main circuit board and DIMM Keep DIMM in an antistatic bag Take it out only when you install it Before touching the main circuit board and DIMM touch a water pipe or other large meta...

Страница 95: ...the MENU key on the operator panel Press the or key repeatedly until Print Status Page appears Press the ENTER key twice If the installation was successful the amount of memory shown on the status pag...

Страница 96: ...yo cera Mita authorized dealer or Kyocera Mita certified techni cian Kyocera Mita shall not be liable for damage due to improper installation of the network interface card The following instructions a...

Страница 97: ...ide cover Insert the optional hard disk unit into the slot Replace the right side cover on the printer and tighten the screw to secure the hard disk unit in the reverse order of removal in step 2 abov...

Страница 98: ...unchanged The pins of the parallel interface connector carry the signals listed in the following table Parallel Connector Pin Assignment Asterisks in the table indicate signals that are active low Th...

Страница 99: ...his line is connected to the printer s 5 V DC line 5 V 0 5 V maximum 400 mA Serial and Parallel total fused Error nFault Pin 32 When the high speed parallel line control is on FRPO O2 2 this line retu...

Страница 100: ...ta sent by the computer to the printer RTS Request To Send Pin 4 This output is always held high above 3 volts CTS Clear To Send Pin 5 DSR Data Set Ready Pin 6 Unused SG Signal Ground Pin 7 All signal...

Страница 101: ...empty thresholds H6 and H7 are subject to change without notification The gap between the nearly full and nearly empty thresholds allows the computer to send a fairly large amount of data in a contin...

Страница 102: ...Baud rate 9600 bps data bits character length 8 bits stop bits 1 parity none The two RS 232C protocols are XON XOFF and DTR The printer performs both of them simultaneously using positive logic for D...

Страница 103: ...following commands C MODE COM1 96 N 8 1 P C MODE LPT1 COM1 To test the interface enter the following CTRL P C DIR CTRL P The software settings made using the above procedures are temporary On most com...

Страница 104: ...rfaces Parallel IEEE1284 USB Full Speed USB 2 0 Option Network interface card KUIO LV Memory card slot One Memory card CF Hard disk slot 1 Microdrive Self test Performed at power up Maximum duty cycle...

Страница 105: ...240 V 50 Hz 60 Hz max 7 2 A European countries Max allowable voltage fluctuation 10 Max allowable frequency fluctuation 2 Power consumption Max 961 W During printing 382 W During standby 21 W During l...

Страница 106: ...y printing The default setting is On Kyocera Mita Digital Library This is contained on the CD ROM supplied with the printer The contents of the CD ROM include manuals printer drivers and various utili...

Страница 107: ...rarily and use electronic sorting to reduce print time Simple Network Management Protocol SNMP This is a protocol for the management of networks that use TCP IP Transmission Control Protocol Internet...

Страница 108: ...1 40 Quick copy 1 36 Virtual mailbox 1 39 Emulation 1 25 Glossary 1 Envelopes 2 5 Error messages 4 6 Expansion memory B 2 B 3 Glossary 1 F Face down tray 4 5 Font 1 13 1 27 A 1 Font list 1 13 A 2 Fron...

Страница 109: ...L fonts A 2 Plastic bag 3 1 Plastic bags 2 8 Preprinted paper 2 5 PRESCRIBE 4 3 C 4 Print density 1 21 Print quality 1 33 4 2 Printer driver 1 6 1 17 B 4 Glossary 2 Protocol 1 43 C 4 C 5 Glossary 2 R...

Страница 110: ...Kyocera Mita Corporation 14 9 Tamagawadai 2 Chome Setagaya Ward Tokyo 158 8610 Japan Printed in Japan 2BM80030D 2002 by KYOCERA MITA CORPORATION All rights reserved Revision 1 0 2002 9...

Отзывы: