Oce TDS600 Скачать руководство пользователя страница 241

Media and supplies

241

Load rolls of copy material

When a roll is empty during a print job, a ‘Roll empty’ message is displayed
at the printer operating panel and on the System Control Panel application. You
then have to load a new roll of print material.

Note:

Currently the following media are supported on the Océ TDS600:

Plain paper (Red label plus) 75g/m

2

Plain paper (Red label) 110g/m

2

Transparent paper 90-95g/m

2

Polyester film (CPRF) 3.5mil

Polyester film 4.5mil

vellum (9020/9022) 20lbs.

Caution:

See Appendix B for more information about safely handling/

placing rolls of print material in the printer.

Load paper

1

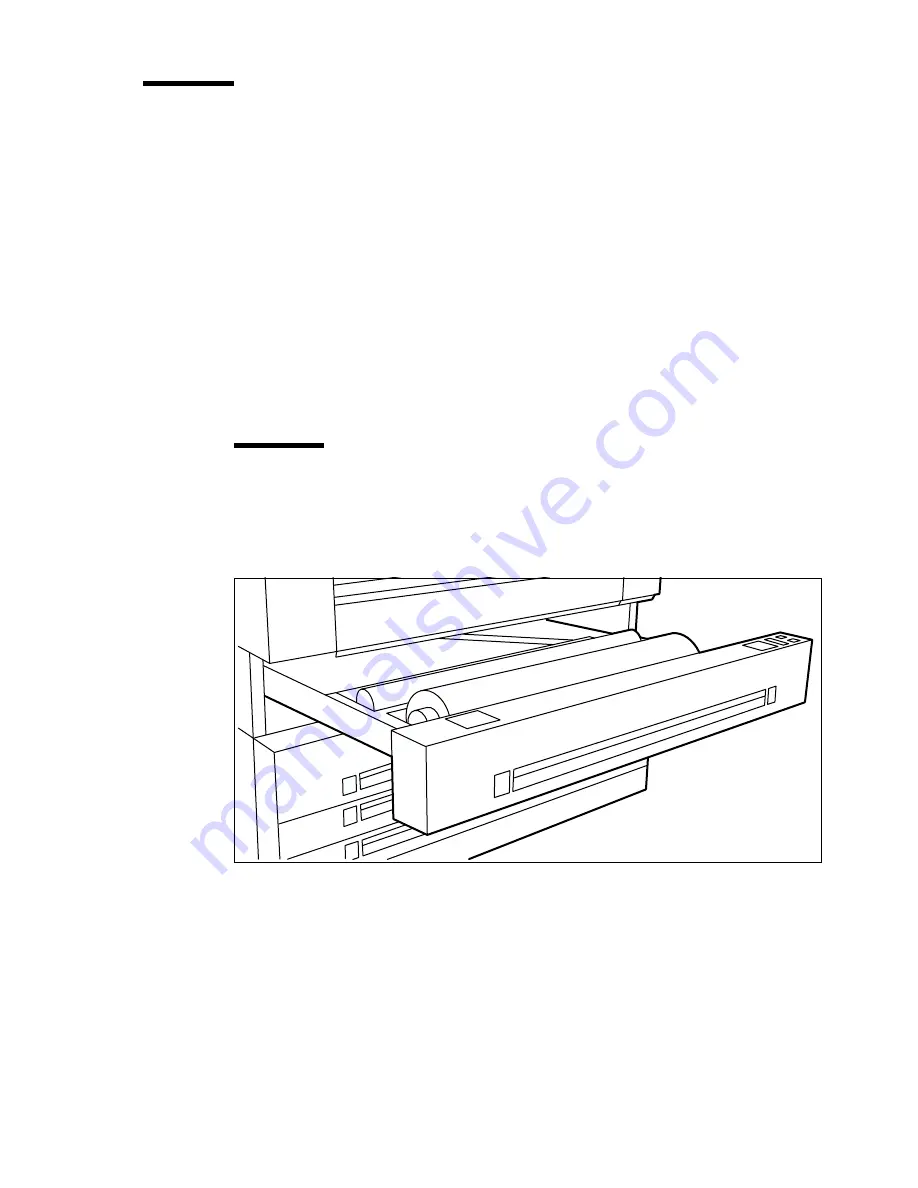
Open the appropriate roll compartment (see figure 126).

[126] Opening the appropriate roll compartment

2

If necessary remove any scrap material from the paper roll compartment.

3

Remove the roll holder from the paper roll compartment.

Содержание TDS600

Страница 1: ...Multifunctional Digital System User Manual Oc TDS600...

Страница 2: ...gies B V GB This manual contains a description of the Oc TDS600 and the copying printing and scanning that can be done with it Tademarks Products in this manual are referred to by their trade names In...

Страница 3: ...S600 printer off 25 Printer operator panel 26 Display 26 Counter 27 Buttons 28 Printer operator panel actions 29 Media type and size on the printer 29 Special media indication 31 Interrupt a print job...

Страница 4: ...manual feed for copying 54 Define delivery of copies 55 Stop a copy job 56 Chapter 4 Use the Oc TDS600 to scan Before you begin 58 Switch the Oc TDS600 scanner on 58 Switch the Oc TDS600 scanner off...

Страница 5: ...the image quality 98 Brightness 98 Automatic background compensation 98 Editing functions 101 Auto align 101 Shift the image 103 Mirror image copies 104 Chapter 6 Oc Print Exec LT Web Introduction to...

Страница 6: ...8 Oc Power Logic Queue Manager Introduction 124 Structure 124 Modes 127 Icons 128 Managing print jobs 130 Print queue 130 Inbox queue 131 History queue 132 Chapter 9 Oc Power Logic System Control Pan...

Страница 7: ...ishing 174 Image 176 Layout 179 Off line folding 180 Printer related settings 182 Scanner related settings 184 Single options 185 Sheet 186 Zoom steps 187 Timers 187 System related settings 189 Teleph...

Страница 8: ...Account information for the media format 231 Account information for the media weights 232 Structure of the account file 233 Description of all the parameters in the account log file 233 Chapter 13 M...

Страница 9: ...0 Oc TDS600 folder 290 Off line folding 295 Reinforcement unit 296 Belt unit 297 Appendix A Overview and tables Overview of the Oc TDS600 system 300 Printer operating panel 301 Scanner operating panel...

Страница 10: ...10 Oc TDS600 Multifunctional Digital System User Manual Appendix C Miscellaneous Notation conventions 330 Reader s comment sheet 331 Addresses of local Oc organisations 333 Index 335...

Страница 11: ...gital System User Manual Chapter 1 Introduction This chapter contains a general introduction to the Oc TDS600 including a general description of the main features delivery options and software applica...

Страница 12: ...5 Special copy and scan jobs provides a detailed description of special copy functions to be performed on the Oc TDS600 Chapter 6 Oc Print Exec LT Web a jobsubmission application which allows you to s...

Страница 13: ...at may occur while using the Oc TDS600 Chapter 16 The folder contains a description of the folder delivered as an optional with the Oc TDS600 Appendix A Overview and tables contains an overview of the...

Страница 14: ...e is available in a number of printer configurations ranging from two rolls in a single drawer the minimum configuration to a maximum of six rolls with one sheet feeder and three sheet feeders with fo...

Страница 15: ...twork connectivity The Oc TDS600 supports a number of popular network protocols This means that it can be used in multiple networking environments such as TCP IP NetBEUI and Novell Pserver IPX SPX Set...

Страница 16: ...ations Operating panels The Oc TDS600 consists of two operating panels for making a wide variety of settings for printing and copying See Printer operator panel on page 26 and Before you begin on page...

Страница 17: ...ntrol Format RCF file or Oc Job Ticket OJT can be used to instruct the Oc TDS600 how to handle a remote print job The specific settings can be made by a user on a control panel or by means of the user...

Страница 18: ...ry loads media as needed and defines the default printer settings for recurring print jobs Also the key operator defines all time settings such as panel time out and sleep mode time out See Oc Power L...

Страница 19: ...anual for more details about making networking settings on the Oc TDS600 printer You find more information about installing configuring and using drivers in the documentation provided with the drivers...

Страница 20: ...Oc Remote Logic includes QM SCP and SE on a remote workstation which connects to the Oc Power Logic controller Oc Queue Manager The Oc TDS600 Queue Manager QM application provides you with a graphical...

Страница 21: ...all aspects related to the infrastructure of the system These settings include Host information Network settings Pen settings Printer language settings General administrator settings See Oc Power Log...

Страница 22: ...22 Oc TDS600 Multifunctional Digital System User Manual...

Страница 23: ...0 Multifunctional Digital System User Manual Chapter 2 Use the Oc TDS600 to print This chapter contains a short description of the operator panel of the Oc TDS600 printer and the actions that can be d...

Страница 24: ...before you can print You do not have to use a specific order in which you switch on or off the Oc TDS600 printer and the Oc Power Logic controller Switch the Oc TDS600 printer on You switch the Oc TDS...

Страница 25: ...oller see figure 3 2 Press the on off button on the monitor The controller starts up Switch the Oc TDS600 printer off Switch the Oc TDS600 printer off Note Ensure that the engine does not run 1 Set th...

Страница 26: ...isplay The graphical LCD display offers feedback about the current printer status It provides you with the following information Status information e g Preparing for run or Ready to print During norma...

Страница 27: ...he counter which is located at the bottom of the upper window on the operating panel displays the number of sets and or pages printed Counting starts at 1 The following options are available When no s...

Страница 28: ...line and the small selection triangles next to the specified option are no longer dimmed These selection triangles indicate that you can select an option from a predefined list with the help of the Up...

Страница 29: ...media change function This function allows the printer to switch to another roll of the same format and copy material when the roll or sheet feeder becomes empty during printing Note Since the Oc TDS...

Страница 30: ...loaded 5 Press the on line button to put the printer on line again The printer now knows which material is used for the specified roll or sheet feeder Set media type for manual feed 1 Press the on lin...

Страница 31: ...Press the on line button to put the printer on line again The printer now knows which media size is used for the specified roll or sheet feeder Special media indication On the Oc TDS600 Printer you ca...

Страница 32: ...nt job Note In general the printer cannot be stopped immediately because the started prints have to be finished Printing will be stopped at the end of the page Continue a print job 1 Press the Stop bu...

Страница 33: ...tion button The dotted line around the current selection is changed into an uninterrupted line and the small selection triangles next to the specified language are no longer dimmed 4 Use the up down b...

Страница 34: ...5 If necessary change the value in the Legend field with the up down buttons 6 Press the right selection button again to activate the Method option 7 If necessary change the value in the Width field w...

Страница 35: ...nu 3 Select the Special option from the Folding menu 4 Press the right selection button start activate the Knife option The following information is now displayed in the panel display 6 Cleaning the r...

Страница 36: ...36 Oc TDS600 Multifunctional Digital System User Manual...

Страница 37: ...ltifunctional Digital System User Manual Chapter 3 Use the Oc TDS600 to copy This chapter contains a short description of the interface of the Oc TDS600 Copier and the actions that can be done on its...

Страница 38: ...switch on or off the Oc TDS600 printer scanner and the Oc Power Logic controller Note Chapter 1 see Printer operator panel on page 26 explains the printer operator panel Switch the Oc TDS600 printer...

Страница 39: ...position 1 see figure 7 The green LED will be on 2 The message Ready to print appears Switch the Oc TDS600 scanner on 1 Set the on off switch at the front of the scanner to position 1 see figure 8 The...

Страница 40: ...not run 1 Set the on off switch at the rear of the printer to position 0 Switch the Oc TDS600 scanner off 1 Set the on off switch at the front of the scanner to position 0 Switch the Oc Power Logic co...

Страница 41: ...in this diagram see figure 10 the panel consists of a display in the centre surrounded by a number of function section and arrow buttons To the left of the display you can find the Stop button and bel...

Страница 42: ...the help of the left most function button which is also called the card selection button Button type Function Start buttons The green button marked with is used to start the feeding of the original o...

Страница 43: ...r two sections are the most commonly used options on the Oc TDS600 Copier The key operator can change the contents of the Custom section from the Oc Settings Editor on the controller see Custom card o...

Страница 44: ...able top to bottom Image Layout Finishing Sheet Each card contains a number of specific options as is shown in figure 12 on page 44 12 Copy section of the Oc TDS600 Copier File section The File sectio...

Страница 45: ...al section Press the Language function button to set the needed language Settings on the Oc TDS600 Copier operator panel On start up of the Oc TDS600 Copier the Custom card is displayed see figure 14...

Страница 46: ...e panel you first activate the selection triangles next to the specified option the dotted line around this selection is changed into an uninterrupted line and the selection triangles are no longer di...

Страница 47: ...ne delivery of copies Stop a copy job Make copies 1 Place your original face down right aligned along the original guide Keep the legend at your right hand side Note When feeding the original keep it...

Страница 48: ...ator panel If the optional folder is installed you can use the Folding settings to get a neatly folded copy 8 Press the green start button to start the copy job Your original will be fed into the scan...

Страница 49: ...tant characteristic of Multiple sheets is that if this setting is selected the active job is kept together and treated as a whole In this case the job cannot be interrupted by a high priority copy job...

Страница 50: ...the numeric zoom factor the four little triangles will appear to the right Now you can define a new zoom factor in two different ways By using the Arrow buttons on the right of the display see figure...

Страница 51: ...or darker original Selecting the exposure setting 1 Select the Image card in the Original section 2 Select the desired exposure level by using the Arrow buttons to the right of the display see figure...

Страница 52: ...disabled if the optional copy delivery tray is installed Note If you are copying thick or very thin originals originals that are damaged or originals in a carrier sheet it is recommended to use the ou...

Страница 53: ...o change the settings for the next original even if you already put the original in place on the scanner feed table Define settings for the next copy job 1 Select all settings required for the next or...

Страница 54: ...r copying If you want to copy a job on a media type and or size that is not available on one of the paper rolls or sheet feeders it can be convenient to manually feed sheets instead of switching paper...

Страница 55: ...t of the sheet The bulge will be reduced or it will disappear A few seconds later the complete sheet will be pulled in the printer Note If the copy job requires more sheets the display will ask you to...

Страница 56: ...on interrupts the original transport Stop a job 1 Press the Stop button The original transport is now stopped and you are prompted the open the scanner cover in order to remove the original 2 Open the...

Страница 57: ...Multifunctional Digital System User Manual Chapter 4 Use the Oc TDS600 to scan This chapter contains a description of the interface of the Oc TDS600 Scanner and the actions that can be done on its op...

Страница 58: ...scan You do not have to use a specific order in which you switch on or off the Oc TDS600 scanner and the Oc Power Logic controller Switch the Oc TDS600 scanner on You switch on the Oc TDS600 scanner w...

Страница 59: ...ff button on the controller see figure 25 2 Press the on off button on the monitor The controller starts up Switch the Oc TDS600 scanner off Switch the Oc TDS600 scanner off 1 Set the on off switch at...

Страница 60: ...you can see in this diagram see figure 26 the panel consists of a display in the centre surrounded by a number of function section and arrow buttons To the left of the display you can find the Stop b...

Страница 61: ...the left most function button which is also called the card selection button Button type Function Start buttons The green button marked with is used to start the feeding of the original or to re start...

Страница 62: ...ne of the other two sections are the most commonly used options on the Oc TDS600 Copier The key operator can change the contents of the Custom section from the Oc Settings Editor on the controller see...

Страница 63: ...ttom Image Layout Finishing Sheet Each card contains a number of specific options as is shown in figure see figure 28 28 Print section of the Oc TDS600 Copier File section The File section contains al...

Страница 64: ...in the Original section Press the Language function button to set the needed language Settings on the Oc TDS600 Copier operator panel On start up of the Oc TDS600 Copier the Custom card is displayed...

Страница 65: ...you first activate the selection triangles next to the specified option the dotted line around this selection is changed into an uninterrupted line and the selection triangles are no longer dimmed wh...

Страница 66: ...lution you want to scan and where you want to store your file The result of the scan to file can be stored on the controller temporary store or directed forward towards a network destination via Windo...

Страница 67: ...Use the Oc TDS600 to scan 67 31 Scan click count in the Oc Scan Manager...

Страница 68: ...ton on the scanner Scan to file 1 Place your original face down right aligned along the original guide 2 Select the appropriate original type 3 Select the Destination card in the File section 32 Desti...

Страница 69: ...Use the Oc TDS600 to scan 69 33 Feedback during scan to file 7 On the controller Oc View Station LT starts automatically showing the result of the scan see figure 34 34 Oc View Station LT...

Страница 70: ...ding scan to file on the scanner operating panel are divided into two cards Destination and Image Destination card Destination File type TIFF subformat or PDF compression 35 Scanner operating panel De...

Страница 71: ...destination You can define up to ten destinations in the Oc Scan Manager application On the scanner operating panel you can choose one of these destinations Select a destination 1 Press the function b...

Страница 72: ...PDF Portable Document Format Adobe Postscript 3 PDF is a file format that has captured all the elements of a printed document as an electronic image that you can view navigate print or forward Tiff su...

Страница 73: ...you can use this compression afterwards Choose None in any other case Resolution The Oc TDS600 scan to file option allows you to scan at the following three resolutions 200 dots per inch dpi 300 dpi...

Страница 74: ...ways results in a 1 1 scan to file Optimization There are two ways to epitomise a scan to file Scan quality epitomises for the best image quality The scan resembles the original as close as possible F...

Страница 75: ...n Manager displays the filename and the status of the file generation process When the scan is completed a view of the scanned image is automatically displayed on the controller Figure 37 on page 75 s...

Страница 76: ...ontent in the right table view this destination will show selected Figure 37 on page 75 shows that the destination Temp10 is selected If for any reason a scan to file cannot be sent to the appropriate...

Страница 77: ...t is possible that your most recent scanned file is not visible in the table on screen In this case you can update the table view Update the table view 1 From the View menu select Refresh or click the...

Страница 78: ...r file to You can create delete and lock destinations You can also define automatic filenaming to ensure your files get the desired names A destination can also be a file server or a PC of an end user...

Страница 79: ...g in the temporary store on the controller 5 Enter the name of the system you want to scan your files to in the System text box 6 Enter a path of the target folder in the Path text box You can also cl...

Страница 80: ...perties 3 Uncheck the Locked check box 4 Click Ok to accept the destination settings The destination properties are now unlocked Note This option is only available if you are logged on as a Key operat...

Страница 81: ...lbar The Destination properties screen appears as in figure 40 on page 79 3 Change the destination properties as described in Create a destination on page 78 Scanned files The right pane of the Oc TDS...

Страница 82: ...file in the right pane 2 Open the File menu and select Delete or click the Delete button on the toolbar see figure 45 45 Delete button on the toolbar The selected file will be deleted Note This optio...

Страница 83: ...ll start automatically and show the scanned file Manage the temporary store When you regularly scan originals to a file many files are created in the temporary store You can clean up the temporary sto...

Страница 84: ...en you scan to file your files will be stored in the destination you set This can be on the local controller or on a remote system You can retrieve your files from the local host via File Transfer Pro...

Страница 85: ...ller is now established and a window appears asking you for a user name 4 Enter your user name anonymous and enter as your password also anonymous A connection is now set up for the default user anony...

Страница 86: ...after scanning on page 83 after scanning or via Oc Scan Manager see Print a scanned file on page 81 Oc View Station LT has the following menu s see figure 50 File View Preference Help 50 Oc View Stat...

Страница 87: ...Rotate 180 Rotates the image 180 degrees Sample When active displays only a sample of bilevel raster pixels Negate Reverses the raster image pixels on display and changes which are dominant for scalin...

Страница 88: ...es the image 90 degrees counter clockwise 8 Rotate 90 CW Rotates the image 90 degrees clockwise 9 Rotate 180 Rotates the image 180 degrees 10 Measurement When active allows you to measure lines and ar...

Страница 89: ...tire current page in miniature for reference 12 Displays or removes the Detail window View error When the memory is almost full it can occur that the viewer does not show the scanned file Instead it s...

Страница 90: ...90 Oc TDS600 Multifunctional Digital System User Manual...

Страница 91: ...91 Oc TDS600 Multifunctional Digital System User Manual Chapter 5 Special copy and scan jobs This chapter describes the special jobs such as non standard sizes and how to improve the print quality...

Страница 92: ...put at the rear side of the scanner to ensure correct delivery see Deliver originals after scanning on page 52 The scan width To prevent information loss when copying a non standard original you can s...

Страница 93: ...or sheet feeder in the Custom section Note The media can also be selected directly from the Custom section Note When Automatic is selected the roll or sheet feeder that is used is indicated by the sym...

Страница 94: ...to remove a filing strip along the left hand side right hand side in the feed direction face down This side can be reduced by up to 60 mm see figure 55 55 Example of adjusting the left hand side of an...

Страница 95: ...right hand side will not be scanned see figure 57 57 Example of removing the right hand side of an original Copying with removed filing strip along the right hand side 1 Select the required media in...

Страница 96: ...riginal section 2 Press the Remove strip function button 59 Removing strip 3 Adjust the values in mm for the trailing edge using the numeric or arrow buttons 4 Press the Remove strip function button a...

Страница 97: ...on 2 Press the function button Add strip function button 60 Adding strip 3 Adjust the values in mm for the trailing edge using the numeric or arrow buttons 4 Press the function button Add strip again...

Страница 98: ...r Set the exposure 1 Press the Exposure function button and use the arrow buttons to set the exposure as desired Note The Up and Down arrow buttons can be used to gradually increase or decrease the ex...

Страница 99: ...1 on page 99 Set the original type of your image 1 Press the Original type function button to select the appropriate image type By default Lines text is selected with Background compensation enabled T...

Страница 100: ...select Printed matter when you want to copy an original that is already a print itself containing raster information Press the Original type function button to select Dark orig when the original has...

Страница 101: ...alignment functions of the Oc TDS600 scanner Alignment is possible in the following ways see figure 62 62 Auto align options with standard cut option active Select default settings for auto shifting w...

Страница 102: ...lows see The scan width on page 92 Standard if a standard sized original is used The exact original width numeric if a non standard sized original is used 4 Feed your original Note You must switch on...

Страница 103: ...hift the image in horizontal and or vertical direction as shown below 65 Example of shifting the image Shift the image 1 Open the Layout card in the Print section 66 Image shift 2 Press the Shift func...

Страница 104: ...shift the image vertically you can only shift up or down 4 Make other settings as required 5 Feed the original Note You can use horizontal and vertical shift simultaneously Mirror image copies With th...

Страница 105: ...DS600 Multifunctional Digital System User Manual Chapter 6 Oc Print Exec LT Web The Oc Print Exec LT Web is a job submission application which allows you to send print jobs to a printer from your web...

Страница 106: ...the available media Get information on pending jobs in the printer queue Assemble up to 10 documents in a job Prepare the basic settings which will be used for the printer Submit the job to the print...

Страница 107: ...is the domain network server DNS name or IP address of the printer see figure 69 69 Oc Print Exec LT Web Add new jobs 1 Click New job A form appears see figure 70 on page 108 2 Click Browse to add do...

Страница 108: ...108 Oc TDS600 Multifunctional Digital System User Manual 70 Job composition For more information please consult the on line help...

Страница 109: ...109 Oc TDS600 Multifunctional Digital System User Manual Chapter 7 Oc Power Logic Remote Logic This chapter describes how to install and use Oc Remote Logic...

Страница 110: ...s are meant to limit access to the special functions to authorised users Log in to get access to one of the user modes Change the display language to operate the Oc Remote Logic in your language Use t...

Страница 111: ...em The installation procedure for Remote Logic is quite simple and self explanatory When you select the Install remote applications option on the CD ROM a Wizard starts to guide you through the instal...

Страница 112: ...he applications by selecting them from the specified folder in the Start menu To work with the applications you first have to connect to an available Oc TDS600 machine How to connect is described in H...

Страница 113: ...e links to JRE s for various UNIX platforms 2 Unpack the contents of the file RemoteLogic_vX tar from the directory Products remotelogic UNIX to a subdirectory on the system 3 Use tar xvf RemoteLogic_...

Страница 114: ...of the java runtime engine for use with Oc Remote Logic is the 1 1 8 version HP UX For HP UX 10 20 and 11 00 the runtime engine can be downloaded from http www unix hp com java The preferred version...

Страница 115: ...eneral 1 Install Java Virtual machine preferred 1 1 8 or higher 2 Extract RemoteLogic_vX tar or RemoteLogic_vX zip from the Oc Remote logic CD ROM 3 Set the environment variable RL_VM_HOME to point to...

Страница 116: ...to operate Oc Remote Logic in the language of your selection Use the on line help system if you do not know how to go on with the applications The Oc Remote Logic applications operate separately You...

Страница 117: ...r the user modes offer different rights In repro operator mode the operator is allowed to only view settings in the key operator and system administrator views In key operator mode the operator is all...

Страница 118: ...g in 1 From the File menu select Log in 2 Select the correct user name 3 Enter the Password 4 Click OK Note You must log in into each application separately Log out You have to log out to leave the ke...

Страница 119: ...le automatic log in 1 From the Edit menu select Options The Options window appears 2 Select the Enable automatic login check box 3 Select the correct user mode and enter your password for that user mo...

Страница 120: ...and may include a path server server Specifies the server you want to connect to language1 lang Specifies the first language in combination with the parameter country1 country country1 country Specif...

Страница 121: ...ine parameter Below is an example of how to start the Oc remote Logic applications with the configuration file Myconfig cfg connected to the My9600 server The first language is set to US English and t...

Страница 122: ...ms 2 Click Edit The Edit systems dialogue box appears 3 Enter the IP address or the name of the Oc Remote Logic system you want to connect to in the Systems text box 4 Click Add The system is added to...

Страница 123: ...l Chapter 8 Oc Power Logic Queue Manager This chapter describes how to view the Oc TDS600 System print copy queue and how to abort the active print how to delete and put on hold print and copy jobs in...

Страница 124: ...tall Remote Logic in Installation procedure for MS Windows systems on page 111 1 Select Oc Remote Logic via the Start menu or 2 Select the Launcher application 3 Select Queue Manager Oc Queue Manager...

Страница 125: ...can set how long and how many jobs are kept in the history queue in the Settings Editor Note You can select the History or Inbox queue from the drop down list box on top of the right window Status ba...

Страница 126: ...126 Oc TDS600 Multifunctional Digital System User Manual 72 Queue Manager window with the History queue 73 Queue manager with the Inbox queue...

Страница 127: ...Queue Manager and the System Control Panel the repro operator the key operator and the system administrator have the same user rights In the Settings Editor however the user modes offer different righ...

Страница 128: ...display information about a job in the queue The following icons are used 74 Receiving job 75 Received job 76 Processing job 77 Processed job 78 Job in progress 79 Printing job 80 Delivering job 81 De...

Страница 129: ...Oc Power Logic Queue Manager 129 85 Attention needs operator attention e g a media request...

Страница 130: ...ve to enter a password to get the required access Delete print jobs 1 Select the desired job s by clicking on it them Note You can select a consecutive list of jobs to be deleted by clicking on the fi...

Страница 131: ...ired job s by clicking on it them Note You can select a consecutive list of jobs to be restarted by clicking on the first job holding down the Shift key and clicking on the last job You can select a n...

Страница 132: ...s can be seen The key operator selects the time the jobs are stored in the history queue after printing and how many jobs are stored in the history queue The setting Rights for printing has two values...

Страница 133: ...133 Oc TDS600 Multifunctional Digital System User Manual Chapter 9 Oc Power Logic System Control Panel This chapter describes how to view the status of the Oc TDS600...

Страница 134: ...llowing menu s File Login Logout Connect to and Exit Edit If you select this option a window is displayed in which you can view your default system for the System Control Panel application The Auto lo...

Страница 135: ...med and the media information is replaced by the text disabled see Icons on page 136 Note Special media are excluded from the automatic behaviour of the Oc Power Logic Controller The Scanner status di...

Страница 136: ...able on the printer The following icons are used The material is available and the roll is ready for printing The roll is disabled The roll is enabled but empty The material is available in portrait o...

Страница 137: ...Oc Power Logic System Control Panel 137 The sheetfeeder is empty and material should be loaded in landscape orientation The sheetfeeder is disabled...

Страница 138: ...t settings on the Oc Power Logic Controller Clear the system 1 Select the Clear system option in the System menu to delete all jobs You can use this option in case of a corrupt job which can not be de...

Страница 139: ...DS600 Multifunctional Digital System User Manual Chapter 10 Oc Power Logic Settings Editor for the key operator This chapter describes how to make key operator settings in the Settings Editor of the O...

Страница 140: ...erators The key operator is responsible for correct default settings of the system These settings include the default settings and groups of default printer settings for the print and the copy jobs th...

Страница 141: ...ngs Editor is minimized to save screen estate Take the following actions to shut down the controller Shut down the Oc controller 1 Go to the System Control Panel application 2 Select the Shutdown opti...

Страница 142: ...The system administrator group allows authorised users to configure default printer language PDL settings and printer pen settings It also allows the system administrator to configure system and conne...

Страница 143: ...Oc Power Logic Settings Editor for the key operator 143 87 Settings Editor General structure The Settings Editor is structured as follows Menu bar Top toolbar Left toolbar Settings area Status bar...

Страница 144: ...Editor application The Auto login option allows you to start the Settings Editor application automatically in the specified user mode View The View menu allows you to switch between the display langu...

Страница 145: ...ocal client a dialogue is displayed and the user can supply a file name The file is saved in a predefined directory on the system If the client is a remote client a dialogue box is displayed and the u...

Страница 146: ...buttons available at the left toolbar of the Settings Editor These are Jobs Printer Scanner and System Each button provides access to a specific group of settings By clicking on each of these buttons...

Страница 147: ...ng for which he is authorised he can edit the setting in the update area If the user is not authorised for a particular setting the update area is greyed and no changes can be made Note that a few set...

Страница 148: ...ired to access them The service engineer will provide this password to you upon installation Note Only one key operator or system administrator at a time is authorised to make modifications However th...

Страница 149: ...elect Save as You now have two possibilities If the client is a local client a dialogue is displayed and the user can supply a file name The file is saved in a predefined directory on the system If th...

Страница 150: ...ity settings Because there is only room for five default settings on the basic card and there are more functions that might qualify the custom card is programmable This option allows you to add or del...

Страница 151: ...f the Settings Editor to prevent unauthorized use of the Oc TDS600 Make key operator settings in the Settings Editor 1 Maximize the Settings Editor on the screen 2 Log in as key operator 3 Click on on...

Страница 152: ...hat are sent along with the copy job via a job ticket or from the scanner panel plus a folder with settings for horizontal and vertical zoom calibration The Defaults folder contains the following opti...

Страница 153: ...e default number of copies for each job in the printer memory The default value is 1 The maximum number of copies is 999 Min max values 1 999 Menu path Jobs Copy File Defaults Number of prints sets Ou...

Страница 154: ...nt Min max values N A Menu path Jobs Copy File Defaults Account id Zoom method Description The Oc TDS600 has a custom automatic and 1 to 1 scaling option Custom let s you define the zoom ratio If you...

Страница 155: ...e job e g 11111 22222 33333 Set Sort by set job e g 123 123 123 123 123 Min max values N A Menu path Jobs Copy File Defaults Original card Feeding Input mode Legend location Description You can use th...

Страница 156: ...e You can remove up to of 400 mm or 16 inch in steps of 1 mm By default no leading or trailing strip is defined Remove leading or trailing strips will always work unless you try to remove the entire p...

Страница 157: ...tically sensed original length Non standard The scan length extends to the first original length sensor that is not activated or to the maximum original size Custom selected length Useful if the origi...

Страница 158: ...original background The compensation depends on the original type For photo or Greys lines originals the background compensation will be fixed For other original types the compensation will be adapti...

Страница 159: ...he align function enables you to automatically align the im age to one corner to one side or to the centre of the page The default is Upper left The following options are available Left up Up Right up...

Страница 160: ...shift the image in horizontal and or vertical direction Image shift can be used in combination with the align function Min max values 1219 1219 mm Menu path Jobs Copy File Defaults Print card Layout...

Страница 161: ...path Jobs Copy File Defaults Print card Finishing Binding strips Description To add a binding strip to folded prints Min max values 15 30 mm Menu path Jobs Copy File Defaults Print card Finishing Auto...

Страница 162: ...et feeder Manual feed Auto Min max values N A Menu path Jobs Copy File Defaults Print card Sheet Default pa per source Default paper source number Description Use Default paper source number to define...

Страница 163: ...Description You can define a specific cut length The specified cut length is used when the Custom cut method is selected If custom cut is enabled the copy media length will only depend on this setting...

Страница 164: ...th Jobs Copy File Defaults File card Destination File format Destination Description To define the default destination when you scan to file Min max values N A Menu path Jobs Copy File Defaults File c...

Страница 165: ...cription The Oc TDS600 scan to file option allows you to scan at the following three resolutions 200 dots per inch dpi 300 dpi 400 dpi The higher the resolution the better the image quality Higher res...

Страница 166: ...Copy File Horizontal vertical zoom calibration Description In order to optimise the 1 to 1 copy and print quality the key operator can adjust the zoom calibration factor to an accuracy of 0 1 The zoo...

Страница 167: ...wer Logic Settings Editor for the key operator 167 Scan to file With the options available for scan to file you can define another extension for PDF TIFF or Cals files 97 Scan to file Folder for Copy...

Страница 168: ...printing error pages see figure 98 The Print tab contains the following options Print error page Defaults Number of prints sets Collate Default print mode User id Account id Sheet Finishing Image Layo...

Страница 169: ...ng is done by set Min max values N A Menu path Jobs Print Defaults Collate Default print mode Description With the print mode the printer Image Logic can be set in a mode that matches the contents of...

Страница 170: ...count id Auto format Description The Auto format option allows you to specify that the select ed media size should be based on the size of your original Note Only sizes present in the specified paper...

Страница 171: ...he Feed preference option allows you to define which me dia type is to take preference when the Automatic media se lection option is active Sheet then roll Roll then sheet Min max values N A Menu path...

Страница 172: ...Print cut method Custom print length Description The Default paper source number option allows you to de fine the On the Oc TDS600 you can define a specific cut length The specified cut length is used...

Страница 173: ...1 mm Note Add leading or trailing strips will always work unless you try to remove the entire plot Min max values 0 400 mm Menu path Jobs Print Defaults Sheet Strip Add leading trailing strip Remove...

Страница 174: ...the Copy Delivery tray Min max values N A Menu path Jobs Print Defaults Finishing Unfolded print delivery Folding Description To determine if the job will be folded by default Min max values N A Menu...

Страница 175: ...h Description Determines the folding length of the package Min max values 276 310 Menu path Jobs Print Defaults Finishing Folding length Folding width Description Determines the folding width of the p...

Страница 176: ...m ratio you need Shrink to fit the large image zooms to fit on the chosen and smaller media Exact fit enlarge or reduce the image to fit to the selected me dia Min max values N A Menu path Jobs Print...

Страница 177: ...ed to the print The following values are available 0 90 180 270 degrees Auto rotate Note Use Auto rotate to make the Oc 9600 choose a rota tion automatically When this setting is activated the image w...

Страница 178: ...est fitting media format The following values are available Auto rotate productive If possible the orientation is changed to landscape to allow for faster printing paper movement through the machine w...

Страница 179: ...Up Right up Left Centre Right Left down Down Right down Min max values N A Menu path Jobs Print Defaults Layout Auto shift Horizontal Vertical shift Description The print margin may be too small to a...

Страница 180: ...N A Menu path Jobs Off line folding Folding delivery Legend location Description You can use the Legend location option to determine if users will default feed the original with the legend on the lea...

Страница 181: ...of the package Min max values 276 310 Menu path Jobs Off line folding Folding length Folding width Description Determines the folding width of the package Min max values 186 230 mm Menu path Jobs Off...

Страница 182: ...u enable Automatic roll switch the system switches to another roll or sheet feeder depending on the specified feed preference with the same material type and size as soon as a roll or sheet feeder is...

Страница 183: ...lt full indicator is activated Min max values N A Menu path Printer Folder Sheets on belt Block number with correct light intensity Description As the printer drum gets older the print quality might s...

Страница 184: ...Manual Scanner related settings There are single Scanner related settings and groups of settings for a key operator see figure 105 Printer family Rewind originals Automatic feed Sheet Zoom steps Timer...

Страница 185: ...r family Rewind originals Description Use Rewind originals to have the Oc 9600 rewind the orig inals after they have been scanned You can then take the scanned original from the front of the scanner M...

Страница 186: ...ll only be printed if the specified media size is available Next larger if the specified media size is not available the document will be printed on the next larger size Next smaller if the specified...

Страница 187: ...e zoom step 100 0 can not be changed 107 Zoom steps for key operators The defaults for the 8 zoom steps are Reduction step 1 70 7 Reduction step 2 50 Reduction step 3 35 5 Reduction step 4 25 Enlargem...

Страница 188: ...t Description The Set time out option allows you specify after how much time the set on the scanner is automatically closed if no new original is fed and the set is not closed with the start key Min m...

Страница 189: ...d settings There are single System related settings and groups of settings for a key operator see figure 109 Telephone number Enabling passwords Localization Job priorities Media Timers Disk cleanup J...

Страница 190: ...o that of the local service organisation Min max values N A Menu path System Telephone number Scan Logic password Description Scan Logic is an option To activate this option you require a password Cal...

Страница 191: ...Print Exec LT Web Account logging Description To enable the logging of job attributes for account purposes To activate this option you require a password Call your local dealer for this password Min m...

Страница 192: ...also on the system will be presented in the specified language Min max values N A Menu path System Localization Display languages First language Second language Description Use the Second language opt...

Страница 193: ...nt unit option to specify the preferred measurement unit for your system meters or inches The selected measurement unit will be used throughout the system Note After the measurement unit has changed a...

Страница 194: ...re 112 112 Job priorities settings for key operators Copy priorities Description When you enable Copy priorities the copy job will be placed right behind the active job When you disable the option the...

Страница 195: ...only the sizes in the selected paper series are available If Auto format is enabled the Paper Series setting deter mines which sizes will be used only those present in the pa per series Choose from th...

Страница 196: ...ual feed time out to define the manual feed time out in seconds This time out is the delay before jobs will get the status not ready to print e g when the sheet is not be ing fed Min max values N A Me...

Страница 197: ...the power supplies are switched off Note The sleep mode time out also applies to the scanner and the folder but NOT to the controller Min max values N A Menu path System Timers Sleep mode timer Contro...

Страница 198: ...er Scan spool folder 115 Disk clear up settings for key operators Frequency Description Frequency the folder will be cleaned at the preset time Min max values 0 850 h Menu path System Disk cleanup Loc...

Страница 199: ...ding to the frequency setting Min max values N A Menu path System Disk cleanup Local storages Unsent folder Scan spool cleanup Next time Print jobs Description To determine if jobs go to the inbox are...

Страница 200: ...th System Job management History queue Enable history queue Print job lifetime Description Time the jobs are stored in the history queue Min max values N A Menu path System Job management History queu...

Страница 201: ...gging files Choose between 7 bit ASCII or Unicode Min max values N A Menu path System Logging File format File field separator Description To define if the field separator should be a semicolon a com...

Страница 202: ...202 Oc TDS600 Multifunctional Digital System User Manual...

Страница 203: ...ltifunctional Digital System User Manual Chapter 11 Oc Power Logic Settings Editor for the system administrator This chapter describes how to make System Administrator settings in the Settings Editor...

Страница 204: ...controller settings Pen settings Automatic Language Selection ALS settings Controller identification settings Set memory reservation settings Connectivity settings To modify the system administrator s...

Страница 205: ...2 Log in as system administrator See User modes on page 117 for more information about logging into the Settings Editor 3 Click on one of the top buttons to display the desired group of settings 4 Sel...

Страница 206: ...206 Oc TDS600 Multifunctional Digital System User Manual There are two types of system administrator settings see figure 118 Printer System 118 System administrator settings in the Settings editor...

Страница 207: ...ices in polygons Scale down algorithm HPGL HPGL 2 Calcomp Postcript NIRS C4 TIFF CALS ASCII Dithering matrix Description The Dithering matrix option allows you to select the dither ing matrix for impr...

Страница 208: ...ly handled by the printer Min max values 1024 35000 Menu path Printer PDLs Poker min number of vertices in polygons Poker max number of vertices in polygons Description This setting specifies the maxi...

Страница 209: ...ic data format recognition and which language is forced These settings are called ALS Automatic Language Sensing settings If ALS is enabled the Oc TDS600 automatically recognizes the host data languag...

Страница 210: ...ain In that case the selected option only applies to this job Alternatively you can select the appropriate data format manually on the Settings Editor panel and then resend the print However this sett...

Страница 211: ...rs and poly gons Pen width scaling To enable or disable the pen width scaling If enabled scaling an image will scale the pen width correspond ingly Kanji font set To specify the correct font set for t...

Страница 212: ...mulate HP650C or HP750C The default em ulation type is HP650C which is backward compatible with old machines Differences occur in the default pen palette and the de fault number of pens If HP750C is s...

Страница 213: ...ine the character code for the end of message byte This will indicate the end of a data sequence Pen priority Pen parameters can be defined in two ways In the plot data file In the Remote Configuratio...

Страница 214: ...option Default page size To indicate the dimensions of the paper on which your document will be printed PS heap size To increase the PostScript Level 3 heap size if the system is una ble to print the...

Страница 215: ...option allows you to enable or disable CALS In case of problems with CALS the CALS PDL can be disabled by select ing the Disabled option ASCII Setting Description Enable ASCII The Enable option allows...

Страница 216: ...e Pen width option allows you to define the default line width of the text Page type The Page type option allows you to define the default page type for the logical image that contains the ASCII text...

Страница 217: ...ngs apply to all vector languages HP GL HP GL 2 and CalComp 119 Making pen settings Pen width Pen width can be defined from 0 12 up to 16 25 mm By default all pen widths are set to 0 12 mm Adjustment...

Страница 218: ...e 119 3 Type a pen number in the Pen number box or select a number with the selection arrows to the right of the box The Pen width and Pattern boxes now become active 4 Specify a pen width by typing a...

Страница 219: ...oller identification Set memory reservation Connectivity 121 System related settings in the Settings Editor Scan memory reservation Description To specify the maximum amount of the file system disk us...

Страница 220: ...9 if you use a hyphen put it somewhere in the middle of the name not at the beginning nor at the end Min max values N A Menu path System Controller identification Hostname Description Description To...

Страница 221: ...ferent connection types with the help of the Settings Editor Making connectivity settings 1 Click on the System button Orange zone limit Description To specify the orange limit in Megabytes The orange...

Страница 222: ...nabled or disabled Time out To define the plot time out on a FTP connection 60 900 s Communication mode To define the communication mode for a FTP connection With Print while spool the data will be sp...

Страница 223: ...string should not be preceded by a period Pserver password To specify the Novell PSERVER password Access mode To define the Novell access mode File server names To specify the names of the available...

Страница 224: ...e server The subnet mask is a number that when compared by the computer with a net work address number will block out all but the necessary in formation Default gateway To specify the IP address of th...

Страница 225: ...225 Oc TDS600 Multifunctional Digital System User Manual Chapter 12 Oc Power Logic Account logging This chapter describes what Account logging is and how you use it...

Страница 226: ...ption Account logging is an option You enable this option in the Settings Editor via a password see Account logging on page 191 2 The account log file File format The account logging information is st...

Страница 227: ...field separator character end of line or double quote then the text in the field changes as follows 1 An occurrence of a double quote is replaced by two double quotes 2 The resulting text is surround...

Страница 228: ...TP in a internet browser 1 Start an internet browser 2 Enter the ftp address of the Oc TDS600 system see Host name on page 220 Note You set the name of the system in the Settings Editor The browser sh...

Страница 229: ...erforming steps 2 and 3 you could also enter ftp host_name in the FTP client The connection with the Controller is now established and a window appears asking you for a user name 4 Enter your user nam...

Страница 230: ...You can import the account log file into for example Microsoft Excel or Microsoft Access Import the account log file into Microsoft Excel 1 Start Microsoft Excel 2 Open the account log file that is on...

Страница 231: ...h record and is unique for each job in the file This field is for collecting records that are part of a single job and to calculate the totals for the whole job Account information for the media forma...

Страница 232: ...actual media to the values in the account log Format name Width units of 1 72 inch Height units of 1 72 inch A0 2384 3370 A1 1684 2384 A2 1191 1684 A3 842 1191 A4 595 842 E 2448 3168 D 1584 2448 C 122...

Страница 233: ...is in records of type 6211 the second up to the last record in the account log file The fields of that record are described in the table All Parameter descriptions on page 234 For the TDS800 these num...

Страница 234: ...without any prefix Job ID text 255 ID of job e g job name as specified in a job tick et escaped according to escaping rules Empty field if not available Machine ID text 255 Unique ID of the printer If...

Страница 235: ...e For PDL s TIFF CALS PDF PS NIRS HPGL HPGL2 C4 CALCOMP ASCII For scans SCANF scan of front of page SCANB scan of back of page Source width num 6 Native width of source page in points 1 72 inch Source...

Страница 236: ...when source page was delivered 1 12 Delivery date day num 2 Day of the month when source page was deliv ered 1 31 Delivery time hours num 2 Hour when source page was delivered 0 23 Delivery time minut...

Страница 237: ...BELTS CDT IRT FIRST FOLD STACKER Empty if no physical output Output file type text Type of output file in case of digital output TIFF CALS PDF Empty if no digital output Output file com pression text...

Страница 238: ...238 Oc TDS600 Multifunctional Digital System User Manual...

Страница 239: ...239 Oc TDS600 Multifunctional Digital System User Manual Chapter 13 Media and supplies This chapter describes how to refill paper refill toner and refill the reinforcement unit of the folder...

Страница 240: ...pe material can be used in the bottom sheet feeder The minimum size of media in the third sheet feeder is A2 Attention After loading new print material you need to inform the system of the size of the...

Страница 241: ...Plain paper Red label plus 75g m2 Plain paper Red label 110g m2 Transparent paper 90 95g m2 Polyester film CPRF 3 5mil Polyester film 4 5mil vellum 9020 9022 20lbs Caution See Appendix B for more info...

Страница 242: ...een knob Note You can place the new roll in the groove on top of the printer 5 Slide the roll holder in the new roll of material while pressing the green knob 6 Align the roll with the appropriate siz...

Страница 243: ...top few centimetres no more than 10 of the print material to facilitate the load process 9 Press the appropriate green button inside the paper roll compartment see figure 130 The material will automa...

Страница 244: ...ompartment Inside the drawer the roll loaders are installed The roll loaders consist of a metal frame with a lever and a green knob in the middle of the lever 2 Put the appropriate horizontal lever in...

Страница 245: ...ding rolls of print material 11 Press the appropriate green button inside the roll compartment The material will automatically be fed into the machine Note Also refer to the sticker inside the drawer...

Страница 246: ...Note You must fan polyester cut sheet before use to prevent sticking together Also avoid the use of sheets that have already been printed on one side Load cut sheet material 1 Open the appropriate dra...

Страница 247: ...awer see figure 134 5 Adjust the right hand guide Note Carefully place the print material in the drawer to avoid damage to the media 6 Slide the two other guides into position Also refer to the sticke...

Страница 248: ...sh your current job If you do not refill toner in time the system will stop and an Out of toner message will appear In that case printing will only be resumed after you have refilled toner and pressed...

Страница 249: ...as possible over the holder see figure 136 136 Replacing the waste toner bag Attention Use only Oc B5 toner 4 Shake the toner bottle thoroughly and open the bottle 5 Screw in the bottle clockwise in a...

Страница 250: ...and close it 10 Close the cover Printing will be resumed after you press the on line button Note When you have refilled toner after a toner low message it may take a while up to thirty seconds depend...

Страница 251: ...251 Oc TDS600 Multifunctional Digital System User Manual Chapter 14 Maintenance This chapter describes the maintenance of the glass platen the reference roller and the reinforcement unit...

Страница 252: ...ensure top quality copies are produced At the same time you can clean the white reference roller Clean the glass platen and reference roller 1 Switch off the scanner 2 Open the top cover of the scann...

Страница 253: ...er with soft cloth moistened with a small quantity of Cleaner A see figure 140 5 Lift the top cover of the scanner to release the lock of the hinge and close the cover see figure 141 141 Closing the t...

Страница 254: ...nforcement strips from Oc to avoid damage to the reinforcement unit A new tape roll When the tape roll is empty while the engine is in stand by one of these messages will appear on the display Load re...

Страница 255: ...n the side door of the reinforcement unit see figure 143 143 Opening the side door of the reinforcement unit 2 Turn the two guide plates away from the pin roller and lock them into their open position...

Страница 256: ...nscrewing the green knurled nut and remove the old kernel Note It is recommended that you clean the reinforcement knives before you place a new roll See Maintenance of the reinforcement knives on page...

Страница 257: ...and lead the tape over the large guide roller see figure 147 147 Guiding the tape around the guide roller 7 Lead the tape between the upper and lower knife and over the pin roller see figure 148 148 L...

Страница 258: ...igure 149 149 Protruding tape 9 The holes in the tape must be aligned with the hole pattern on the sticker you can find on the frame plate of the reinforcement unit see figure 150 If this is not the c...

Страница 259: ...Maintenance 259 10 Close the guide plates of the pin roller see figure 151 151 Closing the guide plates 11 Peel the protection sheet off the tape see figure 152 152 Peeling off the protection sheet...

Страница 260: ...ck between the upper and lower knife 153 Leading the protection sheet between upper and lower knife 13 Lift the guide and lead the protection sheet between the protection sheet rollers pulling the pro...

Страница 261: ...Inserting the tape into the closed section of the slide 15 Hold the upper guide plate down and cut the tape at the knife section by quickly pulling the edge up so that the tape is cut by the upper kn...

Страница 262: ...ach roll of tape the box should be emptied twice Note You can empty the waste box while the engine is running Empty the waste box 1 Open the waste box by first pulling it to the left hand side and nex...

Страница 263: ...he reinforcement unit Clean the reinforcement knives 1 Press the on line button on the printer operating panel to put the printer off line The message Off line is displayed in the status window 2 Pres...

Страница 264: ...Oil the felt using Fixing Unit Cleaning Oil silicon oil 160 Oiling the felt Close the side door of the reinforcement unit The knives are automatically placed back in their home positions The picture o...

Страница 265: ...265 Oc TDS600 Multifunctional Digital System User Manual Chapter 15 Problem solving This chapter describes the problems that can occur when you use the Oc TDS600...

Страница 266: ...moves through the system without problems On the graphic display a cover or door indicates in which part of the system the paper has stopped Stickers on some parts of the system indicate which green h...

Страница 267: ...riginal from the scanner Remove a stopped original 1 Open the top cover of the scanner see figure 161 161 Opening the top cover of the scanner 2 Remove the original 3 Lift the top cover of the scanner...

Страница 268: ...if you use the correct type of original Check if you insert the original along the guide Check if the original is damaged before you insert it Note When you are working with poor quality or valuable o...

Страница 269: ...ect the paper jam as described in the equivalent chapter Remove all the pieces of paper from the machine If a paper jam occurs often check if The paper is refilled correctly see Load rolls of copy mat...

Страница 270: ...sheet feeder 1 Open the appropriate sheet feeder Note Only one sheet feeder can be open at a time 2 Remove any jammed printing material from the paper path see figure 164 164 Removing jammed material...

Страница 271: ...ote Occasionally a jam may occur before the printing material has been cut In that case you can cut the material manually by pressing the appropriate green load button in the roll compartment 3 Reload...

Страница 272: ...to remove paper after a media jam Because of hot surfaces the operator always has to be cautious and wear heat protective gloves when removing printing material in the fuser section How to clear a jam...

Страница 273: ...andle 8 Close the cover 9 Switch the printer on again Paper jam at the integrated receiving tray How to clear a jam at the integrated receiving tray 1 Open the manual feeder to release the printing ma...

Страница 274: ...folding section Any jams in the folder can occur in either the first fold section the second fold section the folder transport section or the belt unit How to clear a jam in the first fold section 1...

Страница 275: ...ection see figure 169 169 Opening first fold section 4 Open the guide plate see figure 170 170 Opening guide plate 5 Remove any jammed printing material 6 Close the guide plate 7 Close the cover of th...

Страница 276: ...e any jammed printing material 3 Close the cover of the folder transport section from the left side by lifting it up and pushing the hinge away from you Clear a jam in the second fold section 1 Open t...

Страница 277: ...belt unit put the belt in an upright position see figure 173 173 Putting the belt in an upright position 5 Open the delivery unit see figure 174 174 Opening the delivery unit 6 Open the guide plate w...

Страница 278: ...tem User Manual 175 Opening the guide plate with the green lever 7 Remove any jammed printing material 8 Open the vertical transport with the green lever see figure 176 176 Opening the vertical transp...

Страница 279: ...Problem solving 279 10 Close the vertical transport see figure 177 177 Closing the vertical transport 11 Close the guide plate 12 Close the delivery unit see figure 178 178 Closing the delivery unit...

Страница 280: ...r of the belt unit see figure 179 179 Opening the belt unit door 2 Squeeze the two green knobs in the upper section of the belt unit and open the plate see figure 180 180 Opening the plate 3 Remove an...

Страница 281: ...it and pulling it forward to open the lower plate see figure 181 181 Opening the lower plate 6 Remove any jammed printing material 7 Pull up the green lever again until it locks into position to close...

Страница 282: ...tion explains how these errors can be solved Clear paper jams in the Reinforcement Unit When a paper error occurs the following message is displayed Paper jam A picture of the engine appears on the di...

Страница 283: ...section 2 Close the cover of the folder transport section 3 Open the front door of the reinforcement unit see figure 184 184 Opening the front door of the reinforcement unit 4 Open the top cover of t...

Страница 284: ...t When a tape jam occurs the following message appears on the display Reload tape in reinforcement unit When a tape jam occurs while the engine is running the message will be accompanied by a picture...

Страница 285: ...front door of the reinforcement unit 2 Turn the two guide plates away from the pin roller and lock them into their open position see figure 188 188 Opening the guide plates 3 Remove all tape between t...

Страница 286: ...n happen when the file header Remote Control Format or Oc Job Ticket contains instructions to have no reinforcement If you want to process A4 formats reinforcement can be disabled for this format For...

Страница 287: ...90 there is no mechanical error and you should insert a new tape roll as described in A new tape roll on page 254 If this error frequently occurs you should call the Oc service organisation see Other...

Страница 288: ...onal Digital System User Manual Other problems call service If you have a problem that you can not correct call the Oc service organisation In that case switch off the system with the main switch and...

Страница 289: ...289 Oc TDS600 Multifunctional Digital System User Manual Chapter 16 The folder This chapter contains a description of the folder delivered as an optional with the Oc TDS600...

Страница 290: ...th and length with a drawing method You can only fold paper Polyester transparent or vellum media cannot be folded a media jam can occur 192 Oc TDS600 folder Standard folding settings By default you u...

Страница 291: ...t 210 mm Set the folded package length 1 Press the Finishing card in the Print section 2 Press the function button Folded package 3 Select Length 4 Enter a range between 276 310 mm in steps of 1 mm de...

Страница 292: ...function button to select Standard Ericsson or Afnor fold 193 Fold options from the scanner operator panel 2 Open the Finishing card in the Print section 3 Press the Folding function button to select...

Страница 293: ...ing edge When you change the folding length and or folding width and the folder has a belt you must also adjust the side guides of this unit Maximum folding length There are maximum values for differe...

Страница 294: ...d only delivered in first fold delivery 6 m length known at start Unfolded delivered in first fold delivery 6 m length not known at start Possible paper jam First fold only selected 6 m Delivered in f...

Страница 295: ...is off line but the folder still processing the last prints If this is blinking rapidly an error has occurred If this is on the printer is off line and you can feed a sheet Note Also refer to the stic...

Страница 296: ...ou install a reinforcement unit copies can be delivered with a pre punched self adhesive strip see figure 199 199 Example a of reinforcement strip With this strip the copy can be stored in a binder wi...

Страница 297: ...t part of the window 7 Click on the Apply button to save any changes you have made Belt unit A belt unit offers a large capacity and more flexibility On the belt unit up to 100 A0 prints can be delive...

Страница 298: ...298 Oc TDS600 Multifunctional Digital System User Manual 201 Adjusting the side guides of the belt 2 Adjust the plate in accordance with the width of the fold package 3 Tighten the nuts...

Страница 299: ...299 Oc TDS600 Multifunctional Digital System User Manual Appendix A Overview and tables...

Страница 300: ...of the Oc TDS600 system 202 The Oc TDS600 system 1 Off line folding input 2 Integrated receiving tray 3 Printer operating panel 4 Manual feed 5 Printer 6 Rolls or sheet feeders 7 Scanner 8 Scanner op...

Страница 301: ...Overview and tables 301 Printer operating panel Stop button On line button Up Down buttons Selection buttons Display...

Страница 302: ...302 Oc TDS600 Multifunctional Digital System User Manual Scanner operating panel Stop button Correction button Start button Section buttons Arrow buttons Function buttons Numeric buttons...

Страница 303: ...Overview and tables 303 Product specifications Oc TDS600 The Oc TDS600 is a wide format mid to high volume printing and copying system...

Страница 304: ...with 2 rolls to 360 kg model with 6 rolls and 1 sheet feeder Safety approvals T V GS CETECOM CE UL c UL CB FCC Class B Functionality Multiple prints up to 999 Automatic Language Sensing ALS Auto roll...

Страница 305: ...ogic real time image processing hardware Speed 5 linear metres per minute or approximately 4A0s per minute Original feed Face down right aligned Automatic feed off on Rewind original to front off on O...

Страница 306: ...ngs Programmable custom card Automatic roll selection Automatic reduction enlargement Standard cut synchro cut and custom cut modes Leading and trailing edge adjustment up to 400 mm Two languages avai...

Страница 307: ...er panel scan directly to destination Options Oc View Station Edit and enhancement software Oc Batch Processor Automated editing software Drivers and application software Oc ADI driver For AutoCAD 12...

Страница 308: ...aper film vellum and polyes ter Power consumption 40 W Electrical require ments 120 230 V 50 60 Hz Dimensions 1 170 mm W x 1 090 mm H x 1 440 mm D with tray fully extended Weight 35 5 kg Finishing ori...

Страница 309: ...Oc TDS600 Material sizes The following material sizes are available for the Oc TDS600 Plain paper 75 to 110 g m2 Transparent paper 80 to 110 g m2 Vellum 16 20 lbs Polyester film 3 5 or 4 5 mil Special...

Страница 310: ...are high Also avoid dust and direct sunlight Wrap unused paper in plastic to prevent it absorbing moisture Reinforcement strips Information about the different reinforcement strips is available from...

Страница 311: ...311 Oc TDS600 Multifunctional Digital System User Manual Appendix B Safety information...

Страница 312: ...ted Note A roll will always be placed in the machine including a 1 3 kg roll holder In order to be able to put all available materials on all roll positions without exceeding the RWLs a roll loader ha...

Страница 313: ...he NIOSH limit value for handling loads will be exceeded when rolls of imaging materials having a net weight of more than 7 kg i e a width of more than approx 50 cm or 20 inches are placed in the roll...

Страница 314: ...idge any mechanical or electrical circuit breakers Do not use an extension lead to connect the machine Locate the machine close to a dedicated 16 A wall socket that is easily accessible The switch in...

Страница 315: ...erials not approved by Oc may result in faults in your machine Do not use the machine when it is emitting unusual sounds Remove the plug from the power socket and contact your key operator Do not open...

Страница 316: ...roduct We reserve the right to revise safety data sheets as new information becomes available It is the user s responsibility to determine the suitability of this information for the adoption of safet...

Страница 317: ...the Threshold Limit Value for UV radiation TLV list of ACGIH Heat emission Standby 50 W in operation 1470 W Ozone emission 0 004 mg min at continuous operation Room volume Recommendation min 50 m3 Ro...

Страница 318: ...nuous operation Power consumption stand by 97 W Mains connection Cable with plug Safety class I IEC 536 Protective earth connection Protection class IP 20 IEC 529 Sound pressure level at operator posi...

Страница 319: ...Safety information 319 Safety data sheet Oc TDS600 folder Note The contents of this safety data sheet is subject to the disclaimer on page 316 of this manual...

Страница 320: ...er and soap Inhalation Clean nose mouth throat Cough up Fresh air Ingestion Rinse mouth with water If large quantity swallowed seek medical advice For any medical advice take along this material safet...

Страница 321: ...to prevent dusting With due observance of local laws and regulations dispose of by burial in a sanitary landfill or incineration Do not throw in open fire in order to prevent the risk of a dust explos...

Страница 322: ...with cold water and soap Inhalation Clean nose mouth throat Cough up Fresh air Ingestion Rinse mouth with water If large quantity swallowed seek medical advice For any medical advice take along this m...

Страница 323: ...prevent dusting With due observance of local laws and regulations dispose of by burial in a sanitary landfill or incineration Do not throw in open fire in order to prevent the risk of a dust explosion...

Страница 324: ...n ingredients 3 Hazards identification To our knowledge this product presents no health hazard in normal use 4 First aid measures Eyes contact Not Applicable N A Skin contact N A Inhalation N A Ingest...

Страница 325: ...use Hazardous reaction None at intended use 11 Toxicological information 12 Ecological information This product is not biodegradable The ingredients are not classi ed as ecologically hazardous No adve...

Страница 326: ...S600 scanner only the copier printer 5 Oc TDS600 folder optional As an ENERGY STAR partner Oc Technologies B V has determined that both the printer and the copier printer meet the ENERGY STAR guidelin...

Страница 327: ...eep mode default time of 60 minutes still causes you sizable inconvenience due to your particular usage pattern the key operator may disable the sleep mode feature Recycled paper The use of recycled p...

Страница 328: ...328 Oc TDS600 Multifunctional Digital System User Manual...

Страница 329: ...329 Oc TDS600 Multifunctional Digital System User Manual Appendix C Miscellaneous...

Страница 330: ...at take you step by step through all phases of performing the operation Figures and tables Figures and tables are titled and numbered sequentially throughout this manual Figures include pictures of pr...

Страница 331: ...convenient in size readability and arrangement page layout chapter order etc Yes No Could you find the information you were looking for Always Most of the times Sometimes Not at all What did you use t...

Страница 332: ...unknown please do fill in your occupation Name Occupation Company Phone Address City Country Please return this sheet to Oc Technologies B V For the attention of ITC User Documentation P O Box 101 59...

Страница 333: ...heng Chaoyang District Beijing 100028 China Oc esk republika s r o Hanusova 18 14021 Praha 4 Pankr c Czech Republic Oc Danmark A S Kornmarksvej 6 DK 2605 Br ndby Denmark Oc France S A 32 Avenue du Pav...

Страница 334: ...Llobregat Barcelona Spain Oc Svenska AB P O box 1231 S 164 28 Kista Sweden Oc Schweiz AG S gereistrasse 29 CH8152 Glattbrugg Switzerland Oc Taiwan Ltd No 99 24 Nan Kang Road Sec 2 Taipeh Taiwan Taiwan...

Страница 335: ...o a controller 122 connecting 122 connecting workstations 85 229 copying 47 long short originals 92 custom card 150 D default settings 42 61 define settings 53 defining original settings 158 pen setti...

Страница 336: ...tings 142 key operator settings kos 12 kos system introduction 140 L language 45 64 119 leading and trailing edge 95 loading media 240 252 cut sheet material 246 rolls 241 252 using roll loader 244 lo...

Страница 337: ...language 32 setting a special media indication 29 31 setting media type and size 29 stopping print job 32 product specifications 303 properties of a scanned file 82 Q queue manager active print job wi...

Страница 338: ...2 stopping print job 32 supported media 241 switch the oc power logic controller off 40 59 switch the oc tds600 printer off 40 switch the oc tds600 scanner off 40 59 switching on printer 25 39 switchi...

Отзывы: