background image

CS9360 INSTALLATION MANUAL 

AP-40810_1.0 2 

1

8

2

1

2

1

2

4

3

6

5

8

9

3

7

5

9

6

7

10

3

7

5

4

4

11

5

6

6

1

2

3

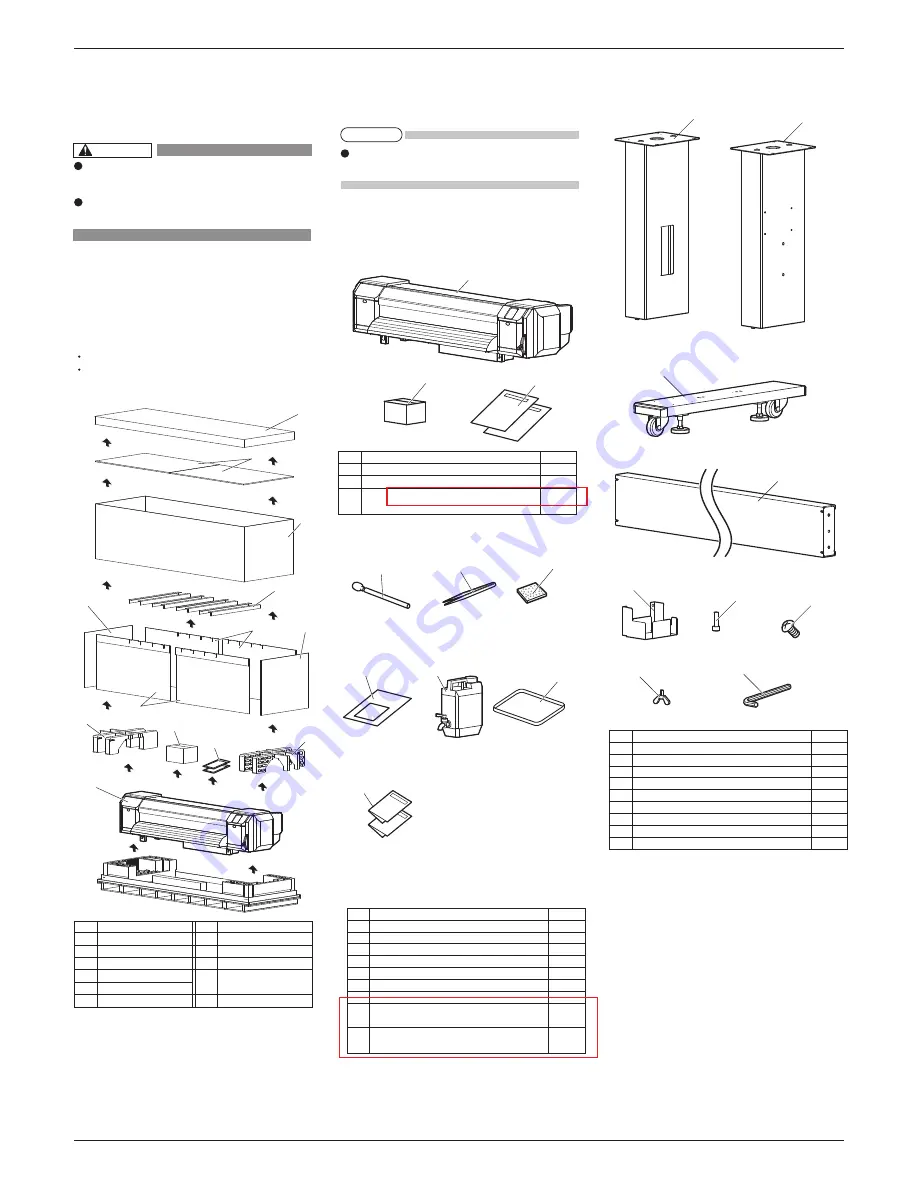
1 Unpacking boxes

Procedures for unpacking boxes are explained.

This product is packaged separately, divided into the 

printer and the stand.

1.1 Unpacking printer box

Unpack the printer box in accordance with the following steps.

1. Carry the box to where you will unpack it. 

2. Remove the bands.

3. Open the box and take out the following components.

Installation Manual (this manual)

Accessory box

1.2 Unpacking stand box

Unpack the stand box in accordance with the following steps.

1. Carry the box to where you will unpack it.
2. Open the box and take out the components.

2 Confirming bundled items

After unpacking, please confirm that the product has 

not damaged and no components are missing.

2.1  Items in the printer box


2.2  Items in the accessory box

2.3    Items in the stand box

 (this manual)

 No.

Name


No.

Name


   1

Top cover

7

Cushion (Left)

   2

Top board

8

Cushion (Right)

   3

Outer board

9

Accessory box

   4

Center board

10

Installation Manual 

   5

Side board A

   6

Side board B

11

Printer main body


No.                                    Name                                 Q'ty

  1 

Clean stick 

10

 2 

Forceps 

1

  3 

Flushing box sponge 

10

  4 

Paper towel 

5

  5 

Waste fluid tank 

1

 6 

Tray 

1

 7 

Documentation 

1

No.                                    Name                                 Q'ty

  1 

Printer main body 

1 set

  2 

Accessory box 

1

  3 

Installation Manual (this manual)

No.                                   Name                                 Q'ty

1

Leg part (Right)

1

2

Leg part (Left)

1

3

Base parts

2

4

Connector bar

1

5

Waste fluid tank holder

1

6

Hexagon socket head cap screws

8

7

Waste fluid tank holder fixing screws

4

8

Butterfly screws

8

9

Hexagonal wrench

1

CAUTION

Make sure to unpack this product with 

four persons or more.
While taking out the printer from the box, 

make sure to remove the vinyl sheet. 

     If any items are damaged or missing, contact 

your local Océ representative.

NOTE

Содержание CS9360

Страница 1: ...installation are shown below There are instructions for each section beginning on the next page 7 8 Installing the ink cartridge 10 Checking the printing condition Setting the display language and uni...

Страница 2: ...are missing 2 1 Items in the printer box 2 2 Items in the accessory box 2 3 Items in the stand box this manual No Name No Name 1 Top cover 7 Cushion Left 2 Top board 8 Cushion Right 3 Outer board 9 Ac...

Страница 3: ...it on the stand 3 Remove the two transfer stays and fasten the printer to the stand using eight butterfly screws 4 Follow the procedure below to attach the waste fluid tank a Place the waste fluid tan...

Страница 4: ...ossibility that the print quality will be affected Places where temperature or humidity may rapidly change even though within the required conditions Places that receive direct sunlight increased illu...

Страница 5: ...ation panel and turn the power OFF 2 Press the Power key on the Operation panel and turn the power ON Language English is displayed on the Operation panel 4 Press or key on the Operation panel to sele...

Страница 6: ...e inserting the ink cartridge Keep mark of the ink cartridge facing up and insert towards the printer side Insert the ink cartridge all the way to the end of the slot When an ink cartridge is installe...

Страница 7: ...plete Start Ink Charge E is displayed on the operation panel 3 Press the Enter key on the operation panel Insert Cleaning cart is displayed on the operation panel 4 Take out the cleaning cartridge fro...

Страница 8: ...l Insert Cleaning cart is displayed on the operation panel 3 Take out the cleaning fluid packs 4 pieces and smart chip cards 4pieces from the bag 4 Install the cleaning fluid pack and smart chip card...

Страница 9: ...tance by turning the flanges of the roll media holders so that the media is not slack or slanted No Name 1 Roll media holder Left No Name 2 Fixing lever No Name 1 Roll media holder Left No Name 2 Roll...

Страница 10: ...l The user type setting is set Media initial is displayed on the operation panel and media initialization starts After media initial operation is complete Ready to Print is displayed on the operation...

Страница 11: ...CS9360 INSTALLATION MANUAL 11 AP 40810_1 0 MEMO...

Страница 12: ...CS9360 INSTALLATION MANUAL Oc Technologies B V St Urbanusweg 43 Venlo The Netherlands P O Box 101 NL 5900 MA Venlo...

Отзывы: