background image

Océ Quick Start 


Page  15 of  24


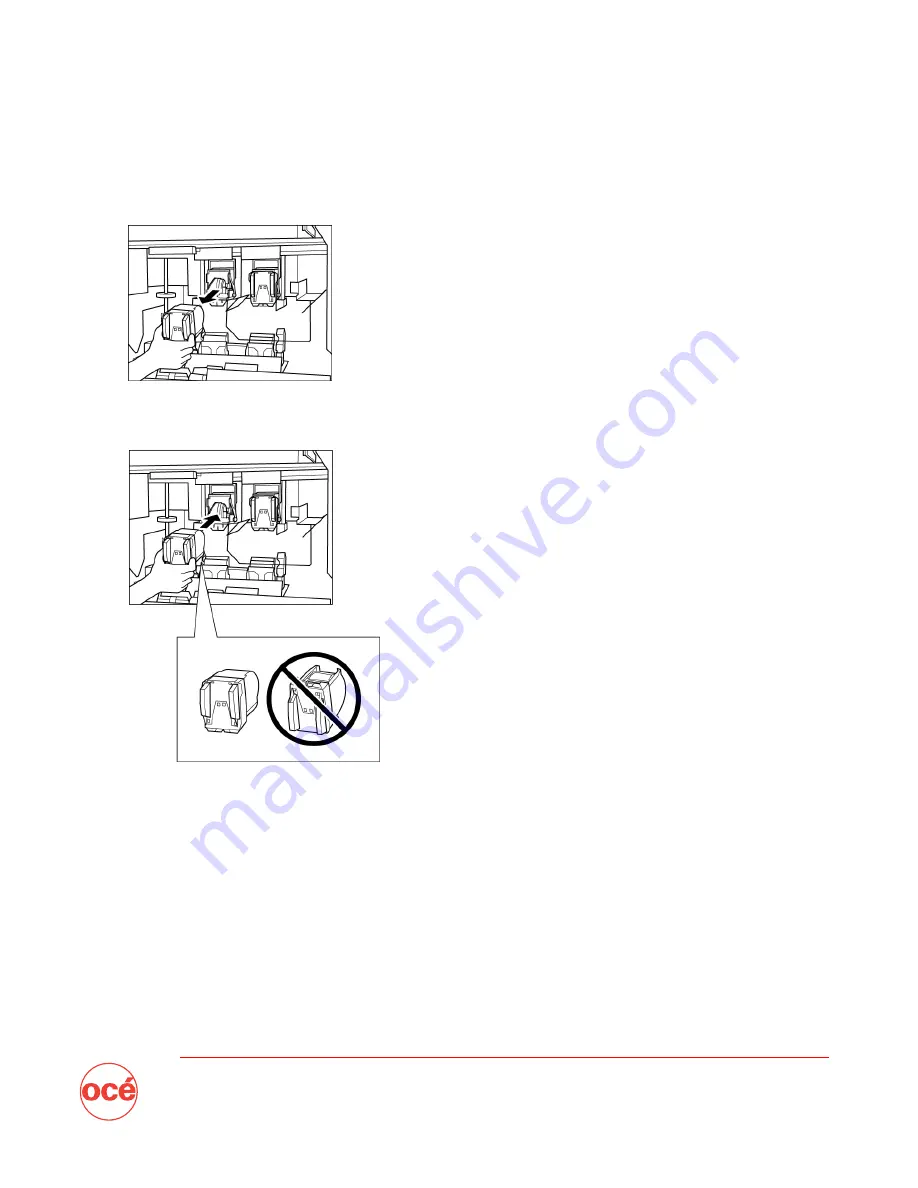
2. 

Remove the empty cartridge. 

• 

The SD-501 has 2 staple cartridges. Make sure you remove the empty one. 

• 

Hold both left and right sides of the staple cartridge and pull the cartridge forward. 


3. 

Put in the new cartridge. 

• 

Check that the top side of the staple cartridge is up. 


4. 

Close the left side door. 

Содержание CS620 Pro

Страница 1: ...Oc CS620 CS650 Pro Quick Start How to execute the Quick Start program at the customer This guideline describes the activities a field engineer needs to execute to deliver the Oc CS620 CS650 Pro Quick...

Страница 2: ...included in the implementation of the Oc CS620 CS650 Pro system Its objective is that after the installation the customer is able to perform the basic operations on the Oc CS620 CS650 Pro system For...

Страница 3: ...Quick Start course This Quick Start of the Oc CS620 CS650 Pro system consists of the following subjects 1 Introduction to the system 2 Turn On and Off the engine 3 Load paper 4 Re fill staples 5 Re f...

Страница 4: ...kit and post inserter a high capacity stacker a booklet maker 2 Turn On and Off the engine The machine has 2 power switches the main power switch used mainly by the service engineer the sub power swi...

Страница 5: ...Oc Quick Start Page 4 of 24 To turn Off the engine 1 Set the sub power button to Note the main power switch should remain turned on...

Страница 6: ...esired position See the size indication on the bottom plate of the tray to determine the position of the side guide plate Push down the lock lever firmly until it clicks in position to fix the side gu...

Страница 7: ...he right side of the tray then align the rear stopper to the paper Do not load more than 500 sheets 80 g m or above the limit indicated on the side guide plates 5 When the paper is positioned properly...

Страница 8: ...ion of the paper guides and rear stopper Turn the four paper guide knobs and two rear stopper knobs counterclockwise to loosen them Move the upper part of the two paper guides to the appropriate posit...

Страница 9: ...on according to the size indication on the bottom plate then turn the two rear stopper knobs clockwise to fix the rear stopper 3 Press the green paper loading button once then load the paper into the...

Страница 10: ...ithdraw tray 4 or 5 2 Adjust the position of the side paper guides Turn the four paper guide knobs counterclockwise to loosen them While you push the paper guide lock release lever move the lateral gu...

Страница 11: ...t the left side edge is aligned with the left side lining of the tray While you push the guide lock release lever move the rear stopper to the edge of the paper 4 When the paper is positioned properly...

Страница 12: ...4 Re fill staples 4 1 Staple finisher FS 503 CS650 Pro When the staple cartridge of the finisher is empty the Machine status screen displays a message and the Staple Cartridge Supply indicator lights...

Страница 13: ...aple cartridge Pull down the handle of the staple cartridge to draw it downward 4 Set the staple roll into the staple cartridge Open the staple cartridge cover and put the staple roll into the cartrid...

Страница 14: ...Oc Quick Start Page 13 of 24 5 Place the staple cartridge back Push up and secure the cartridge in its position 6 Push the stapler unit in the machine...

Страница 15: ...2 Booklet maker SD 501 CS650 Pro When the staple cartridge of the SD 501 is empty the Machine status screen displays a message and the Staple Cartridge Supply indicator lights red 1 Open the left sid...

Страница 16: ...SD 501 has 2 staple cartridges Make sure you remove the empty one Hold both left and right sides of the staple cartridge and pull the cartridge forward 3 Put in the new cartridge Check that the top s...

Страница 17: ...of 24 4 3 Booklet finisher FS 607 CS620 When the staple cartridge of the finisher FS 607 is empty the Machine status screen displays a message and the Staple Cartridge Supply indicator lights red 1 O...

Страница 18: ...f 24 2 Pull out the stacker unit by holding the stacker unit handle 3 Pull up the cartridge housing then remove it while you slide the cartridge along the stapler rail 4 Remove the empty cartridge fro...

Страница 19: ...h case and housing Remove the lock tape from the cartridge Do not remove the staples that were still in the housing 6 Insert the cartridge housing while you slide it along the stapler rail Push down t...

Страница 20: ...of 24 5 Re fill toner When toner supply is low the Machine status screen displays a message and the Toner indicator will light 1 Open the toner access door 2 Unlock and open the toner bottle cover of...

Страница 21: ...ully withdraw the toner bottle straightforward to remove the bottle 5 Loosen the toner in the new bottle Tap both top and bottom of the new toner bottle on a solid surface at least five times Then sha...

Страница 22: ...osition the Up arrow mark at the top and align the two hollow parts of the toner bottle with the salients on the bottle entrance Fully insert the new toner bottle until it locks in place 8 Close and l...

Страница 23: ...ment Feeder face up or on the glass plate face down 2 Select the copy settings as desired Original setting Separate scan Color mode Zoom Application Quality adjust ment Output appli cation Simplex Dup...

Страница 24: ...job On the control panel click the Scan function button Explain shortly what the different scanning methods are Scan to E mail HDD FTP SMB GROUP or Queue If one of the options will be used show how t...

Страница 25: ...e machine In the customer training the end user operator and administrator will learn how to execute advanced copy print and scan jobs Also accounting will be covered and how to calibrate the engine I...

Отзывы: