Scanner maintenance
41
Clean the scanning area
You can clean the scanning area occasionally to remove residual paper dust. To
access the scanning area, you first remove the original pressure platen.
▼
To clean the scanning area
1
Switch the power off and disconnect the power cord.
2
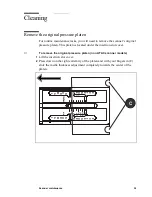
Remove the original pressure platen as described.
3
Carefully wipe clean the glass plate with a cleaning solution suitable for
computer peripherals.
4
Put the guide plate back in its operating position as described.
▼
To clean the bottom side of the glass plate
1
Switch the power off and disconnect the power cord.
2
Remove the original pressure platen as described.
3
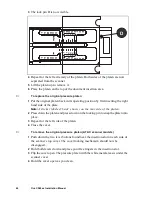
Locate a tab at each extremity of the glass plate.
4
Lift the tab upwards. The glass plate swings up, and its bottom side is
accessible.
5
Clean the bottom side with a lint-free cloth.
Attention:
Do not spray any solution on this area, or allow any liquid to
reach the internal optics. Do not let any object fall inside this area.
6
Holding the tab, push the glass plate back into position.
7
Replace the original pressure platen as described.
Replace the white reference platen
After long periods of continuous scanning, we recommend that you change the
white reference platen in order to maintain consistently high quality scans.
▼
To replace the white reference plate
1
Switch the power off and disconnect the power cord.
2
Remove the original pressure platen as described.
3
With a screwdriver, remove the two screws located at the extremity. Take care
not to lose the two small washers.
4
Remove the angle bracket.
5
Turn over the original pressure platen.
6
Gently slide the white reference plate horizontally out of its lodging.


