OBID CPR50.10-E Скачать руководство пользователя страница 18

OBID

® 

classic-pro


Installation 

ID CPR50.10-E/-RE 


FEIG ELECTRONIC GmbH 

Page 18 of 31 

M90701-4de-ID-B


N

 G

 L

 I

 S 

H


Note 

 Copyright 2009-2012 by 

FEIG ELECTRONIC GmbH 
Lange Strasse 4 
D-35781 Weilburg 
Tel.: +49 6471 3109-0 

http://www.feig.de


With the edition of this document, all previous editions become void. Indications made in this manual may be 

changed without previous notice. 

Copying of this document and giving it to others and the use or communication of the contents thereof are 

forbidden without express authority. Offenders are liable to the payment of damages. All rights are reserved 

in the event of the grant of a patent or the registration of a utility model or design. 

Composition of the information in this document has been done to the best of our knowledge. FEIG 

ELECTRONIC GmbH does not guarantee the correctness and completeness of the details given in this 

manual and may not be held liable for damages ensuing from incorrect or incomplete information. Since, 

despite all our efforts, errors may not be completely avoided, we are always grateful for your useful tips. 

The instructions given in this manual are based on advantageous boundary conditions. FEIG ELECTRONIC 

GmbH does not give any guarantee promise for perfect function in cross environments and does not give 

any guaranty for the functionality of the complete system which incorporates the subject of this document. 

FEIG ELECTRONIC call explicit attention that devices which are subject of this document are not designed 

with components and testing methods for a level of reliability suitable for use in or in connection with surgical 

implants or as critical components in any life support systems whose failure to perform can reasonably be 

expected to cause significant injury to a human. To avoid damage, injury, or death, the user or application 

designer must take reasonably prudent steps to protect against system failures. 

FEIG ELECTRONIC GmbH assumes no responsibility for the use of any information contained in this 

document and makes no representation that they free of patent infringement. FEIG ELECTRONIC GmbH 

does not convey any license under its patent rights nor the rights of others. 


OBID

®

 and OBID i-scan

®

 is a registered trademark of FEIG ELECTRONIC GmbH. 

All brand names, trademarks or logos are property of their respective owners. 
 

Содержание CPR50.10-E

Страница 1: ...auptdokumentfinal public B 2012 08 22 M90701 4de ID B ID CPR50 10 E RE RFID Reader for ISO IEC14443 A B NFC and ISO IEC15693 with Ethernet Interface RFID Access Control Terminal with Ethernet Interfac...

Страница 2: ...OBID classic pro Montage ID CPR50 10 E RE FEIG ELECTRONIC GmbH Seite 2 von 31 M90701 4de ID B D E U T S C H deutsche Version ab Seite 3 english version from page 18 E N G L I S H...

Страница 3: ...ollst ndig vermeiden lassen sind wir f r Hinweise jederzeit dankbar Die in diesem Dokument gemachten Installationsempfehlungen gehen von g nstigsten Rahmenbedingun gen aus FEIG ELECTRONIC GmbH bernimm...

Страница 4: ...uss 7 3 1 Anschluss des Adapter Board 9 3 1 1 LSA Anschluss X2 f r TCP IP Verbindung 9 3 1 2 Anschluss des internen Relais nur ID CPR50 10 RE 10 3 1 3 Anschluss ber PoE Netzteil 10 3 1 4 Anschluss ein...

Страница 5: ...n mit einschl giger Ausbildung erfolgen Alle Arbeiten am Ger t und dessen Aufstellung m ssen in bereinstimmung mit den nationalen Bestimmungen und den rtlichen Vorschriften durchgef hrt werden Bei Arb...

Страница 6: ...berteil mit Leserelektronik 1 x Aufputzadapter 1 x Anschlussplatine 1 x Linsenschraube Torx 3 x 8 mm Torx T10 zum Verschlie en des Geh uses 2 x Schneidschraube Senkkopf 3 2 x 15 mm zur Montage von Geh...

Страница 7: ...l che sollte die Montage mit dem Aufputzadapter erfol gen damit ein ausreichender Abstand zwischen Leser und Metalloberfl che hergestellt ist Beim Einbau des Readers in einen Metallrahmen ist darauf z...

Страница 8: ...erteil auf der Wand verschrauben Montagerichtung TOP beachten siehe Kapitel 3 Montage Geh useoberteil gerade auf das Geh useunterteil aufstecken und einrasten Stiftleiste X1 der Leserelektronik sauber...

Страница 9: ...Anschluss X2 F r das Auflegen der CAT 5 Kabel auf der LSA Anschlussleiste ist ein entspre chendes LSA Auflegewerkzeug punch down tool zu verwenden Es gibt bei CAT 5 zwei Belegungen EIA TIA T568A und E...

Страница 10: ...50 10 RE Tabelle 2 zeigt die Anschlussbelegung des internen Relais X3 ID CPR50 10 RE 3 internes Relais COM 4 internes Relais NO Tabelle 2 Anschlussbelegung des internen Relais 3 1 3 Anschluss ber PoE...

Страница 11: ...elle 3 Anschluss f r externe Spannungsversorgung an X3 HINWEIS Die Versorgung ber ein externes Netzteil ist nicht notwendig wenn der Reader ber ein PoE Netzteil versorgt wird in dem Fall bleiben die A...

Страница 12: ...ais COM 9 Relais NC Tabelle 4 Anschlussbelegung des I O Extension Board Die digitalen Eing nge IN1 und IN2 d rfen nur gegen Klemme GND geschaltet werden Eine Beschaltung mit Fremdspannung kann zur Zer...

Страница 13: ...lative Luftfeuchte 95 nicht betauend Antenne intern ca 70 x 70 mm Betriebsfrequenz 13 56 MHz Sendeleistung 250 mW 2 dB RF Interface ISO14443 A ISO14443 B NFC 1 ISO15693 Unterst tzte Transpondertypen z...

Страница 14: ...D E U T S C H 4 1 Abmessungen X1 1 84 2 mm 84 2 mm 60 0 mm 60 0 mm 77 7 mm 56 8 mm 60 0 mm 28 4 mm 28 4 mm 77 7 mm Abbildung 10 Unterputzgeh use Befestigungsmasse Abbildung 11 Aufputzadapter Befestig...

Страница 15: ...SS 210 RSS 212 EMV EN 301 489 Sicherheit Niederspannung Human Exposure EN 60950 EN 50364 Umwelt RoHS 2002 95 EC WEEE 2002 96 EC 5 1 Europa CE Die Funkanlage entspricht bei bestimmungsgem er Verwendung...

Страница 16: ...iehe Kapitel 3 Montage und Anschluss 2 Einen 2 mm Jumper auf die Steckkontakte B2 stecken und den Reader wieder mit Spannung versorgen Geh useoberteil wieder auf die Adapter Platine stecken 3 Ein alte...

Страница 17: ...OBID classic pro Montage ID CPR50 10 E RE FEIG ELECTRONIC GmbH Seite 17 von 31 M90701 4de ID B D E U T S C H...

Страница 18: ...your useful tips The instructions given in this manual are based on advantageous boundary conditions FEIG ELECTRONIC GmbH does not give any guarantee promise for perfect function in cross environment...

Страница 19: ...X2 for TCP IP Interface 24 9 1 2 Connection of the internal relay ID CPR50 10 RE only 25 9 1 3 Connection with PoE Supply 25 9 1 4 Connection with External Powered Supply 26 9 1 5 Connection of the ex...

Страница 20: ...nd local electrical codes When working on devices the valid safety regulations must be observed Special advice for carriers of cardiac pacemakers Although this device doesn t exceed the valid limits f...

Страница 21: ...rx 3 x 8 mm Torx T10 for closing the housing 2 x Thread cutting screws 3 2 x 15 mm for mounting the surface adapter 2 x Thread cutting screw 3 2 x 25 mm for wall mounting 1 x Installation instruction...

Страница 22: ...omes necessary the surface adapter can be em ployed in order to keep the minimal distance If the device is installed in a metal frame it must be ensured that a minimum distance of 25mm is observed to...

Страница 23: ...crew bottom part of casing to selected surface Take care about the mounting direction TOP Put the casing upper part straight onto its bottom part and snap it in see Fig 4 Insert the pin board X1 of th...

Страница 24: ...terminal connector X2 For applying the CAT5 cable on to the LSA connector a special LSA punch down tool must be used There are existing two different ways for the connection of a CAT5 cable EIA TIA T...

Страница 25: ...lay ID CPR50 10 RE only Table 2 shows the connection of the internal relay X3 ID CPR50 10 RE 3 internal relay COM 4 internal relay NO Table 2 Terminal assignment of the internal relay 9 1 3 Connection...

Страница 26: ...rnal 24 V DC 2 External GND Table 3 Connection for the external power supply on X3 NOTICE The power supply via an external power supply is not necessary if the reader is powered via PoE power supply I...

Страница 27: ...ay COM 9 Relay NC Table 4 Connection assignment of the I O Extension Board The digital inputs IN1 and IN2 must to be connected to the internal ground connector GND Any connection to external voltage m...

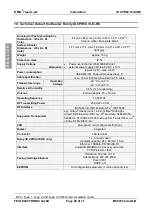
Страница 28: ...ration Storage 20 C to 55 C 40 C to 85 C Relative air humidity 95 non condensing Antenna internal approx 70 x 70 mm Operating frequency 13 56 MHz RF Transmitting Power 250 mW 2 dB RF Interface ISO1444...

Страница 29: ...90701 4de ID B E N G L I S H 10 1 Dimensions X1 1 84 2 mm 84 2 mm 60 0 mm 60 0 mm 77 7 mm 56 8 mm 60 0 mm 28 4 mm 28 4 mm 77 7 mm Fig 10 Concealed casing Fixing dimensions Fig 11 Surface adapter dimen...

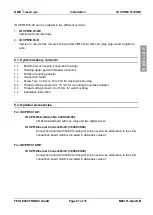
Страница 30: ...ns not expressly approved by the party responsible for compliance could void the user s authority to operate this equipment NOTE This equipment has been tested and found to comply with the limits for...

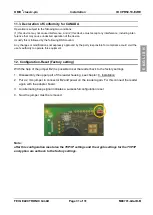
Страница 31: ...e party responsible for compliance could void the user s authority to operate this equipment 12 Configuration Reset Factory setting With the help of the jumper B2 it is possible to set the reader back...

Отзывы: