background image


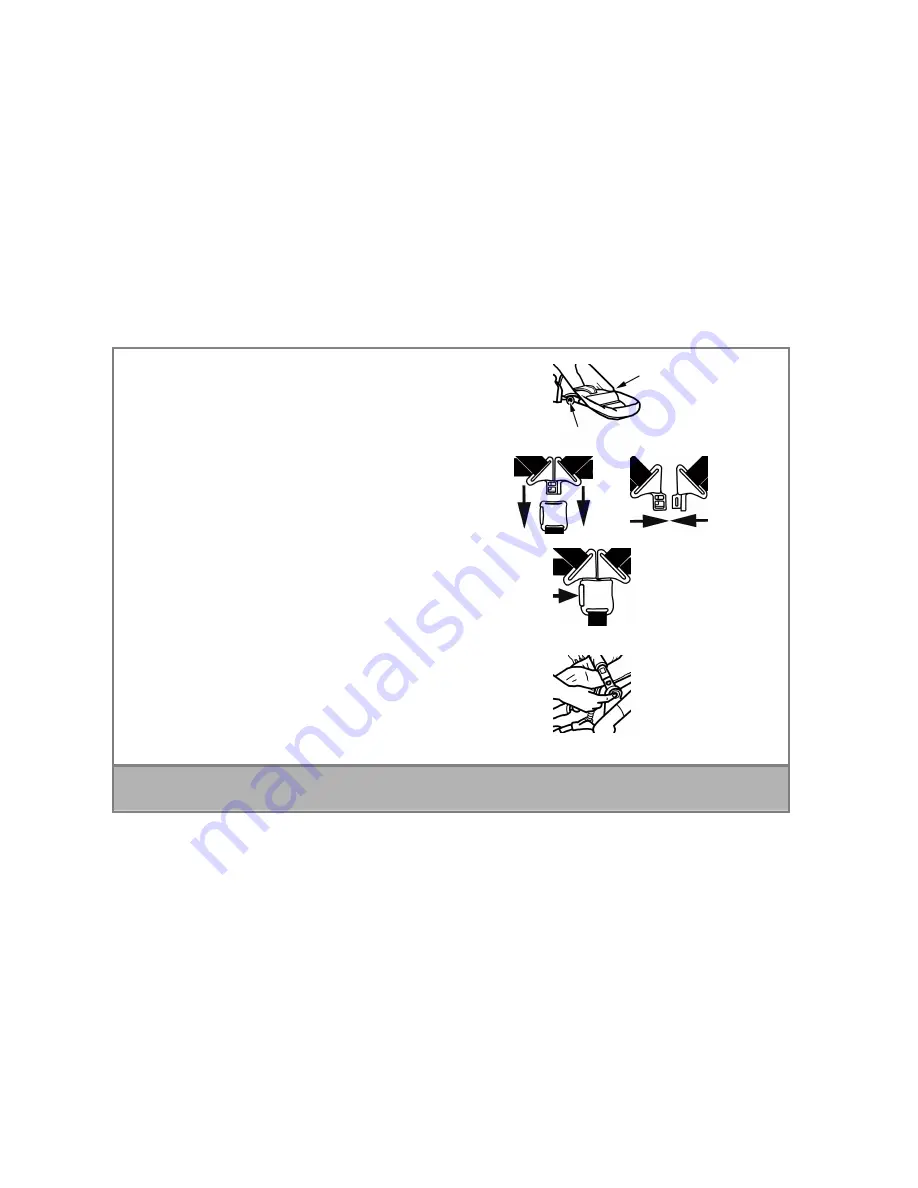
8. Adjusting the leg rest 

 
To adjust the leg rest, press in the buttons on both sides and then adjust the 
height. 
Let go of the buttons again so that the leg rest clicks into place. 


9. Fastening the harness 

 
To fasten the harness, push the two plastic sections (1) into the catch (2) 
until they engage. 
Adjust the harness to a setting where the baby is held in the correct position. 


10. Unfastening the harness 

 
To unfasten the harness, press the middle button (offset right/left).  
The harness will now open.  
 

CAUTION: 

Always use the shoulder harness and lap belt together. 


11. Adjusting the seat unit    

 
To adjust the seat unit, press and hold down the catches on both sides of the 
seat unit and adjust the height of the seat. When you have reached the 
required position, let go of the catches to allow the seat to remain in that 
position. 


Содержание Condor 4s

Страница 1: ...NB Keep these instructions for future reference Instructions for use Obaby Limited Unit I Kirton Business Park Cleatham Road Kirton in Lindsey DN21 4JR North Lincolnshire UK ...

Страница 2: ...ty of the product it is necessary to oil the moving parts or tighten the rivets as and when required NB Please do not use any product for lubrication other than silicone oil or silicone spray lubricant Regular care and upkeep have a major part to play in maintaining the safety and value of the product Exposure to such things as salt in the air road gritting salt or acid rain will encourage the ons...

Страница 3: ...modifications to the product which compromise its safety Keep this product away from fire and other sources of heat Customer complaints No claims may be made for natural wear and tear or for damage caused by undue demands on the product or by exceeding the permissible load No claims may be made for damage caused by improper use No claims may be made for damage caused by incorrect assembly or opera...

Страница 4: ... until it engages To remove the wheels press the button 1 to release the wheels The wheels can then be removed from the axle To mount the front wheels push the wheels into the fittings until they click into place To remove the front wheels press the buttons on the wheel fittings and pull the wheels out 3 Wheel locking and swivel settings Push the lever down to lock the wheels Push the lever downwa...

Страница 5: ...cing it on the frame until it clicks into place To convert the seat press the buttons on both adapters and lift up the seat 6 Fitting and removing the guard rail Fit the guard rail by inserting it in the plastic mounts on both sides To remove the guard rail from the pushchair press in the buttons on both sides and pull the guard rail off away from the pushchair 5 ...

Страница 6: ...lt through the opening in the seat liner Fix the tab on the head end of the seat liner with the Velcro fastening on the backrest Sun vizor There are three Velcro fastenings and two snap fasteners on the sun vizor and cover Fasten them together Guard rail cover Fit the cover around the guard rail and secure it in place with the Velcro fastening 6 ...

Страница 7: ...ness to a setting where the baby is held in the correct position 10 Unfastening the harness To unfasten the harness press the middle button offset right left The harness will now open CAUTION Always use the shoulder harness and lap belt together 11 Adjusting the seat unit To adjust the seat unit press and hold down the catches on both sides of the seat unit and adjust the height of the seat When y...

Страница 8: ...position 21 Folding the pushchair To fold the pushchair bring the handle to its lowest position as described in point 19 holding the button 1 down as you do so Now rotate the knob 2 to the left and push the handle down Now you can fold up the pushchair Note To unfold the pushchair follow the instructions in point 1 Opening the pushchair CAUTION Ensure that all the catches are engaged before use 8 ...

Отзывы: