background image

7

INSTALLATION

Leveling Instructions

INSTALLATION

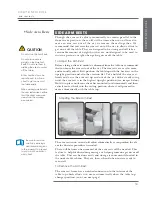
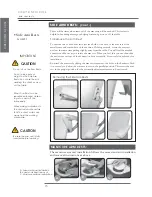
To Adjust the Leveler Feet:


1.  Place the table in the location where you plan to use it.


2.  Rock the table to determine if it is level with the floor. If the table  


    rocks back and forth at all, the foot that clears the floor when you rock  


  the table will need adjustment.

 3. 

Adjust 

the 

Leveler Foot by first loosening the locking nut found just  


  above the rubber Leveler Foot with the open-end wrench.


4.  Lower the adjustable rubber Leveler Foot until it meets the floor  


  snugly.  Tighten the locking nut against the wooden leg of the table  


  with the open-end wrench to fix the Leveler Foot in position.


5.  Rock the table again to be sure adjustments have stabilized the table.  


  If necessary make any additional adjustments in the same way.

Locking Nut

Tighten Locking Nut

Locking 

Nut

Содержание Celesta Lift

Страница 1: ...Lift Celesta PerformaLift AVAILABLE WITH RECTANGULAR FLAT TOP ROUND CORNER FLAT TOP BACKREST TOP FLEX TOP SHOWN HERE I N S T R U C T I O N M A N U A L ELECTRIC LIFT TILT MANUAL TOP ELECTRIC LIFT TILT...

Страница 2: ...n this document is subject to change without notice and should not be construed as a commitment by OAKWORKS Inc OAKWORKS Inc assumes no responsibility for any errors that may appear in this document n...

Страница 3: ...ns Celesta Lift Celesta PerformaLift pg 9 Hand Control Operations Celesta Deluxe pg 10 11 Manual Top Operations Celesta Lift Celesta PerformaLift pg 12 Grounding pg 13 Section IV Accessories Side Arm...

Страница 4: ...labels warns that during transport there should be no stacking of containers This symbol when used in this manual or on product labels indicates that the product should be protected from moisture The...

Страница 5: ...been dropped or damaged or dropped into water Contact Oakworks Customer Service before use 5 Keep the cord away from heated surfaces 6 Never drop or insert any object into any opening 7 Do not use ou...

Страница 6: ...holstery TerraTouch UltraTouch Published weight and height may differ slightly due to options chosen natural material variations and padding density For electrical specs see Specifications Chart 3 PRO...

Страница 7: ...gth 72 183 cm Top Manually Controlled Access Design Top Padding Plush 4 Aero Cel or 6 Aero Cel Upholstery TerraTouch UltraTouch Published weight and height may differ slightly due to options chosen na...

Страница 8: ...rraTouch standard Ultratouch Published weight and height may differ slightly due to options chosen natural material variations and padding density For electrical specs see Specifications Chart 5 PRODU...

Страница 9: ...reate a tripping hazard and where the controllers are located to you liking and are conveniently accessible LEVELING INSTRUCTIONS If Table Will Not Sit Flat on the Floor The Celesta and Performance Li...

Страница 10: ...stment 3 Adjust the Leveler Foot by first loosening the locking nut found just above the rubber Leveler Foot with the open end wrench 4 Lower the adjustable rubber Leveler Foot until it meets the floo...

Страница 11: ...ly adjusted on the Celesta Lift and PerformaLift The Celesta Deluxe features a top that is operated electrically by a hand control FOOT CONTROL OPERATIONS Foot Control Operate the foot control as show...

Страница 12: ...n Follow the directions below to access these functions Height Controls Tilt Controls HAND CONTROL OPERATIONS Right Side Tilt Control activates tilt up to 15 positioning stops when table is level pres...

Страница 13: ...CAUTION Do not leave clients unattended when table is tilted near its limits Celesta Deluxe Back Rest Controls Leg Rest Controls Backrest Control activates backrest down to level position Backrest Con...

Страница 14: ...activates tilt up to 15 positioning stops when table is level press again for complete reverse Left Side Tilt Control activates tilt up to 15 positioning stops when table is level press again for comp...

Страница 15: ...leg rest as you lift Leg Rest Raises Leg Rest up to 55 Leg Rest at total recline Celesta Lift Celesta PerformaLift flex top CAUTION Do not release leg rest without supporting the leg rest and client T...

Страница 16: ...he product is connected to an outlet having the same configuration as the plug Correct Implementation Incorrect Implementation DANGER Improper connection of the equipment grounding conductor can resul...

Страница 17: ...resting position where it will proceed to move automatically with the table top The arm rest is now set and will adjust automatically as you position the cli ent for whatever procedure is needed Ther...

Страница 18: ...and allow the arm rest to rest in the parallel position This resets the arm rest in the proper position for the automatic adjustment feature to be activated Removing the Side Arm Rests A hand soak bow...

Страница 19: ...and angle and then locking the cam locks into that position To remove the QuickLock Face Rest just pull the frame from the outlets in the end of the table until it comes free When replacing the Quick...

Страница 20: ...faulty controller Unplug the power cable from the wall outlet Make sure that all male and female connectors are firmly pushed into each other Even a slight misconnection can cause a possible malfuncti...

Страница 21: ...heat Very cold temperatures can make your fabric prone to cracking Very high temperatures can cause the fabric to stretch permanently Avoid exposing your products to direct sunlight for extended peri...

Страница 22: ...ltage AC Power Cord Plug 5097 11 120v 60 Hz 3 prong grounded hospital grade North America 5097 3 220v 50 Hz Continental Plug Europe 5097 4 220v 50 Hz Swiss plug Switzerland 5097 2 220v 50 Hz British p...

Страница 23: ...cle 24 VDC 1 5 amps 9 0 amps Class I Equipment Type B Applied Part IPX0 Continuous Operation 10 Duty Cycle Length Deluxe Lift Rectangular Rounded Corner Back Rest Top Flextop Width Celesta Deluxe Cele...

Отзывы: