background image

The Schaeffer panel database uses 6.3mm diameter holes which are designed for Cliplite LED 
lenses available from Maplin in the UK. Other LED lenses may be used with a suitable sized 
hole, although you may have alter the procedure below slightly to suit your chosen clips.

The LEDs are able to be soldered directly into the board. Preform the LED legs using a pair of 
fine nosed pliers, bending the leads at right angles to the body of the LED at a distance of 
around 8mm from the base of the LED’s package. When the LED is in its final placement the 
bend should be directly aligned with the holes in the PCB. Now poke the LED through the 
correct holes on the printed circuit board from the underside of the board but 

do not solder 

them yet.

Make sure you get the all the LEDs connected the right way if you are not using a bipolar 
LEDs. Pin 1, which is the square pad on this board, must be connected to the anode of the 
LED. The cathode of the LED is normally, but not always, marked with a flattened edge on 
the base of the package. It doesn’t matter which lead goes into which hole of the LED pad if 
you have used bipolar LEDs since these can go in any way.

The bicolour LED may go in any way around but I normally try to make sure that positive 
output voltages make the LED go red.

Fit the LED clips if you have them at this point to the panel. Now move the board into place 
on the front panel. The LEDs dangling loose should be carefully aligned with the LED clips in 
the panel. It is a little bit fiddly, but because you haven’t soldered the LEDs there is a good 
deal of slack so nothing will get damaged.

Once the LEDs are in place you can then attach the pots to the panel. You need to add the 
washer between the outside of the panel and the final nut. Again, do not over tighten and be 
careful not to scratch your panel.

You can now solder the LED’s legs to connect with the solder pads. Snip off any excess lead 
length from the two LEDs.

Note that the pot shafts of the two pots will not need cutting to size. They are already at the 
correct length.

Connections

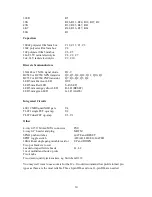
The power socket is 0.156” Molex/MTA 4-way header. Friction lock types are recommended. 
This system is compatible with MOTM and standard Oakley Modular systems.

Power

Pin number

+15V

1

Module GND 2
Earth/SCR

3

-15V

4

14

Содержание MOTM-820

Страница 1: ...Oakley Sound Systems Oakley Modular Series OMS 820 issue 2 The MOTM 820 Companion Module User s Guide V2 01 Tony Allgood B Eng Oakley Sound Systems CARLISLE CA4 9QR United Kingdom 1...

Страница 2: ...2...

Страница 3: ...shape of the waveform by introducing the usual non linearites of the exponential rise and decay Top frequency is 1KHz or so whilst the lowest frequency is so low I got bored waiting for one cycle 2 E...

Страница 4: ...ules need to come apart at anytime The wires from the connectors are simply soldered to special key locations on the MOTM 820 No component changes are required to the MOTM 820 at all Inserting a jack...

Страница 5: ...tput The U1 pins 5 6 7 op amp performs two important jobs Firstly it steps down the 15V swings to a more reasonable 7 5 volts This gives us the peak charging voltage for the MOTM 820 s input This is n...

Страница 6: ...positive gate arrives Q9 turns on and pulls its collector down to ground or 0V This inverse version of the applied gate signal is sent to two destinations One is another transistor Q12 This is config...

Страница 7: ...de which we have talked about already Also monitoring the BUFFERED voltage is a comparator based around U2 When the voltage exceeds 5V or so the comparator s output goes from 0V to 15V With the AD R s...

Страница 8: ...pots have the same pin spacing Not a problem of course if you are not fitting them to the board In the UK Farnell CPC and Rapid Electronics sell the Spectrol pots for a reasonable price For the resis...

Страница 9: ...reen for no particular reason other than to look like a traffic light There are five switches on this board The GATE and RESET switches are push switches These are sometimes designated SPNO single pol...

Страница 10: ...m orange yellow LED R LD RESET LED 5mm green LED G LD GATE Integrated Circuits 4001 CMOS quad NOR gate U4 TL071 single FET op amp U2 TL072 dual FET op amp U3 U1 Other 4 way 0 156 Molex MTA connector P...

Страница 11: ...metimes people like to substitute parts in place of my own recommendations Feel free to do this but remember that there is normally a good reason why I have selected that particular part If you do fin...

Страница 12: ...lone Now solder the middle pin first then the other two once the middle one has cooled solid Sometimes transistors come with the middle leg preformed away from the other two This is all right the part...

Страница 13: ...f Fit only one nut at this stage to hold the pot to the pot bracket Make sure the pot sits more or less centrally in the pot bracket with legs pointing downwards Tighten the nut up carefully being car...

Страница 14: ...t matter which lead goes into which hole of the LED pad if you have used bipolar LEDs since these can go in any way The bicolour LED may go in any way around but I normally try to make sure that posi...

Страница 15: ...onnected at the PCB end Use a bit of heatshrink tube to keep the end from fraying The GATE socket s signal lug goes to the pad marked GATE And the RESET socket s signal lug goes to the pad marked RESE...

Страница 16: ...try again I like to use as many different colour wires as possible It makes wiring easier and looks great Each wire now needs to be soldered onto key points on the MOTM 820 PCB or sockets Trim back th...

Страница 17: ...nd GATED mode Set the UP DN pot to level 7 Now press the GATE button and keep your finger there Does the GATE and SET LEDs light up immediately Does the OUT LED quickly rise in brightness Now let go o...

Страница 18: ...d and fixed within one hour The minimum charge is 20GBP plus return postage costs Your comments and questions are important to both Oakley Sound and Oakley Modular In the first instance please use the...

Отзывы: