

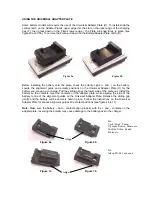

CHARGING THE BATTERY
As soon as the battery is properly connected, charging begins. The green Charging Status Indicator (A) will
blink as the battery is being charged. The battery is fully charged when the Charging Status Indicator stops
blinking and lights up permanently. You may remove the battery for use once the green light is shown;
however, it is recommended that you leave the battery on the charger for another 30 minutes to ensure a
full, or "top off" charge.
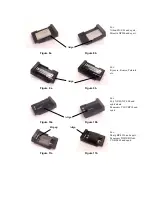
AUTOMATIC BATTERY VOTAGE DETECTION AND INDICATION
Most of the Lithium-Ion (Li-Ion) batteries are either 3.6V or 7.2V type. This charger has a built-in battery
detection function for automatic selection of the appropriate charging output to the battery, to ensure a safe
and efficient charging of the battery. The 3.6V/7.2V Battery Voltage Indicator (B) will light up in red when
charging a 3.6V battery, and will light up in green if the battery is of the 7.2V type.
ABNORMAL BATTERY DETECTION
This charger will detect an abnormal battery pack by sensing the voltage on the battery pack. If it is too
high or too low, or if the battery pack does not reach full charge status within 8 hours of charging, the
charger will stop the operation immediately and indicate the abnormal condition by flashing both the power
and battery status indicator LEDs. Normal operation will resume when the faulty battery is removed.
TROUBLESHOOTING
Problem
Possible Cause / Solution
No Indicator Lights
Confirm that the AC Adapter is firmly
connected at both ends (wall and Power Input
Jack).
Confirm wall outlet as “good”
Confirm that Car Cord is firmly connected at
both ends (cigarette lighter socket and Power
Input Jack)
Confirm cigarette lighter socket is “good”
Power light only
Battery is fully charged *
Battery mounted incorrectly
Remove and remount battery
Clean battery and charger contacts
Battery may be defective*
Power & Battery status LED both blinking
Defective battery*
Hissing noise while charging
Normal operation due to advance switching
circuitry
•
To determine if the battery is overcharged or defective, place it on the camcorder/digital camera
and turn the camcorder/digital camera on. If the camcorder/digital camera does not come on, the
battery is probably defective. If the camcorder/digital camera does not operate, leave the power
turned on for 30+ minutes, then remove the battery and put it on the charger; the charger should go
into charge mode, indicated by the green blinking Charge Status Indicator (A).
SAFETY PRECAUTIONS & MAINTENANCE
DO NOT
use this charger inside a drawer, closed cabinet, or cover with a cloth. The heat from charging
may damage the charger or battery pack. This charger will become slightly warm during use
DO NOT
attempt to open the unit. Doing so will void your warranty.
DO NOT
allow moisture of any kind to come in contact with the charger. Never immerse in water for any
reason.
DO NOT
store in areas which may expose the charger to extreme temperatures. Avoid placing in direct
sunlight, such as on a car dashboard. High temperatures will and warp or melt plastics.
DO NOT
drop the unit. A severe jolt may cause permanent damage and is not covered by the warranty.


