NXe 23-399 Скачать руководство пользователя страница 3

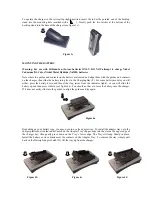
To operate the charger in the vertical (up-right) position, insert the tab at the pointed end of the desktop 
stand into the mounting hole (marked with a        ).  Gently push the two latches at the bottom of the 
desktop stand into the base of the charger (see figure 3c). 

Figure 3c 


MOUNTING THE BATTERY 
 
Warning: For use with Lithium-Ion (Li-ion) batteries ONLY. DO NOT attempt to charge Nickel 
Cadmium (Ni-Cd) or Nickel Metal Hydride (Ni-MH) batteries. 
 

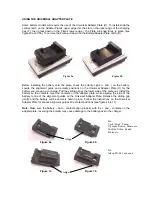
Note where the guides and contacts on the battery are located and align them with the guides and contacts 
on the charger, then slide the battery into place in the Charging Bay (F). For some battery models you will 
either; press the battery down and then slide it up (away from the indicator lights), or you will slide the 
battery up and then press it down (see figure 4a). You should not have to force the battery onto the charger. 
If it does not easily slide into the guides, re-align the guides and try again. 


Figure 4a 


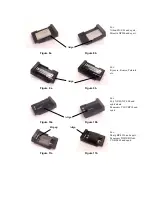
Depending on your battery type, you may need to use the adapter tray. To install the adapter tray onto the 
charger platform, slide the central notch on the Adapter Tray’s upper edge into the slot on the upper edge of 
the charger bay, then gently press down on the Tray’s lower edge. The Tray will snap firmly in place. 
Install the battery so its contacts meet the contacts on the Adapter Tray. To remove the tray, simply pull 
back on the Battery/Adapter Latch (D), lift the tray up from the charger. 

Figure 4b 

Figure 4c 

Figure 4d 

Содержание 23-399

Страница 1: ...nction trickle charges to maintain a full charge Automatic battery voltage detection with LED indication LED status indicator displays charger mode Abnormal battery detection identifies faulty battery and halts charging Overcharge protection Timer Protection Important Please read the following instructions before using your charger for the first time it explains how to operate this product H A B F...

Страница 2: ...r Indicator C will turn on Figure 2a Figure 2b CHANGING OPERATING POSITION OF THE CHARGER A Detachable Desktop Stand G is included with the charger This allows you to use your charger in a horizontal flat position or a vertical up right position To operate the charger in a horizontal flat position remove the desktop stand from base of the charger by gently pressing on the bottom side of the deskto...

Страница 3: ...ls you will either press the battery down and then slide it up away from the indicator lights or you will slide the battery up and then press it down see figure 4a You should not have to force the battery onto the charger If it does not easily slide into the guides re align the guides and try again Figure 4a Depending on your battery type you may need to use the adapter tray To install the adapter...

Страница 4: ...battery you are going to charge Pull the sliding grip at the lower side of the plate out Install the battery so the contacts meet the contacts on the adapter plate while aligning the side of the battery to one of the alignment guides on the Universal Adapter Plate Release the sliding grip gently and the battery will be securely held in place Follow the instructions on the Universal Adapter Plate f...

Страница 5: ...8a Figure 8b For Kyocera Konica Polaroid etc Align Figure 9a Figure 9b For Fuji NP 80 NP 100 and equivalents Panasonic VW VBP10 and equiv Align Figure 10a Figure 10b Flip up Align For Sharp BP L226 and equiv Panasonic DMW BCA CGR S602 and equiv Figure 11a Figure 11b ...

Страница 6: ... is firmly connected at both ends wall and Power Input Jack Confirm wall outlet as good Confirm that Car Cord is firmly connected at both ends cigarette lighter socket and Power Input Jack Confirm cigarette lighter socket is good Power light only Battery is fully charged Battery mounted incorrectly Remove and remount battery Clean battery and charger contacts Battery may be defective Power Battery...

Страница 7: ...y dampened with mild detergent Use a clean cloth lightly dampened with rubbing alcohol to clean the metal contacts TECHNICAL SPECIFICATIONS Input 12V DC Stand by Current 30mA Charging Current 800mA max constant current mode Charge Termination Fixed voltage 4 2V for 3 6V battery 8 4V for 7 2V battery LIMITED WARRANTY ...

Отзывы: