


nVent.com | 3
2. Calculate the total heating cable length required
Length = A + B + C + D + E + F + G + H
A Pipe length x spiraling ratio
B 4 ft x # gate/globe valves x valve length (ft) x spiraling ratio
C 2 ft x # ball/butterfly valves x valve length (ft) x spiraling ratio
D 2 ft x # flanges x pipe diameter (ft) x spiraling ratio
E 2 ft x # pipe supports v pipe diameter (ft) x spiraling ratio
F 1 ft for each power connection
G 2 ft for each splice connection
H 3 ft for each tee connection
= Total heating cable length (ft)
3. Determine the maximum heating cable circuit length allowed.
See Table 3 on the next page. Ensure that your circuits do not
exceed the maximum circuit length listed in Table 3. If necessary,
use additional shorter circuits.
Example (taken from Example 2 [on metal pipe], page 3):
Pipe length:
50 ft
Spiral ratio:
1.3 (from Table 1, page 3)
Globe valves:
3 (each 0.5 ft long)
Pipe supports:
10 supports for 1 in pipe
Power connections:
1
Splice connections:
1
WinterGard heating cable required:
A Pipe length x spiral ratio = 50 ft x 1.3
= 65.0 ft
B 3 globe valves (0.5 ft each) = 4 ft x 3 x 0.5 x 1.3
= 7.8 ft
C 0 ball/butterfly valves
= 0
= 0
D 0 flanges
= 0
= 0
E 10 pipe supports
= 2 ft x 10 x 0.085* x 1.3 = 2.2 ft
F 1 power connection
= 1 ft x 1
= 1.0 ft
G 1 splice connection
= 2 ft x 1
= 2.0 ft
H 0 tee connection
= 0
= 0
Total heating cable length required
= 78.0 ft
*1 in pipe diameter / 12 in per foot = 0.085 foot
HEATING CABLE INSTALLATION
1. Prepare for installation
• Store the heating cable in a clean, dry place.
• Complete piping pressure test.
• Review the WinterGard heating cable design and compare to
materials received to verify that the proper WinterGard heating
cable and accessories are available. The WinterGard heating
cable will have the heating cable type printed on the outer
jacket.
• Walk the system and plan the routing of the WinterGard heating
cable on the pipe.
2. Cut the heating cable to length
• Cut the heating cable to the length required. This can be
done before or after the cable is attached to the pipe. Leave a
minimum of 1 foot extra heating cable for connection to power.
For splice and tee connections, leave a minimum of 1 foot for
each section of heating cable. WinterGard heating cable can be
cut to length without affecting its heat output per foot.
• Protect the heating cable ends from moisture or mechanical
damage if they will be left exposed before connection.
3. Position and attach heating cable to pipe
• Be sure all piping to be traced is dry.
• Install heating cable, using straight tracing, spiraling, or multiple
tracing according to the “Heating cable selection and design”
section on page 2.
• For straight tracing, install the heating cable on a lower half of
the pipe; for example, in the 4 o’clock or 8 o’clock position.
• Be sure to install the additional heating cable required for
valves, flanges, etc. as indicated in Step 2 of the “Heating cable
selection and design” section.
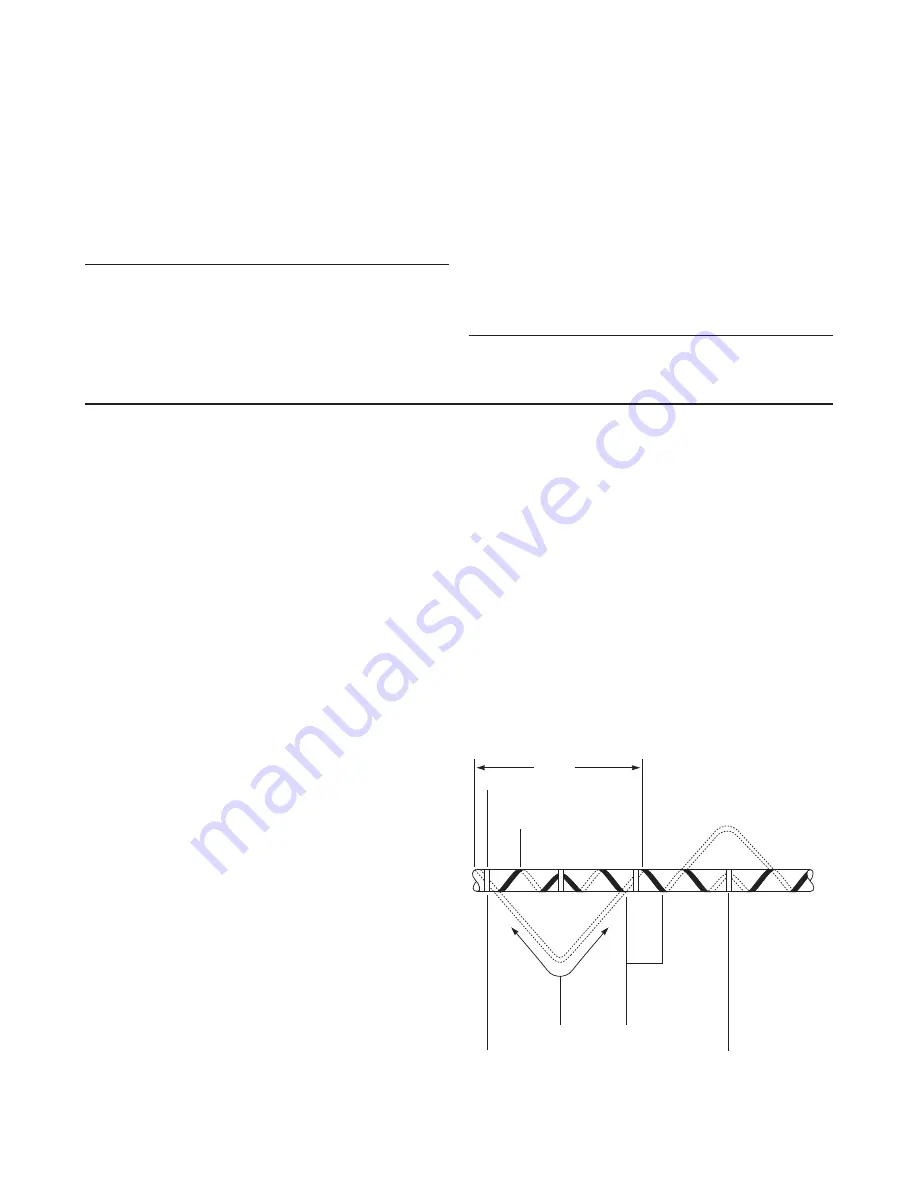
• When the design calls for spiraling, begin by suspending a
loop every 10 feet as shown in Figure 1. To determine the loop
length, obtain the spiral factor from Table 1 or 2 and multiply
by 10. For example, if a spiral factor of 1.3 is called for, leave a
13-foot loop of heating cable at every 10-foot section of pipe.
Grasp the loop in its center and wrap it around the pipe. Even
out the distance between spirals by sliding the wraps along the
pipe. Use glass tape to secure the center of the loop to the pipe.
Secure the heating cable flat to the pipe to obtain good contact.
• Tape WinterGard heating cable to the pipe at 2-foot intervals
using RAYCHEM H903 fiberglass application tape or nylon
cable ties. Do not use vinyl electrical tape, duct tape, metal
bands, or wire.
4. Install heating cable end seals, splices, tees, and power
connection
• Test each circuit before installing the H908 ground-fault device,
according to the instructions in the “Heating cable testing and
maintenance” section.
• Install all end seals, splices, tees, and power connection prior to
plugging in.
• Follow the H908 kit installation instructions beginning on page 8.
• Use only weatherproof receptacles approved for wet locations
when installing WinterGard Wet H612 heating cable with the
H908 Power Connection Kit for Roof and Gutter De-Icing
Applications.
5. Check the installation
• Prior to installing thermal insulation, make sure the heating
cable is free of mechanical damage (from cuts, clamps, etc.)
and thermal damage (from solder, overheating, etc.).
• Visually check all power connections, end seals, splices, and tees.
• Using a megohmmeter, test each circuit according to the
instructions in the “Heating cable testing and maintenance”
section (page 4) both before and after installing the
thermal insulation.
Figure 1. Spiraled heat tracing
10 feet
Glass tape
(typical)
Heating
cable
Tape after
spiraling
heating
cable on
pipe
Wrap loops
in opposite
direction
Pull heating
cable loop
length
Apply glass
tape before
spiraling
heating cable
on pipe


