If you would like to use the device immediately after the empty process, allow it to cool for at least
20 minutes after draining the residual water. The same applies to numerous consecutive uses.
OPERATION
CLEANING AND MAINTENANCE
1. Clean the parts that are to be sterilised with mild washing up liquid or in the dishwasher.
Disassemble any assembled parts.
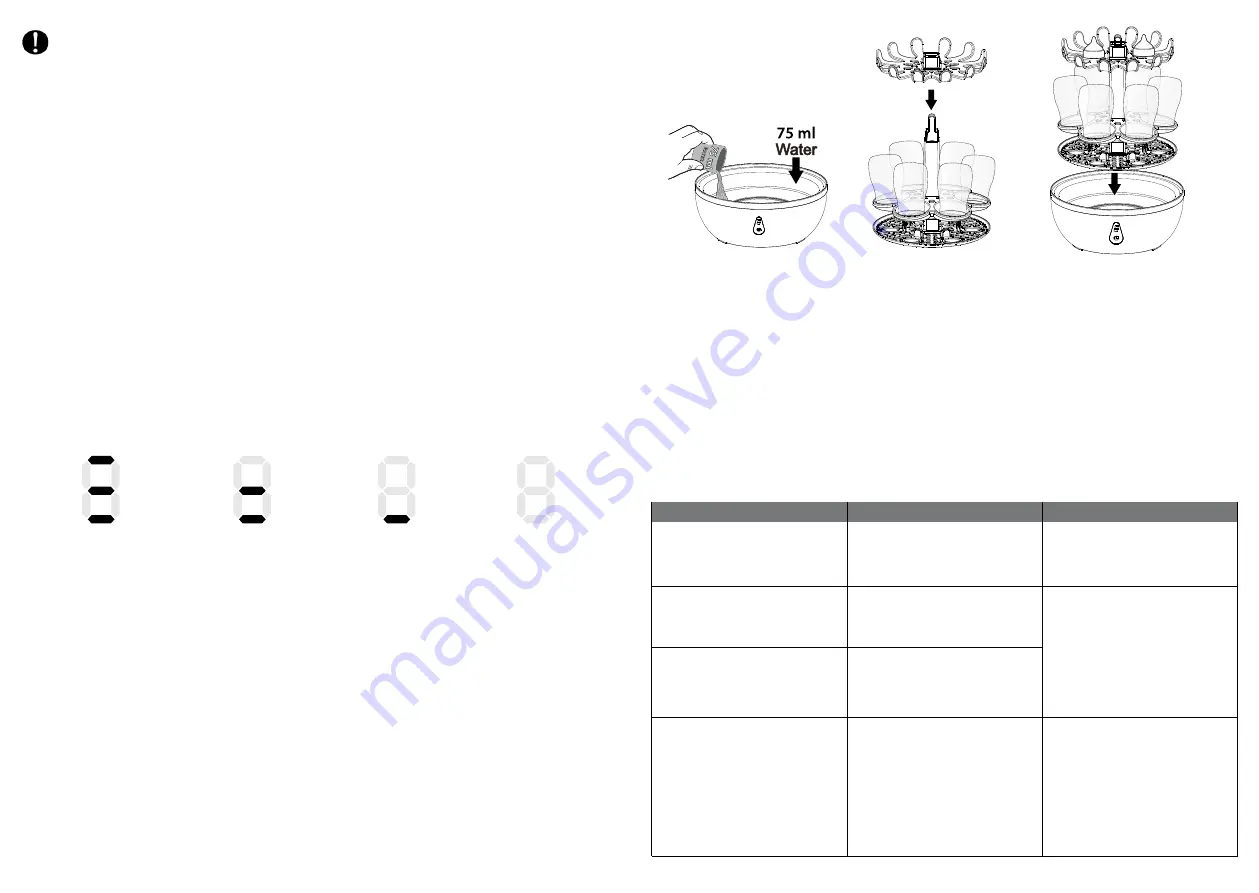
2. Measure 75 ml distilled or tap water and pour it into the sterilisation container.
3. Now place the bottles into the lower rack for bottles with the opening pointing downwards and place
the teats or other small parts in the upper rack for small parts.
4. Place the lower rack for bottles and the upper rack for small parts into the sterilisation container.
5. Then put the lid on the device.
6. Plug the mains plug into a socket and press the physical on and off switch at the back– a beep will be
heard once done. The display shows 0. The device is ready for use. If there is no operation in 5 minutes,
the display will be off which refers to sleep mode. When the display is off, press the button once, the
product will be back to standby mode. Display will show 0.
7. Press the start button when in standby mode. When done you will hear a beep. Sterilisation starts
at this stage. This will be the heating up process. The display will show and LED light that is going
round clockwise. When two minutes finished the product will go into the sterilizing process.
8. At the end of the process, you will hear the beep three times. When the sterilizer finishes the total
working time for 8 minutes, it will go into a 24 hour countdown process. The display will show the
illustration below to indicate this countdown. It is advisable to use the bottles within these 24 hours.
Although the display is lighting up, the sterilizer at this stage is not working.
9. When the 24 hours countdown process finished the display will be off.
10. If the button will be pressed while the product is working or during the 24 hours countdown process,
the product will stop working and the power will switch off, the display will no longer light up. If you
press the button again this will return to standby mode.
11. If the water finishes before the 8 minutes working sterilization time, the sterilizer will stop working
and the display will be off. Put more than 75ml cool water into the heating plate so the heating plate
will cool down. The product will go back to the standby mode.
12. After a cooling down period of at least 5 minutes, carefully open the lid and remove the sterilised
parts using the gripping tongs. Shake the parts to remove any excess water. Drain the residual water
and dry the sterilizer with a cloth.
The service life of the device depends on careful use:
•
Use distilled or tap water for the sterilisation.
•
Unplug the device before cleaning.
•
To clean the device, use only a damp cloth. Do not use any scouring agents or other cleaning products.
•
Descale the device using vinegar or citric acid. Mix 50 ml white vinegar with 100 ml cold water or a
packet of citric acid with 200 ml cold water and pour the solution into the device. Leave the solution
to work until the lime scale has been removed; do not operate the device during this time. Pour the
liquid away, rinse the device out thoroughly and finally dry it with a cloth.
•
Descale the device approx. every four weeks.
WHAT IF THERE ARE PROBLEMS?
FAULT
The device does not switch on
after the cable is plugged in.
No LED display
The device switches itself off
after the warming up phase.
The device switches itself off
in a short time when it start
the sterilizing process.
No electricity
Mains plug not (properly)
plugged in or the power
switch is not turn on or
device is faulty
No water in the steriliser
Too little water in the steriliser
Check that the plug is properly
plugged in. And check the
switch on the back is on.
Check that the mains plug is
(properly) plugged in. If there is
still no display, then check the
switch on the back and press
it on. If there is still no display,
switch the device off, unplug
it and return the device to the
retailer.
Unplug the device, allow
it to cool down, then fill it
with 75 ml water and start as
described in the instructions.
CAUSE
ACTION
when cycle ends
after 8 hours
after 16 hours
after 24 hours
16
17


