background image

19

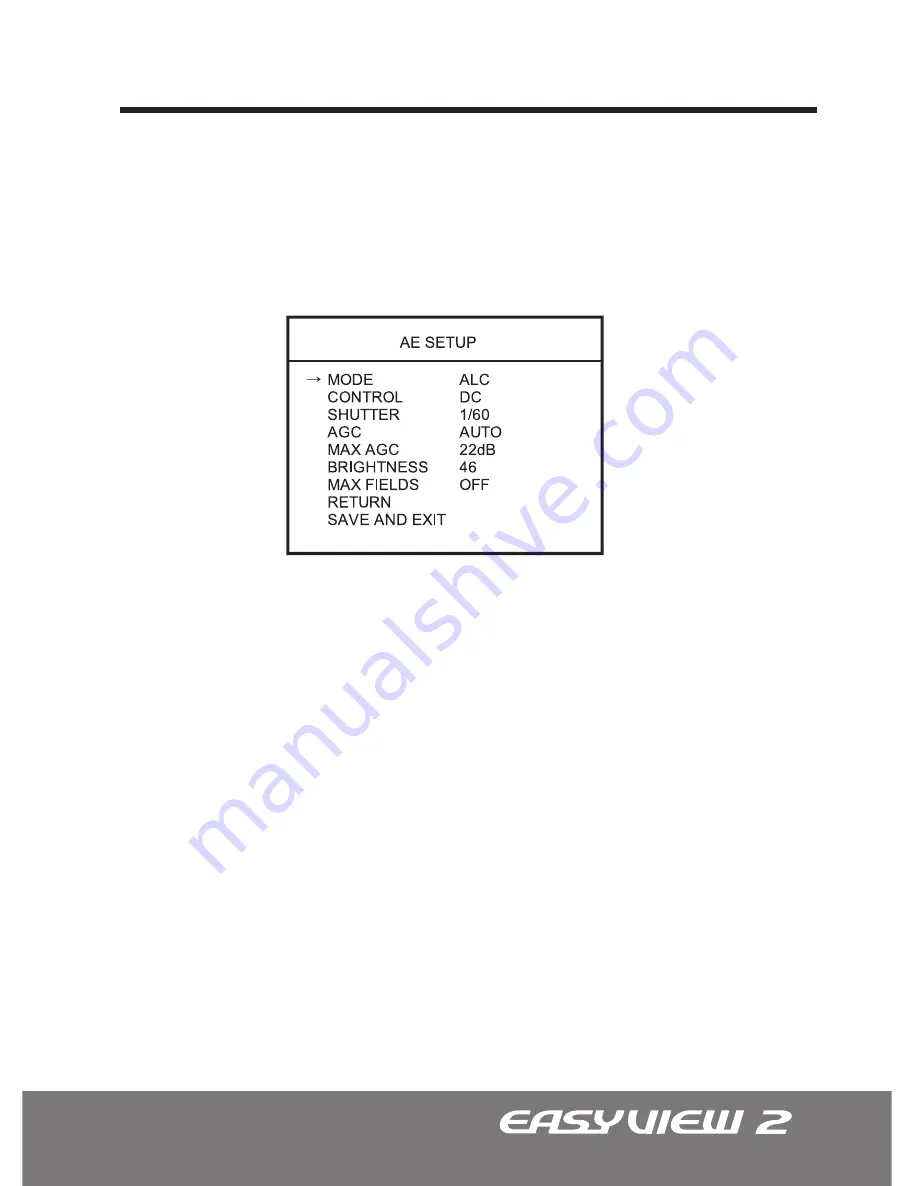
The AE SETUP is used to control the video output levels under different intensities in 
the lighting. 

1. AE SETUP (Automatic Exposure)

1.1 MODE: ALC (Automatic Level Control)

1.2 CONTROL: DC

1.3 SHUTTER (AUTO, 1/60 

^

 - 

a


1/100,000) 

1.4 AGC - Automatic Gain Control (AUTO, FIXED) 

OSD Menu Terms & Settings

The ALC mode and the camera will continuously monitor changes in the lighting 

intensity and automatically adjust the Iris to the most optimal level.

All EasyView™ 2 dome cameras are equipped with DC Auto Iris lens. 

The SHUTTER speed can be selected manually according to user preference. The 

shutter speed of 1/60(NTSC), or 1/50(PAL) seconds are recommended. 

Choose between AUTO or FIXED. In the AUTO setting, the AGC will be automatically 

controlled. The FIXED setting assumes the MAX AGC value. 

All manuals and user guides at all-guides.com

Содержание Easy View 2 CD Series

Страница 1: ...All manuals and user guides at all guides com a l l g u i d e s c o m ...

Страница 2: ...ribed herein at any time without prior notice No part of this guide may be reproduced transmitted transcribed stored in a retrieval system or translated into any language in any form by any means without prior written permission of NUVICO NUVICO makes no warranties for damages resulting from corrupted or lost data due to a mistaken operation or malfunction of the cameras peripheral devices or unap...

Страница 3: ...al triangle is intended to alert the user to the presence of uninsulated dangerous voltage within the product s enclosure that may be of sufficient magnitude to constitute a risk of electric shock to persons CAUTION WARNING The exclamation point within an equilateral triangle is intended to alert the user to the presence of important operating and maintenance servicing instruction in the literatur...

Страница 4: ...RENCE TO RADIO COMMUNICATIONS OPERATION OF THIS EQUIPMENT IN A RESIDENTIAL AREA IS LIKELY TO CAUSE HARMFUL INTERFERENCE IN WHICH CASE THE USER WILL BE REQUIRED TO CORRECT THE INTERFERENCE AT HIS OWN EXPENSE CAUTION CHANGES OR MODIFICATIONS NOT EXPRESSLY APPROVED BY THE PARTY RESPONSIBLE FOR COMPLIANCE COULD VOID THE USER S AUTHORITY TO OPERATE THE EQUIPMENT THIS CLASS A DIGITAL EQUIPMENT COMPLIES ...

Страница 5: ...t Protect the power cord from being walked on or pinched particularly at plugs conve nience receptacles and the point where they exit from the equipment Only use attachments accessories specified by the manufacturer Unplug this equipment during lightning storms or when unused for long periods of time Refer all servicing to qualified service personnel Servicing is required when the equip ment has b...

Страница 6: ...ations Mounting on Electrical Junction Box Connecting to Monitors Adjusting the Vari focal DC Auto Iris Lens Adjusting the 3 Axis Gimbal Camera OSD Setup Controls OSD Menu Control Navigation OSD MENU CONTROLS On Screen Display OSD Menu Terms Settings 1 AE SETUP Automatic Exposure 1 1 MODE 1 2 CONTROL 1 3 SHUTTER 1 4 AGC Automatic Gain Control 1 5 MAX AGC 1 6 BRIGHTNESS 1 7 MAX FIELDS Digital Slow ...

Страница 7: ...RPNESS 5 5 LANGUAGE 5 6 EDIT TITLE 5 7 FACTORY DEFAULT EZ Coax NUVICO Telemetry Control Technical Specifications NTSC Technical Specifications NTSC Technical Specifications PAL Technical Specifications PAL EasyView Dome Camera Accessories Fan Heater Installation Instructions CV FH Indoor Wall Mount Installation Instructions CV WM Outdoor Wall Mount Installation Instructions CA OM 22 22 22 23 23 23...

Страница 8: ...es 580 TVL Day Night ST Series 580 TVL Indoor Plastic Outdoor Vandalproof CD ST21N I CD ST21P IA Ivory CD ST21N B CD ST21P BA Black CD ST21N I CX CD ST21P IA CX Ivory EZ Coax CD ST21N B CX CD ST21P BA CX Black EZ Coax CD STD21N I CD STD21P IA Ivory CD STD21N B CD STD21P BA Black CD STD21N I CX CD STD21P IA CX Ivory EZ Coax CD STD21N B CX CD STD21P BA CX Black EZ Coax CD STD21N LI CD STD21P LIA Ivo...

Страница 9: ...ews These screws are used to mount the Flush Mount Base to the Surface Mount Plate x4 Philips ST4x30 Assembly Screws These screws are used to mount the Surface Mount Plate to a sturdy surface x4 Philips ST4x30 Anchors These anchors are used to fasten the assembly screws securely to the mounting surface x1 Torx Wrench x3 Philips M4x10 Assembly Screws These screws are used to mount the Flush Mount B...

Страница 10: ...crews Philips M4x9 Indoor Torx M4x9 Vandalproof Assembly Screws Philips ST4x12 Indoor Philips M4x10 Vandalproof Mounting Screws Philips ST4x30 Indoor Vandalproof Note These assembly screws are located on the dome cover and not with the mounting hardware 9 4 5 8 6 1 7 12 11 10 13 3 2 9 4 5 8 6 1 7 12 11 10 13 3 2 For longer more consistant performance avoid location prone to direct sunlight REMINDE...

Страница 11: ... Flush Housing and the Surface Mount Housing NOTE The Surface Mount Base for all outdoor vandalproof EasyView 2 domes are 51mm and are deeper than the standard indoor models Flush Mount Top View Surface Mount I Indoor V Vandalproof All manuals and user guides at all guides com a l l g u i d e s c o m ...

Страница 12: ...ws provided mount the surface mount plate to a strudy sur face Using three ST4x12 Indoor screws or M4x10 Vandalproof screws affix flush mount base to the surface mount plate Flush Mount Using four ST4x30 screws supplied mount the surface mount plate to a strudy surface 1 2 3 Flush Mount Surface Mount Philips M4X9 or Trox M4X9 ST4X12 or M4X10 ST4X30 ST4X30 Plastic Anchors Surface Mount Template Flu...

Страница 13: ...ounting on Electrical Junction Box Note Screws required for electrical junction boxes are not supplied These screws are readily available at any well stocked electrical supply store 3 4 Pipe Screws UNC 8 32 x 0 75 When mounting the flush mount base surface mount plate or both together use the pre drilled holes marked with the symbol for proper installation All manuals and user guides at all guides...

Страница 14: ...roper connections to the CRT Monitor or the Service Monitor Power connection 12VDC 24VAC Dual Voltage Auto polarity detection and protection All cameras are equipped with a service monitor output on the camera module All manuals and user guides at all guides com ...

Страница 15: ...ocus screws Using the screw move it RIGHT or LEFTto the desired position Once the desired adjustments have been made tighten the screw to lock in place Adjust the Field of View by moving the screw towards the RIGHT Tele to zoom in or towards the LEFT Wide to zoom out Adjust the Focus the same way as described above after the desired zoom position is established FOCUS ZOOM All manuals and user guid...

Страница 16: ... mechanism yields maximum rotation and placement as shown below Z Axis Rotation 355 Y Axis Tilting 85 75 IR LED X Axis Panning 240 Tilting 85 Panning 240 Rotation 355 Tilting 75 w IR LED All manuals and user guides at all guides com a l l g u i d e s c o m ...

Страница 17: ... directional keys located at the bottom of the Gimbal base to make the desired changes in the OSD menu Enter Key Right Key Up Key Down Key Left Key Service Monitor Output Directional Navigation Keys All manuals and user guides at all guides com ...

Страница 18: ...eft Right key at the selected line While in the OSD menu scroll up down the available options by using the corresponding navigational keys To go to the up menu from the sub menu press the Left Right Key at the RETURN line Once all of the desired changes have been made move the cursor over to the SAVE AND EXIT line to save and exit Choosing EXIT will lose all changes and revert back to its previous...

Страница 19: ...amera will continuously monitor changes in the lighting intensity and automatically adjust the Iris to the most optimal level All EasyView 2 dome cameras are equipped with DC Auto Iris lens The SHUTTER speed can be selected manually according to user preference The shutter speed of 1 60 NTSC or 1 50 PAL seconds are recommended Choose between AUTO or FIXED In the AUTO setting the AGC will be automa...

Страница 20: ...s high as 36dB MAX The factory default limit is 22dB The BRIGHTNESS can be adjusted by opening and closing of the Iris aperture User may fine tune the screen to their preferred brightness The brightness ranges from 0 100 0 being the darkest and 100 being the brightest In the absence of adequate lighting DSS allows the ability to capture usable images without the use of additional illumination The ...

Страница 21: ...olor changes and automatically adjusts the red and blue values to compensate for the color shifting LOCK mode locks in the previous color setting and adjusts accordingly CRLS mode is used to prevent color rolling commonly associated with fluorescent lighting ATW Automatic Tracking White Balance Select the ATW mode if the color temperature of the light source is between 2 500 K 8 000 K i e Fluoresc...

Страница 22: ...ey to lock in the current white balance setting 2 2 CONTROL WB Mode Control LOCK AUTO CRLS 3200 K 5400 K R B CTRL 2 3 RED 0 255 2 4 BLUE 0 255 This field displays the current RED value of the WB mode Only in the Manual mode can the RED value be altered to user preference The red value ranges from 0 255 This field displays the current BLUE value of the WB mode Only in the Manual mode can the BLUE v...

Страница 23: ...each zone according to its exposure level to counterbalance excessive background light to distinguish the subject in the foreground SBLC Super Back Light Compensation BMB Brightlight Masking Block The BMB masks out excessively bright areas within the frame and compensates the rest of the frame accordingly OFF The BLC is off BLC The BLC level can be adjusted from 0 100 SBLC The SBLC level can be ad...

Страница 24: ...by highlighting the specific square and pressing the ENTER key colored in green Note Active masking area is colored in blue 3 Once all the desired areas have been designated press and hold the ENTER key until the AREA MENU displays 4 Choose the RETURN MENU to confirm the already selected areas or AREA SELECT to go back to the blue selection grid The BMB masking tint may be changed to user preferen...

Страница 25: ...turned off The level 10 indicates the maximum IR LED intensity Note For best result please adjust the IR LEDs intensity levels while viewing the changes on a monitor This function is used to adjust the intensity of the IR LED Too much IR reflection from a subject causes over exposure on the most focused area causing Hot Spots within the picture Adjusting this setting can help avoid such problems 4...

Страница 26: ... of the MOTION DETECTION to one of three settings LOW a MID a HIGH OUTPUT Select between the MARK or ALARM option When set to MARK an icon will be displayed when Motion Detection is triggered In the ALARM option camera will send out a MD signal Note The EasyView 2 dome camera is not equipped with an MD output port Note The Motion detection will be disabled when DSS is ON 5 SPECIAL 5 1 MD SETUP Mot...

Страница 27: ...EFT RIGHT Key to enter the move screen At the H V START SET option adjust the width and height of the area concealed by pressing LEFT UP increasing or RIGHT DOWN decreasing At the H V END SET option adjust vice versa by pressing LEFT UP decreasing or RIGHT DOWN increasing To change H V START SET option to H V END SET and vice versa press ENTER key To exit hold the ENTER Key down for 2 or more seco...

Страница 28: ...rpen the image to user preference The lower setting will soften the image while the higher setting will sharpen the image English is the factory default and cannot be changed The EDIT TITLE is used to display the camera title OFF The DNR is off LOW Select the LOW setting for light level of noise HIGH Select the HIGH setting for high level of noise 5 3 DNR Digital Noise Reduction OFF LOW HIGH 5 4 S...

Страница 29: ...itle screen Move the title to the desired location using the navigational keys To exit press and hold the ENTER key until the EDIT TITLE menu displays 4 If you want to change the specific character of the title then select the TITLE Then move the highlighting cursor to the desired location using the LEFT RIGHT keys Scroll up to the character table pressing the ENTER key while highlighting the desi...

Страница 30: ...O up the coax telemetry control that grants access to the EasyView2 OSD menu using only the coax cable already running from the camera Refer to the diagram below for a typical EZ Coax transceiver connection configuration please refer the EZ CX1T or EZ CX8T manual for more information All manuals and user guides at all guides com ...

Страница 31: ... Illumination lux S N Ratio Camera Control Setup General Information Operating Temperature Operating Humidity Power Consumption Input Voltage CD ST21N NTSC 1 3 CCD 580 TV Lines No Vari focal 2 8mm 10mm 131 6 W 35 6 T Internal 768 x 494 525 Lines 2 1 Interlaced 1 60 1 100 000 sec 1 0 Vp p Composite 75 ohm 1 0 Vp p Composite 75 ohm 0 1 DSS Off 0 001 DSS On x512F More than 50dB AGC Off OSD Menu CD ST...

Страница 32: ...of View IR LED IR LED Distance LED Illumination Angle Sync System Effective Pixels HxV Scanning System Electronic Shutter Main Video Output Service Monitor Output Minimum Illumination lux S N Ratio Camera Control Setup General Information Operating Temperature Operating Humidity Power Consumption Input Voltage CD STD21N L NTSC 1 3 CCD 580 TV Lines Yes w ICR Vari focal 2 8mm 10mm 131 6 W 35 6 T 34 ...

Страница 33: ...tput Minimum Illumination lux S N Ratio Camera Control Setup General Information Operating Temperature Operating Humidity Power Consumption Input Voltage CD ST21PA PAL 1 3 CCD 580 TV Lines No Vari focal 2 8mm 10mm 131 6 W 35 6 T Internal 752 x 582 625 Lines 2 1 Interlaced 1 50 1 100 000 sec 1 0 Vp p Composite 75 ohm 1 0 Vp p Composite 75 ohm 0 1 DSS Off 0 001 DSS On x512F More than 50dB AGC Off OS...

Страница 34: ...of View IR LED IR LED Distance LED Illumination Angle Sync System Effective Pixels HxV Scanning System Electronic Shutter Main Video Output Service Monitor Output Minimum Illumination lux S N Ratio Camera Control Setup General Information Operating Temperature Operating Humidity Power Consumption Input Voltage CD STD21P LA PAL 1 3 CCD 580 TV Lines Yes w ICR Vari focal 2 8mm 10mm 131 6 W 35 6 T 34 ...

Страница 35: ...Mount Bracket CA CMB Universal Pole Mount Bracket CA PMB Junction Box CA JB Ideal for indoor applications Ideal for mounting camera on corners of a structure Ideal for outdooor applications Used for mounting camera on a pole Used for mounting camera on the ceiling EasyView Dome Camera Accessories Multipurpose Junction Box Enclosure CA JB2 All manuals and user guides at all guides com ...

Страница 36: ...ness 3 mm Assembly Screw Philips M2 6x14 Q ty 1 Length 14 mm Thickness 2 6 mm Specification Power Input Power Consumption Heater Power Consumption Fan Heater ON Heater OFF Fan ON 24VAC 10W 0 7W at 41 F 5 C at 59 F 15 C 24 Hours Note For Fan and Heater operation 24VAC power input is required Current model does not support 12VDC operation All manuals and user guides at all guides com a l l g u i d e...

Страница 37: ... 10 mm Thickness 3 mm Construction Finish Weight Environment Aluminum Ivory or Black 1 4 lb 0 64Kg Indoor Only This indoor wall mount is designed for EasyView dome camera This mount can be directly to a wall or attached to a junction box CA JB Specification Dimensions Unit Inch mm 5 64 143 4 4 37 111 2 2 75 70 3 95 100 4 7 36 187 0 28 7 All manuals and user guides at all guides com ...

Страница 38: ...a junction box CA JB Assembly Accessories Anchors Plastic Q ty 4 Length 35 mm Thickness 7 mm Mounting Screw Philips ST5x35 Q ty 4 Length 35 mm Thickness 5 mm Specification Aluminum Light gray or Black polyester powder coat 45 lb 20Kg Indoor Outdoor Construction Finish Max Load Environment Dimensions Unit Inch mm 4 33 110 3 44 100 2 75 70 4 53 115 5 63 143 0 47 12 All manuals and user guides at all...

Страница 39: ...39 All manuals and user guides at all guides com ...

Страница 40: ...050600003600 All manuals and user guides at all guides com ...

Отзывы: