background image

Release Latch

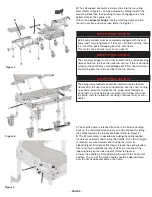
Leg Height Adjustment: When making height adjustments to

any of the legs, make sure that the brass buttons are fully
engaged into the outer legs. If pushed too hard the button
could become stuck inside the inner leg (Contact Nuprodx, Inc.
if this occurs). Leg height adjustment should only be made
before transferring the user into the chair (Refer to Figure 22).

B

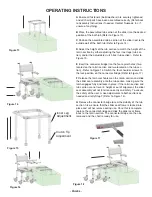
Caster Wheels: When transferring into the chair, out of the

chair and sliding the user from the roll-in section into the tub
section, all four caster wheels should be securely locked in
place. Failure to do so could cause the chair to become unsta-
ble (Refer to Figure 23). 

C

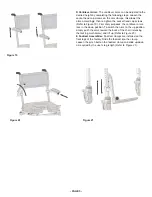
Fasteners: Over time the screws and washers on the chair

may become loose. It is very important that these are checked
and securely tightened before each use. Failure to do so could
cause a part to dislodge from the chair (Refer to Figure 24).

D

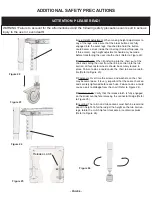
Release Latch: Verify that the release latch is fully engaged

on the slider seat before removing the connector bridge (Refer
to Figure 25). 

E

Leveling: The roll-in and tub sections must both be level and

equal in height. To further adjust the height on the tub section
legs, rotate the crutch tip feet clockwise or counterclockwise
(Refer to Figure 26).

ADDITIONAL SAFETY PRECAUTIONS

!ATTENTION: PLEASE READ!

WARNING! Failure to account for the afformentioned and the following safety precautions can result in serious
injury to the user or even death! 

Figure 23

Figure 22

Figure 24

Figure 25

- PAGE 6 -

Figure 26

Содержание multichair 6000Tilt

Страница 1: ...S FOR THE MULTICHAIR 6000Tilt Series ATTENTION READ BEFORE ASSEMBLING OPERATING ATTENTION READ BEFORE ASSEMBLING OPERATING multichair 6000Tilt multichair 6200Tilt multichair 6000Tilt P2 multichair 6000Tilt P1 November 2012 ...

Страница 2: ... wrench The side suction cup assemblies are to secure the unit inside the tub The suction faces of the cups should be parallel with the side tub walls Then extended them out to create a tight fit within the tub The yellow T handle wrench is needed to make the adjustments F Turn the chair right side up and install the backrest assembly Slide the two backposts into the back of the seat frame and tig...

Страница 3: ...lting in serious injury or even death SAFETY PRECAUTION The connector bridge must be fully seated into the corresponding holes of both the roll in section and tub section If this is not done correctly the seat frame could dislodge itself from the chair when transferring from the roll in section to the tub section PAGE 2 Figure 5 J The shuttle frame is released from the roll in base by pulling back...

Страница 4: ...ntal position and the crank handle should be approximately covering the flat head socket bolt on the frame F Move the slider latch to the opposite side of the tilt assembly 1 Remove the 1 4 20 Flat Head Socket Screw with the 5 32 Allen wrench that is provided with the slider 2 The second 1 4 20 Flat Head Socket Screw is bolted to a nylon insert lock nut Therefore a small crescent wrench or a 7 16 ...

Страница 5: ...b sec tion Refer to Figure 16 Switch the four shoulder screws to the lock position on the connector bridge Refer to Figure 17 F Release the latch mechanism on the roll in section and slide the slider seat assembly onto the tub section making sure the latch engages fully and locks in place If the roll in section and tub section are not level in height or out of alignment the slider seat assembly wi...

Страница 6: ...ses the cantilever arms lock in the down position To switch the arms to the up position simply push the arms toward the back of the chair releasing the locking mechanism and lift up Refer to Figure 20 E Footrest Assemblies Footrest clamps are installed on the front legs at the factory Slide the footrest into the clamp Loosen the pinch bolt on the footrest clamp and slide up down as required by the...

Страница 7: ...3 C Fasteners Over time the screws and washers on the chair may become loose It is very important that these are checked and securely tightened before each use Failure to do so could cause a part to dislodge from the chair Refer to Figure 24 D Release Latch Verify that the release latch is fully engaged on the slider seat before removing the connector bridge Refer to Figure 25 E Leveling The roll ...

Страница 8: ...ve proof of purchase and of purchase date D DISCLAIMER Except for the above warranty and the acknowledgement by Nuprodx Inc that the chair as manu factured by it is fit for the general purpose for which most persons acquire a chair of its kind Nuprodx Inc provides that you accept the chair as is without warranties either express or implied Nuprodx Inc makes no warranty of fit ness for your particu...

Отзывы: