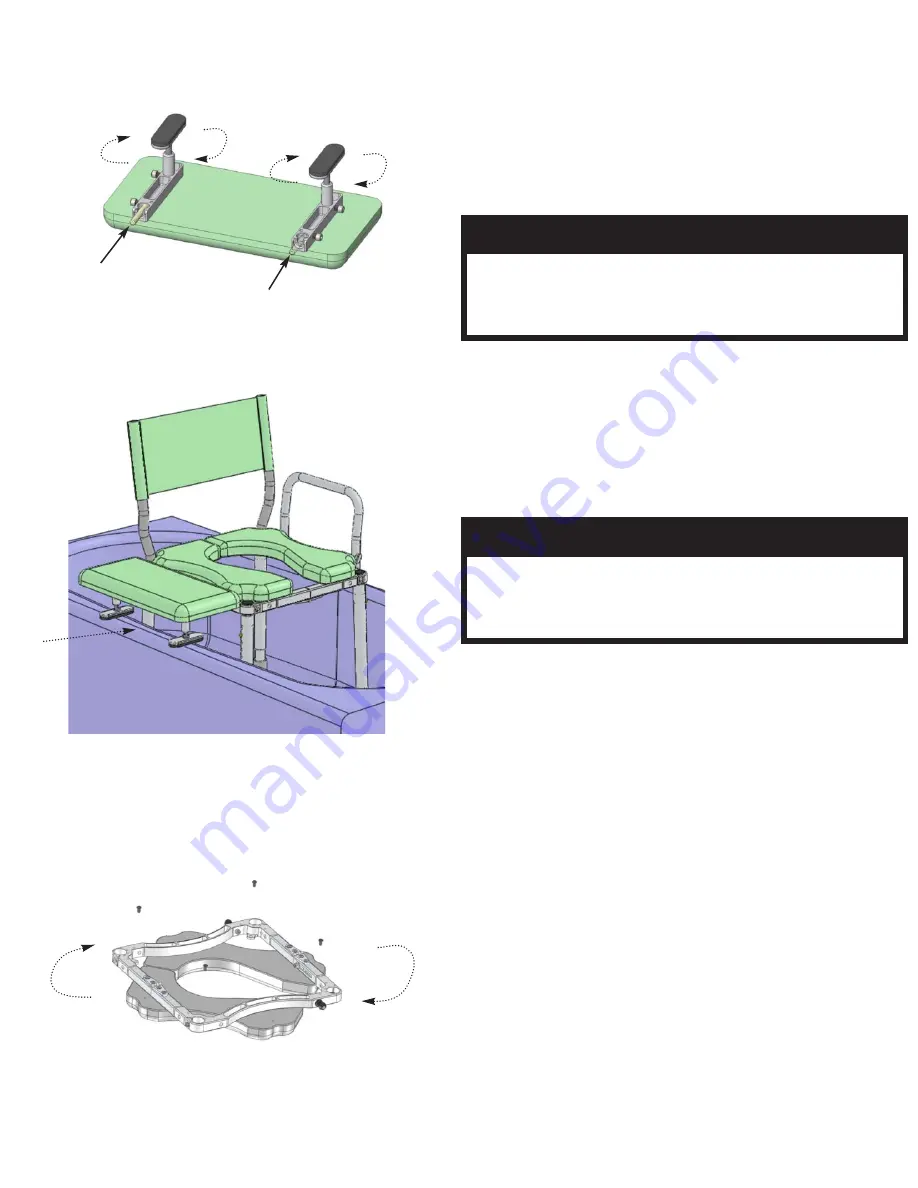
G Transfer Cushion Assembly
:
1) Insert the rubber adjusting feet into the aluminum blocks
attached to the cushion (Refer to Figure 8).
2) Depending on which side of the multiCHAIR you need to
transfer to, insert the stainless steel pin into the appropriate
aluminum block and tighten using the 1/4” Allen wrench (Refer
to Figure 8).
3) Remove the swing-away arm on the side in which you
intend to transfer to. Next, insert the transfer cushion assembly
into the appropriate side of the multiCHAIR by first slipping the
end with the stainless steel pin into matching hole in the
frame. Then lower down the assembly until the block engages
around the black plastic ball attached to either side of the
frame. Adjust the rubber adjusting feet accordingly to secure
the transfer cushion onto the top of the tub wall (Refer to
Figure 9).
SAFETY PRECAUTION!
Failure to securely tighten the stainless steel pin into the transfer
block could cause the entire transfer cushion assembly to dis-
lodge from the multiCHAIR while in use. This could result in seri-
ous injury or even death!
SAFETY PRECAUTION!
The transfer cushion assembly should only be used when proper-
ly seated on top of a bath tub wall. If seated incorrectly while
transferring, the multiCHAIR could tip to one side causing the
user to fall. This could result in serious injury or even death!
Figure 9
Figure 8
ADDITIONAL ASSEMBLY INSTRUCTIONS
A Seat Cushion Orientation
: The standard seat cushion orien-
tation is with the commode opening in the front of the
multiCHAIR. If desired, the commode opening can also be ori-
entated left/right/rear. This can be accomplished by unscrewing
the four button head cap screws that attach the cushion to the
frame, orientating the commode opening to the desired location
and then re-attaching the cushion to the frame with the four
screws using the 5/32” Allen wrench (Refer to Figure 10).
Figure 10
- PAGE 4 -


