background image


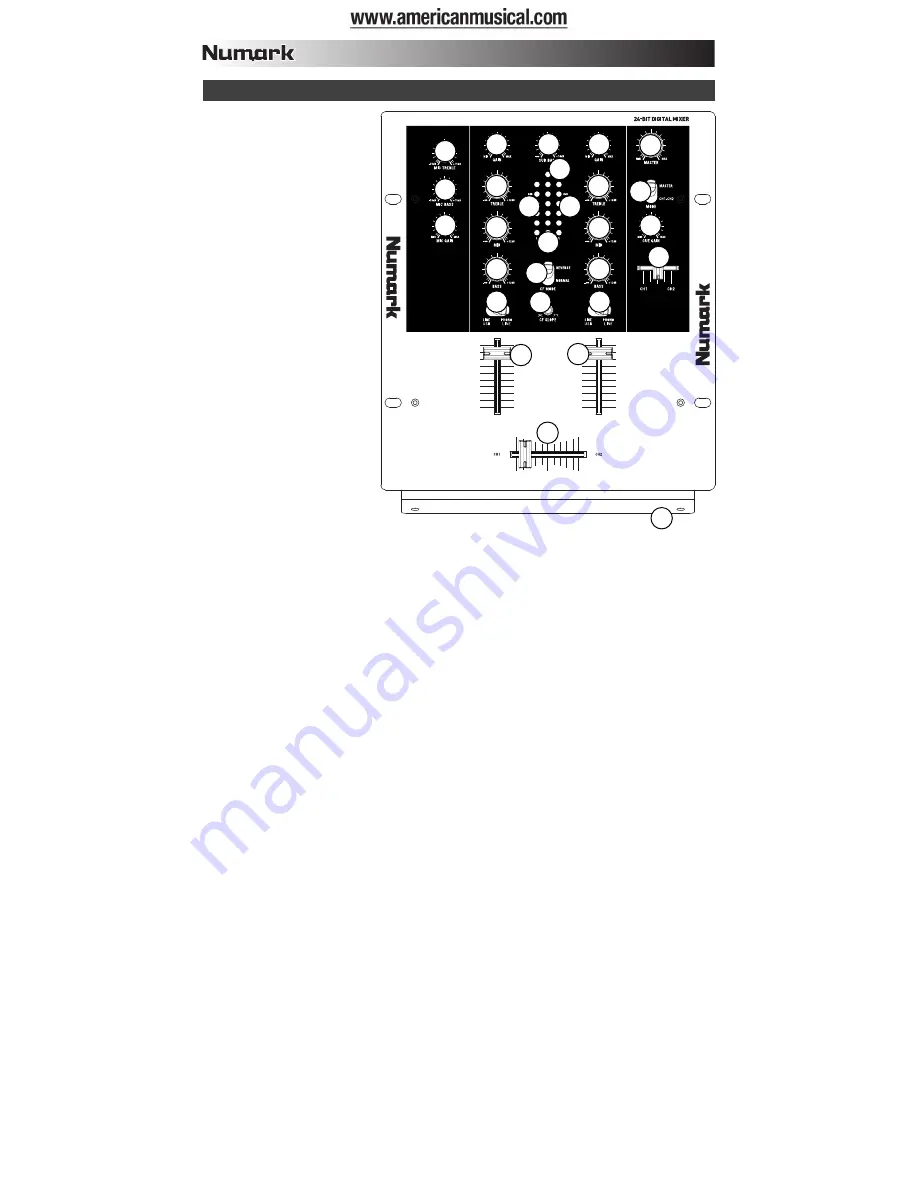
 TOP PANEL FEATURES 

1.


POWER LED – 

Illuminates 

when the mixer is on. 

2.


MIC GAIN – 

Adjusts the audio 

level of the microphone signal. 

3.


MIC BASS –

 Adjusts the low 

(bass) frequencies of the 
microphone channel. 

4.


MIC TREBLE –

 Adjusts the 

high (treble) frequencies of the 
microphone channel.  

Tip:

 If you experience 

feedback when using a 
microphone at loud levels, try 
turning down the high 
frequencies.  

5.


CHANNEL GAIN – 

Adjusts the 

corresponding channel’s pre-
fader and pre-EQ gain level. 

6.


CHANNEL TREBLE – 

Adjusts 

the high (treble) frequencies of 
the corresponding channel. 

7.


CHANNEL MID – 

Adjusts the 

mid-range frequencies of the 
corresponding channel. 

8.


CHANNEL BASS – 

Adjusts 

the low (bass) frequencies of 
the corresponding channel. 

9.


INPUT SELECTOR – 

Selects 

the input source to be routed 
to the corresponding channel. 
Input jacks are located on the 
rear panel. 

10.


CHANNEL FADER – 

Adjusts 

the audio level on the 
corresponding channel. 

11.


HEADPHONE VOLUME – 

Adjusts the volume level of the headphone output. 

12.


HEADPHONES – 

Connect your ¼” headphones to this output for cueing and mix monitoring.  Headphone 

output controls are located on the top panel. 

13.


CUE SLIDER – 

Previews the audio playing on Channels 1 and 2.  Sliding this to the left plays Channel 1. 

Sliding to the right plays Channel 2. 

14.


CUE METER

 – Monitors the pre-fader audio level of Channels 1 and 2. 

15.


CUE MODE SELECTOR 

– Selects the audio that is sent to the headphones.  Switch it to “MASTER” to hear 

the Program mix.  Switch it to “CH1 CH2” to hear Channels 1 and 2 in the Cue channel. (See 

#13

). 

16.


CROSSFADER – 

Blends audio playing between Channels 1 and 2.  Sliding this to the left plays Channel 1 and 

sliding to the right plays Channel 2. 

Note:

 The crossfader is user-replaceable if it should ever wear out. Simply remove the facepanel, then remove 

the screws holding it in position.  Replace the fader with a quality authorized replacement from your local 
Numark retailer only.


17.


CROSSFADER (CF) MODE – 

Reverses the assignment of Channels 1 and 2 on the crossfader.  

18.


CROSSFADER (CF) SLOPE – 

Adjusts the slope of the crossfader curve.  Flip switch to the left for a smooth 

fade (mixing) or to the right for a sharp cut (scratching). 

19.


MASTER –

 Adjusts the output volume of the Program mix. 

20.


STEREO LEVEL INDICATOR – 

Monitors the audio level of the Program mix. 

21.


SUB BASS – 

Adjusts the level of sub-harmonic (bass) frequencies of the Program mix.


1

2

3

4

5

6

7

8

9

5

6

7

8

9

10

10

11

13

14

15

16

12

17

18

19

20

20

21

Содержание X1 USB

Страница 1: ...24 BIT DIGITAL MIXER QUICKSTART GUIDE ENGLISH 3 8 GUÍA DE INICIO RÁPIDO ESPAÑOL 10 15 GUIDE D UTILISATION SIMPLIFIÉ FRANÇAIS 17 22 GUIDA RAPIDA ITALIANO 24 29 KURZANLEITUNG DEUTSCH 31 36 ...

Страница 2: ......

Страница 3: ...software We hope that the X1USB serves you well for many years to come Sincerely The People of Numark BOX CONTENTS X1USB USB cable AC Power Adapter Quickstart Guide Safety Warranty Information Booklet REGISTRATION Please go to http www numark com to register your X1USB Registering your product ensures that we can keep you up to date with any last minute product developments and provide you with wo...

Страница 4: ...4 CONNECTION DIAGRAM COMPUTER CD PLAYERS TURNTABLES MICROPHONE CD BURNER TAPE DECK HOUSE AMP HEADPHONES OR ...

Страница 5: ...RCA Use standard RCA cables to connect this output to a speaker or amplifier system The level of this output is controlled by the MASTER knob on the top panel 8 USB These USB connections send and receive audio from a connected computer The functionality of each port send or receive depends on the position of the corresponding USB SELECT switch For more information refer to the USB OPERATION sectio...

Страница 6: ...p panel 13 CUE SLIDER Previews the audio playing on Channels 1 and 2 Sliding this to the left plays Channel 1 Sliding to the right plays Channel 2 14 CUE METER Monitors the pre fader audio level of Channels 1 and 2 15 CUE MODE SELECTOR Selects the audio that is sent to the headphones Switch it to MASTER to hear the Program mix Switch it to CH1 CH2 to hear Channels 1 and 2 in the Cue channel See 13...

Страница 7: ...ter s sounds will be sent to the mixer channel indicated above the USB connection Note If you have connected both USB ports to your computer the ports will be numbered in the order they were connected For example if you connected USB A before USB B USB A will appear as USB Audio CODEC and USB B will appear as USB Audio CODEC 2 To send audio from your computer into the X1USB select USB Audio CODEC ...

Страница 8: ...dio MIDI Setup Please note that these settings are loaded upon application startup so if you change device settings while the application is open you will need to restart your application for the settings to take effect USING BOTH USB PORTS SIMULTANEOUSLY Since the X1USB has 2 USB ports you can attach a different computer to each USB jack or you can connect both jacks to a single computer Each USB...

Страница 9: ......

Страница 10: ...dB Total Harmonic Distortion 0 01 USB I O Signal to Noise Ratio JIS A weighted 85dB Frequency Response 20Hz 20kHz 0 1dB Total Harmonic Distortion 0 02 INPUTS Analog 2 phono line 1 mic preamp 1 4 Digital 2 USB OUTPUT Analog Master RCA Record RCA Headphone 1 4 stereo Digital 2 selectable USB 1 Master Cue 1 Record Cue ...

Страница 11: ......

Страница 12: ...www numark com ...

Отзывы: