


7
11.
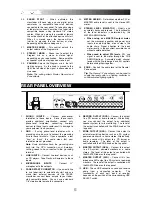
USB SELECT
– These switches determine the
functionality of the USB ports.
USB A:
RECORD –
Outputs the Record mix to
your computer for recording purposes.
CH3 –
Sends incoming audio from your
computer to mixer’s Channel 3 (you will
need to set the channel’s input selector
switch to USB A).
USB B:
MASTER –
Outputs the Master (Program)
mix to your computer for recording
purposes.
CH4 –
Sends incoming audio from your
computer to mixer’s Channel 4 (you will
need to set the channel’s input selector
switch to USB B).
12.
AC IN
– While the power is off, use the included
power supply cable to connect the mixer to a
power outlet.
13.
VOLTAGE SELECTOR
– This 2-position switch
sets the AC input voltage for the speaker. U.S.
users should set this switch to “100-120V”
whereas U.K. and most European users will need
to set this to “220-240V”.
14.
POWER SWITCH
– This switch turns the mixer on
and off. When powering on, ensure that all input
devices are connected to prevent damage to your
equipment. Power the mixer on before powering
on amplifiers and speakers and power off
amplifiers before you power off the mixer.
USB OPERATION
The CM3USB is equipped with two USB ports which allow you to play content from your computer through
the mixer, or record audio from the mixer directly into your favorite software application. The USB interface
on your mixer works with your computer just like a standard USB sound card. In addition, the USB interface
is class-compliant, so there are no special drivers or software to install; simply connect a USB cable from
either or both USB ports to your computer and you are ready to go!
WINDOWS CONFIGURATION
1.
Turn on your computer and the C3USB.
2.
Use a USB cable to connect one (or both) ports of the C3USB to your computer.
3.
Windows will immediately recognize the mixer as a “USB Audio Device” or “USB Audio CODEC” and will
automatically install any required system components.
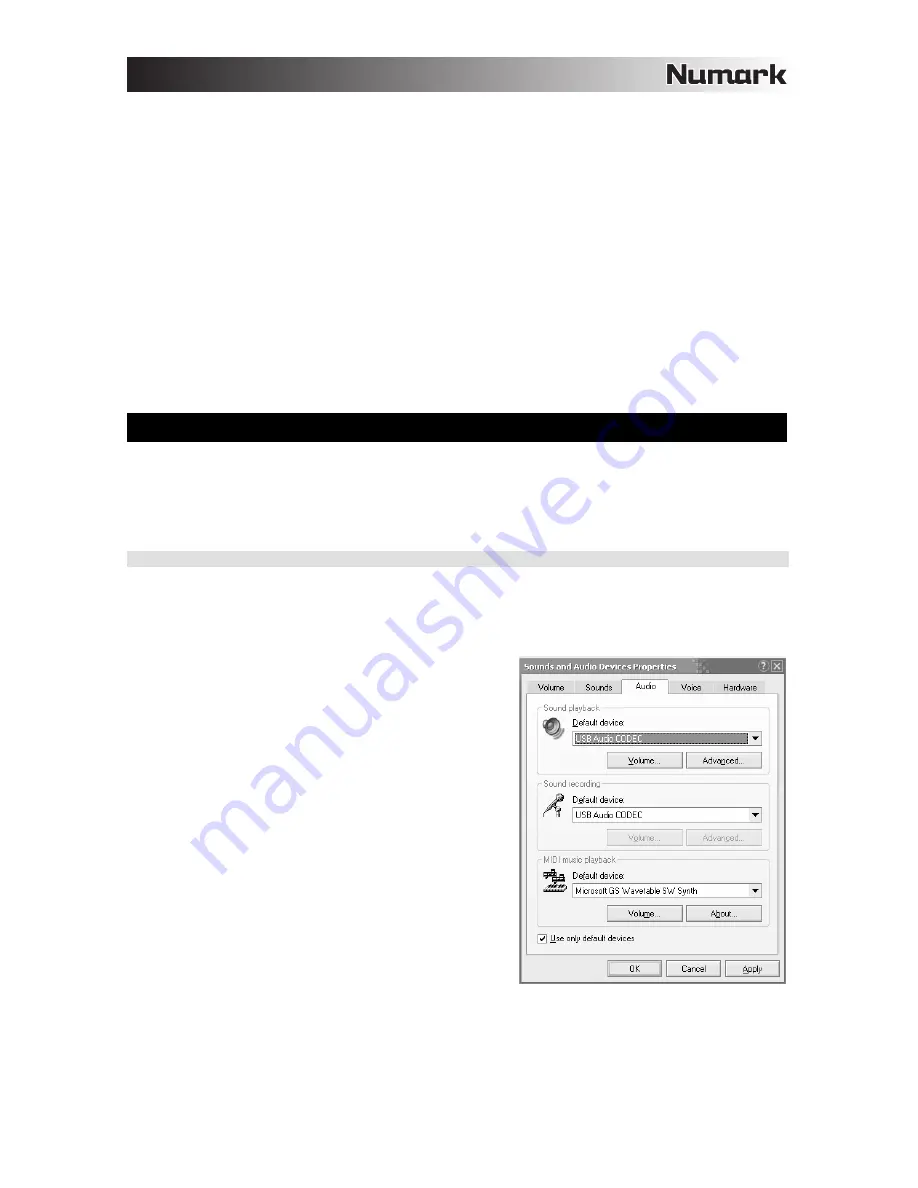
To change system audio preferences in Windows, you will need to
access the
Sounds and Audio Devices
properties, located in the
Control Panel
. To access audio device settings, click on the
Audio
tab.
The first time you connect the C3USB to your computer, the mixer
will be automatically assigned as the Default (or “Preferred”)
Device for sound playback on your computer. All of your
computer’s sounds will be sent to the mixer channel indicated
above the USB connection.
Note:
If you have connected both USB ports to your computer, the
ports will be numbered in the order they were connected. For
example, if you connected USB A before USB B, USB A will
appear as “USB Audio CODEC” and USB B will appear as “USB
Audio CODEC (2)”.
To send audio from your computer into the C3USB, select
“USB Audio CODEC” in the
Sound Playback
field. This
allows you to play audio from your computer into one of
either of the mixer channels, depending on which USB port
is used to make the connection.
To send audio from the C3USB to your computer, select
“USB Audio CODEC” in the
Sound Recording
field. This
allows you to record your mix into your computer.
Note:
If your sound playback or recording application does not have its own audio input and output settings (for
example, Windows Sound Recorder, Windows Media Player or Apple iTunes), it will use the devices set in Sounds
and Audio Devices. Please note that these settings are loaded upon application startup, so if you change device
settings while the application is open, you will need to restart your application for the settings to take effect.
Tip:
To prevent Windows from playing system sounds (beeps and bleeps) through the C3USB, we highly recommend
disabling these by clicking on the
Sounds
tab and selecting
No Sounds
from the pull-down menu.
Содержание C3USB
Страница 2: ......
Страница 10: ......
Страница 11: ......
Страница 12: ...MANUAL VERSION 1 0...
Страница 13: ...www numark com...


