background image


    NVR-3000  OPERATION  MANUAL  &  INSTALLATION  MANUAL 


NVR-3000 OM.E 20210412-02 

38 


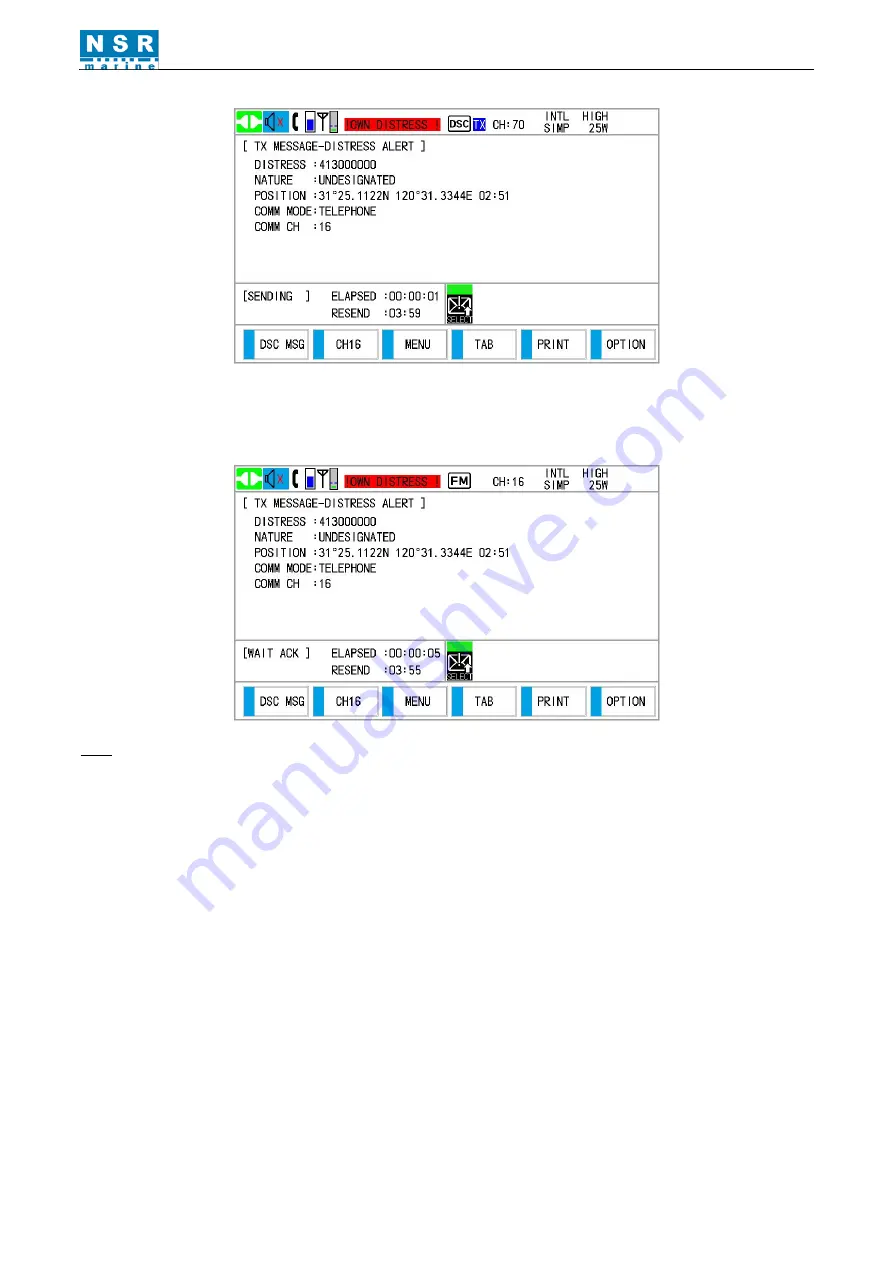
(2) After the distress call has been sent, the screen changes as below. Wait to receive the distress acknowledge call 

from  a  coast  station.  The  elapsed  time  since  transmission  is  displayed.  At  this  time,  the  icons  for  other DSC 

received  messages  except  the  distress  acknowledge  call  are  not  displayed.  You  can only  confirm  them  in  the 

DSC log. 


Note: The equipment automatically re-transmits the distress alert after 3 min 30 seconds to 4 min 30 seconds if 

doesn’t receive the distress acknowledge call. Then awaits the distress acknowledge call. This is repeated 

until the distress call is acknowledged. 


(3) Click 

[OPTION]

, you can temporarily stop the countdown during next retransmission by selecting 

[PAUSE]

 in 

the user options area. 

[Pause]

 is displayed instead of the countdown indication at 

[RESEND]

 indication.     

To  restart,  click 

[OPTION]

  again, 

[Pause]

  indication  changes  to 

[Start]

,  select 

[Start]

.  The  countdown 

restarts. 

You can also cancel the sending/resending by clicking 

[Cancel]

For example: 


  [OPTION]-


[Pause]

Содержание NVR-3000

Страница 1: ...NVR 3000 OM E 20210412 02 Operation Manual Installation Manual VHF RADIO GMDSS NVR 3000 ...

Страница 2: ...tomers needs information in this document is subject to change without prior notice NSR does not make any representations or warranties implied or otherwise regarding the accuracy and completeness of this document and shall in no event be liable for any loss of profit or any commercial damage including but not limited to special incidental consequential or other damage iii Warning Any attempt to i...

Страница 3: ...NVR 3000 OM E 20210412 02 MODIFY RECORD No Modify by Date Paragraph Version Reason 1 Q A 2020 10 21 01 First edition 2 Q A 2021 04 12 all 02 General modification ...

Страница 4: ... 2 8 System Setting 12 2 8 1 Language 12 2 8 2 Print 12 2 8 3 Audio 12 2 8 4 Display Setting 14 2 8 5 Date Time Setting 15 2 8 6 Position Setting 16 2 8 7 Timeout Setting 17 2 8 8 Port Setting 18 2 9 Address List 18 2 9 1 View an address 19 2 9 2 Add an address 19 2 9 3 Delete an address 21 2 9 4 Call to an address 21 2 10 Diagnostics 22 2 10 1 Program Version 22 2 10 2 LCD Test 23 2 10 3 Key Test...

Страница 5: ...l 52 4 3 2 Group Call 59 4 3 3 All Ships Call 62 4 3 4 Position Call 65 4 3 5 Test Call 70 4 3 6 Polling Call 74 5 INSTALLATION 76 5 1 VHF Antenna 76 5 2 Transceiver 76 5 3 CONNECTION 76 5 3 1 POWER SUPPLY 76 5 3 2 GNSS DATA INPUT 76 5 3 3 CONNECT TO PRINTER 76 5 3 4 CONNECT TO S VDR 77 5 3 5 CONNECT TO INS BAM 77 5 4 MMSI ATIS ID Setting 77 6 MAINTENANCE 79 6 1 Maintenance 79 6 2 Simple Troublesh...

Страница 6: ... 2 digit or 4 digit to meet the latest regulation of IMO and ITU 1 2 Product Features NVR 3000 is the new generation of NSR VHF Radio The main features of the NVR 3000 include Large 7 inch color LCD with touch screen operation Knob touch screen operation 4 digital channels available DSC watching receiver integrated Channels are scanned to sample any signal to be received Audio interface to VDR Dat...

Страница 7: ...NVR 3000 OPERATION MANUAL INSTALLATION MANUAL NVR 3000 OM E 20210412 02 7 ...

Страница 8: ...main speaker Press to turn the power on or off DIM Dimmer key for LCD brightness control PUSH TO ENTER Press to switch the volume adjustment object between main speaker and handset in Main screen Rotate to select menu items select channel or SQL level Push to confirm a selection DISTRESS Press and hold down the button 3 seconds to transmit the distress alert Note The DISTRESS button is covered to ...

Страница 9: ...ly NO INFO No position and time data 7 DSC MSG Compose DSC message 8 CH16 Switch to the Main radiotelephone screen and set to CH16 Note This function is not available for PRIV private channel region 9 MENU Open the Main Menu 10 WX Switch to WX Weather Channel 11 MULTI Set SCAN or DW Dual Watching 12 TASK Back to the DSC task menu 13 CH Channel setting 14 REGION Select channel region 15 POWER Power...

Страница 10: ...stay on CH16 for receiving by ignoring the signal on the additional channel Procedures Set the additional channel to be watched for example CH18 Refer to Section 3 2 Channel Setting Click MULIT DW to start the scanning The screen alternately switches between CH 16 and CH 18 To stop scanning click MULIT DW again or click any other button on the screen 2 4 2 All Channel Scan In All Channel Scan CH16...

Страница 11: ... are three ways to turn on off the main speaker except in DSC communication alarming and key buzzing Rotate the VOLUME knob anti clockwise to mute the main speaker At any screen shortly press the VOLUME knob to mute the main speaker and press again to resume While AUDIO OFF HOOK SPK in SYSTEM SETTING is set as ON the main speaker keeps on no matter the handset is on off the hook While OFF HOOK SPK...

Страница 12: ...tem Setting Click SYSTEM on the MAIN MENU screen The following SYSTEM SETTING screen appears 2 8 1 Language The default menu language is English Click LANGUAGE to change the menu language 2 8 2 Print The PRINT menu enables disables automatic printing of all transmitted and received calls and the results of the self test Click PRINT in SYSTEM SETTING Click TX MESSAGE to select MANUAL or AUTO Set RX...

Страница 13: ...n or off 2 8 3 2 ALARM BUZZER Click SYSTEM ALARM to switch the alarm buzzer on or off By setting the SYSTEM ALARM alarm that sounds against system faults and message receiving may be enabled or disabled 2 8 3 3 OFF HOOK SPK Click OFF HOOK SPK to switch the main speaker on or off when the handset is off hook ...

Страница 14: ... Click SQL to switch the SQL on or off 2 8 3 5 SQL LEVEL Click SQL LEVEL to select the threshold value between 1 10 Note SQL can also be set on main screen 2 8 4 Display Setting 2 8 4 1 DISPLAY MODE Set the display mode DAY or NIGHT in the SYSTEM SETTING DISPLAY DISPLAY MODE by clicking ...

Страница 15: ...e Setting This is to set the date and time for the system Click DATE TIME in SYSTEM SETTING to open the DATE TIME SET screen There are four items can be set MODE DATE UTC TIME UTC and ZONE Date or time cannot be adjusted when they are input from GNSS navigator If date or time is not input from GNSS navigator click to enter date and time with the numeric keys in the pop up window For example ...

Страница 16: ...d it will be showed on the bottom right of Main screen 2 8 6 Position Setting This is to set a position used for DSC operations only when GNSS input is not available Do the following to set your position Click POSITION in SYSTEM SETTING The following screen appears Click SOURCR to select EPFS or MANUAL EPFS The position data from EPFS The system will display EPFS LOST POSITION if no any data ...

Страница 17: ...ic keys to enter latitude longitude of your position and UTC time To change coordinate click 1 for North or East 2 for South or West After entering each data click OK Note When the setting of POSITION input type is MANUAL and the message WARNING Position data is not updated is shown the Position data was older than 4H Please update it 2 8 7 Timeout Setting This is to set the time out parameters fo...

Страница 18: ...for the receiving distress call Click to select the item and its time interval desired OFF leaves the menu screen and or the inactive communications open until you close them manually 2 8 8 Port Setting This is to set the baud rate of I O ports Click PORT in SYSTEM SETTING The following screen appears Click INS GNSS or ALARM until the desired baud rate appears 2 9 Address List This is to build up ...

Страница 19: ...NVR 3000 OM E 20210412 02 19 2 9 1 View an address Click to select the address in list Click VIEW to see the details of the address The address can be edited in this menu 2 9 2 Add an address Click ADD to add an address For example add a group MMSI ...

Страница 20: ...with the numeric keys in INPUT Click OK to confirm The TYPE is automatically changed to GROUP if you enter the group MMSI Click NAME to add a group name by using keys in INPUT and rotating the PUSH TO ENTER knob Click OK to confirm the editing Click SAVE and select YES The address is added in the list ...

Страница 21: ...lick to select an address in list Click DEL delete the selected address directly 2 9 4 Call to an address Click to select an address in list Click CALL you can send a DSC call to the selected address For example To a coast station You can send INDIVIDUAL or TEST call To a group You can send GROUP call ...

Страница 22: ...DIVIDUAL TEST or POSITION call After editing click CALL to send the DSC call 2 10 Diagnostics Click DIAGOSTICS on the MAIN MENU screen The following DIAGOSTICS screen appears 2 10 1 Program Version It is to check the program version at DIAGOSTICS menu Click PROGRAM VERSION the following screen appears ...

Страница 23: ...lick KEY TEST to enter the following screen KEY test DIM Press the DIM button DISTRESS Press the DISTRESS button KNOB test LEFT RIGHT ENT Turn the PUSH TO ENTER knob to left and right then press it LEFT2 RIGHT2 ENT2 Turn the PUSH TO PWR knob to left and right then press it TOUCH test Touch the corner of the screen The box corresponding to the item will be filled with blue color If everything is go...

Страница 24: ...ing screen appears Click the items to test the corresponding audio Note 1 The ALARM buzzer should be set to ON while do the test 2 The setting ON or OFF of MIC LOOPBACK used for handset microphone loop test won t be saved 2 11 User Manager Click USER on the MAIN MENU screen The USER MANAGER menu appears ...

Страница 25: ...equency or RX frequency to edit For example Click TX enter the TX frequency with the numeric keys in INPUT Click OK to confirm the input Click SAVE and choose YES to save the edition NO to discard the edition Add a channel Click ADD open the CHANNEL EDIT screen The operation is same as above Delete a channel Move the cursor to the wanted channel Click DELETE delete the channel directly Call Move t...

Страница 26: ...dge the alert LOG Check the alert history For example Note RESET is only used for DISTRESS RX alert reset Alert Mark Description Table MARK PRIORITY STATE ALARM ACTIVE UNACKNOWLEDGED ACTIVE SILENCED ACTIVE ACKNOWLEDGED ACTIVE RESPONSIBILITY TRANSFERRED RECTIFIED UNACKNOWLEDGED WARNING ACTIVE UNACKNOWLEDGED ACTIVE SILENCED ACTIVE ACKNOWLEDGED ACTIVE RESPONSIBILITY TRANSFERRED RECTIFIED UNACKNOWLEDG...

Страница 27: ...EIVER FAIL Not Transmitting Check 3062 316 B WARNING GENERAL FAULT HW error Check equipment 3062 317 B WARNING SELFTEST FAULT Built in self test failure 3019 318 B CAUTION WRONG MMSI Check MMSI setting 3009 320 B CAUTION LOST TRANSCEIVER Check transceiver 2 11 3 User Test Click USER TEST on the USER MANAGER screen Click DAILY to open the DAILY TEST screen Then click TEST and confirm YES to start t...

Страница 28: ... by clicking REGION on the main menu INTL International Channel USA USA Channel CAN CANADA Channel IWW Inland Waterway Channel PRIV Private Channel Note Up to 200 Private channels are available only for fishing or specially assigned channels 3 2 Channel Setting There are three ways to set the channel See below for details Note To set the radiotelephone to CH16 click CH16 Click CH the mark appears ...

Страница 29: ...LLATION MANUAL NVR 3000 OM E 20210412 02 29 Click the number 2 4 digits to enter channel then click OK Click the channel number in the center of the screen The following screen appears Click to choose the desired channel For example ...

Страница 30: ...MANUAL NVR 3000 OM E 20210412 02 30 Rotate the PUSH TO ENTER knob to change the channel number directly while SQL is OFF or mark appears on the left side of CH 3 3 Transmit Transmitting power setting Click POWER to select HIGH 25W or LOW 1W ...

Страница 31: ...he handset Hold the handset close to your mouth press the PTT switch and speak clearly 3 4 Receive Squelch on off The squelch mutes the noise output in the absence of an incoming signal Click SQL to alternately turn squelch on and off in MENU SYSTEM SETTING AUDIO menu When radio noise is too jarring during stand by condition it can be muted by activating the squelch and the threshold value 1 10 is...

Страница 32: ...l can be adjusted Please refer to Section 2 8 3 5 You can also do the following steps to adjust the squelch level Click CH the mark appears Rotate the PUSH TO ENTER knob to change the squelch level Note While using the handset for communication press the PTT switch to talk and release it to listen ...

Страница 33: ...call include Calling category Station ID MMSI Priority Communication mode Communication channel frequency Position DSC channel frequency End code Calling category DSC calls are roughly divided in two groups distress calls and general urgency safety and routine calls Below are the types of DSC calls Call category Call DISTRESS DISTRESS ALERT DISTRESS RELAY ALL DISTRESS RELAY INDIVIDUAL DISTRESS REL...

Страница 34: ...COMM CH Subsequent working channel used to call by VHF radiotelephone The sending station may have the receiving station ship or coast station assign the channel to use Position POSITION Position can be automatically or manually set End code The end of a DSC call is indicated with EOS acknowledgement acknowledgement required no acknowledgement required 4 1 2 Audio Alarms When you receive a distres...

Страница 35: ...gits after decimal point when receiving position data with no information for expansion expansion digits after decimal point Examples Alarm Frequency interval Distress Count Down 2000Hz 500ms Silence 500ms Two Tone Distress 2200Hz 250ms 1300Hz 250ms Distress Ack 2200Hz 500ms 1300Hz 500ms Urgency 2200Hz 250ms Silence 250ms Urgency Ack 2200Hz 500ms Silence 500ms General Routine Routine Ack 750Hz 50m...

Страница 36: ...osition data with expansion the indication is LAT 12 34 5678 N 3 When receiving position data with no information for expansion the indication is LAT 12 34 N The contents of other types of RX calls are similar to that of the individual call 4 1 3 2 TX calls Distress alert Distress relay call Individual call The contents of other types of TX calls are similar to the above ...

Страница 37: ...nds The DISTRESS button is covered to prevent false alarm The audio alarm sounds while pressing the button and the button flashes The countdown message appears on the screen while pressing the DISTRESS button 3S 2S 1S For example With position information No position information Press the DISTRESS button after the countdown shows 1S the distress call is sent The audio alarm sounds for two seconds ...

Страница 38: ...ent automatically re transmits the distress alert after 3 min 30 seconds to 4 min 30 seconds if doesn t receive the distress acknowledge call Then awaits the distress acknowledge call This is repeated until the distress call is acknowledged 3 Click OPTION you can temporarily stop the countdown during next retransmission by selecting PAUSE in the user options area Pause is displayed instead of the ...

Страница 39: ... OM E 20210412 02 39 OPTION Start OPTION Cancel Please see the details in Section 4 2 4 Cancel a Distress Call 4 You can click Resend to resend the distress call Also you can re send the distress alert manually by pressing the DISTRESS button for 3 seconds ...

Страница 40: ...ture of distress and assistance needed Give description of own ship type color number of persons onboard etc 4 2 1 2 Send a distress call by DSC MSG with distress information edited If you have a time to prepare the distress message send the distress call as follows Click DSC MSG or click MENU and choose DSC MESSAGE then click DISTRESS ALERT in MESSAGE Click NATURE to select nature of distress amo...

Страница 41: ...3000 OM E 20210412 02 41 Click POSITION select EPFS MANUAL or NO INFO in pop up window EPFS The position information from EPFS is automatically shown MANUAL Input your position manually NO INFO No information For MANUAL go to step For others go to step ...

Страница 42: ...e to communicate with the coast station Refer to Section 4 2 1 1 5 4 2 2 Receive a Distress Call When you receive a distress call from a ship in distress the audio alarm sounds and the LED of the DISTRESS button flashes The icon for DISTRESS receiving appears in the tab area Click CLICK to silence the audio alarm Wait for the distress acknowledgement from a coast station If you do not receive the ...

Страница 43: ...cknowledgement to the ship in distress after consulting with the RCC or a coast station Send acknowledgement on CH70 as follows When you received a distress call click CLICK to silence the audio alarm and stop the flashing of the LED Wait 5 minutes after receiving a distress call If you do not receive the distress acknowledgement from a coast station and you have received the distress call more th...

Страница 44: ...ip in distress Note You can not edit the message for the distress acknowledgement 2 Send the distress relay to coast station Click OPTION select Relay then click YES to open the composing screen for the distress relay Click TYPE to select RELAY INDIVIDUAL Click TO enter the MMSI of the coast station where to send the distress relay with the numeric keys then click OK to confirm ...

Страница 45: ...oast station by telephone over the channel specified If you do not receive the distress acknowledgement from a coast station click OPTION select RESEND to transmit the distress relay again or select Quit to finish the distress relay You can also transmit the distress relay refer to 4 2 3 again 3 Send the distress relay to all ships Click OPTION select Relay then click YES to open the composing scr...

Страница 46: ...in the following cases You are near the ship in distress and the ship in distress cannot transmit the distress alert When the master or person responsible for own ship considers that further assistance is necessary Note Do not use the DISTRESS button to relay distress Click DSC MSG or MENU DSC MESSAGE Click DISTRESS RELAY in the MESSAGE menu to open the composing screen for the distress relay Clic...

Страница 47: ...TO selected click to enter the MMSI where to send the distress relay by numeric keys in INPUT Click OK to confirm Click DISTRESS ID choose INPUT to enter the ID MMSI of the ship in distress with the numeric keys then click OK With NATURE selected click to select nature of distress ...

Страница 48: ...o enter the UTC time then click OK to confirm Click CALL the distress relay is transmitted to the coast station After transmitting the WAIT ACK screen appears The elapsed time since transmitting is displayed When the distress relay individual acknowledgement from the coast station is received the audio alarm sounds and a pop up message appears Click CLICK to silence the alarm and erase the pop up ...

Страница 49: ...he same as in other DSC calls 4 2 3 2 Send a distress relay to all ships If a coast station directs you to send a distress relay to all ships follow the procedure as below You can not transmit a distress relay unless directed by a coast station Click DISTRESS RELAY in the MESSAGE menu to open the composing screen for the distress relay Click TYPE to select RELAY ALL SHIP With DISTRESS ID selected ...

Страница 50: ...s 4 2 4 Cancel a Distress Call You can cancel the distress call while it is being sent or while waiting for its acknowledgement as follows Click OPTION then select Cancel Click YES to cancel the sending screen appears Pick up the handset make a voice announcement with all ships via radiotelephone referring to the message on screen ...

Страница 51: ... to select the further operation 4 3 DSC GENERAL CALLS The procedure for sending and receiving non distress DSC messages is similar among different message types The following is an example of the procedure for an individual call Send the individual call Wait for the individual message acknowledgement Start the communication ...

Страница 52: ... called ACK RQ transmission wait to receive the acknowledge back ACK BQ signal from the receiving station 4 3 1 1 Send an individual call 1 Click DSC MSG or click MENU and choose DSC MESSAGE then click GENERAL MESSAGE in MESSAGE 2 Click MSG TYPE or rotate the PUSH TO ENTER knob to select MSG TYPE then push the knob select INDIVIDUAL among INDIVIDUAL GROUP ALL SHIP POSITION and TEST ...

Страница 53: ...e call with the numeric keys in INPUT Click OK to confirm 4 Click PRIORITY to select PRIORITY then push the knob select ROUTINE SAFETY or URGENCY 5 The COMM MODE is TELEPHONE automatically 6 Click COMM CH use the numeric keys to enter the VHF channel and click OK to confirm For example 7 Click CALL to send the individual call ...

Страница 54: ...s sent After the call is sent the equipment waits for acknowledgement of the call showing the WAIT ACK screen as below You can also do the option Hold Quit Resend 8 When the ACK is received the audio alarm sounds and the pop up message appears on the screen as below The timer starts counting up the time since the ACK is received ...

Страница 55: ... erase the pop up message The working channel is automatically set you can communicate by radiotelephone pick up the handset to talk After you have completed communications click OPTION select Quit to Main screen Individual acknowledge call new channel received This call means that the station you sent the individual call to accepts your call but requests their channel Click CLICK to silence the a...

Страница 56: ... CH UBABLE MODE UBABLE Coast station use Click OPTION select Quit to Main screen Note If the coast station sends the message QUEUE wait until your turn comes If there is no response from the receiving station do one of the following procedures Resend call Click OPTION select Resend Cancel call Click OPTION select Quit then select Yes to cancel the call 4 3 1 2 Receive an individual call Unable ack...

Страница 57: ... the call Send able unable acknowledge manually When an individual call is received with the setting MANUAL on the ACK SETTING menu the audio alarm sounds and a pop up message appears on the screen as below Click CLICK to silence the audio alarm and erase the pop up message There are three types of ACK transmission able acknowledge able to change channel and unable acknowledge Click OPTION follow ...

Страница 58: ...diotelephone After you have completed communications click OPTION to select Quit 2 Send unable acknowledge call Click Unable With REASON selected click CALL to send unable acknowledge call 3 Send able acknowledge call and change channel Click Propose the following screen appears Click COMM CH ...

Страница 59: ...Click CALL send the able to change channel acknowledge call Communicate by radiotelephone After you have completed communications click OPTION to select Quit 4 3 2 Group Call Group call is used to call a specific group by specifying its group MMSI 4 3 2 1 Send a group call 1 Click DSC MSG or click MENU and choose DSC MESSAGE then click GENERAL MESSAGE ...

Страница 60: ... TO selected enter the group MMSI that where to send the group call in INPUT then click OK to confirm 4 PRIORITY is automatically selected to ROUTINE 5 Click COMM CH set the channel by the numeric keys and click OK to confirm For example CH06 6 After finish setting click CALL to send the group call The screen changes as below ...

Страница 61: ...do the option Hold or Resend 4 3 2 2 Receive a group call Group MMSI must be registered in order to receive a group call Refer to Section 2 10 When a group call is received the audio alarm sounds The icon appears in the tab area and the pop up message RECEIVED A DSC MESSAGE GROUP appears 1 Click CLICK to silence the audio alarm and erase the pop up message The channel is automatically tuned to the...

Страница 62: ...r sending the call you can communicate by radiotelephone Do the following before beginning actual communications URGENCY priority Say PAN three times followed by own ship s call sign SAFETY priority Say SECURITE three times followed by own ship s call sign 4 3 3 1 Send an all ships call 1 Click DSC MSG or click MENU and choose DSC MESSAGE then click GENERAL MESSAGE in MESSAGE 2 Click MSG TYPE to s...

Страница 63: ...3000 OM E 20210412 02 63 5 Click CALL to send the call The screen changes as below Communicate by radiotelephone 6 After you have completed communications click OPTION select Quit and click YES to Main screen 7 You can also do the option Hold or Resend ...

Страница 64: ...nds The icon appears in the tab area and the pop up message RECEIVED A DSC MESSAGE ALL SHIP appears 1 Click CLICK to silence the audio alarm and erase the pop up message The channel is automatically tuned to the received communication channel 2 Watch on the channel Communicate by radiotelephone 3 After you have completed communications click OPTION to select Quit ...

Страница 65: ...es of position calls own ship requests another ship s position and other station requires own ship s position Request position of other station Send own ship s position to other station 4 3 4 1 Request other ship s position 1 Click DSC MSG or click MENU and choose DSC MESSAGE then click GENERAL MESSAGE in MESSAGE ...

Страница 66: ...ck TO enter the MMSI where to send the position call in INPUT then click OK to confirm 4 PRIORITY is automatically selected to SAFETY 5 Click CALL to send position call The screen changes as below 6 After the call has been sent the WAIT ACK screen appears as below The elapsed time since sending the call is displayed ...

Страница 67: ... E 20210412 02 67 You can also do the option during waiting acknowledgement Hold Quit or Resend 7 When you receive an acknowledge message the audio alarm sounds and a popup message appears 8 Click CLICK to silence the audio alarm and erase the pop up message ...

Страница 68: ...on the ACK SETTING menu is AUTO the equipment automatically transmits a reply There are two types of automatic replies one with position information the setting is AUTO ABLE and the other with no position information the setting is AUTO UNABLE Manual reply When a position request message is received and the setting of POSITION on the ACK SETTING menu is MANUAL send the reply manually When you rece...

Страница 69: ...AL INSTALLATION MANUAL NVR 3000 OM E 20210412 02 69 1 To silence the audio alarm click CLICK 2 Click OPTION do the operation as follows Send the ACK with position information Click Accept send position information of own ship ...

Страница 70: ...70 Send the ACK with no position information Click Unable The screen changes as below 3 After the ACK is finished click OPTION to select Quit 4 3 5 Test Call 4 3 5 1 Send a test call 1 Click DSC MSG or click MENU and choose DSC MESSAGE then click GENERAL MESSAGE in MESSAGE ...

Страница 71: ... TYPE to select TEST 3 Click TO enter the MMSI where to send the test call in INPUT then click OK to confirm 4 Click CALL to send test call The screen changes as below 5 After the call has been sent the WAIT ACK screen appears as below The elapsed time since sending the call is displayed ...

Страница 72: ...larm sounds and a popup message appears 7 Click CLICK to silence the audio alarm and erase the pop up message 8 Click OPTION select Quit to back to Main screen 4 3 5 2 Receive a test call Automatic acknowledge When a test call is received with AUTO setting on TEST of the ACK SETTING menu an acknowledgement is sent automatically ...

Страница 73: ...ting of TEST on the ACK SETTING menu is MANUAL send the acknowledgement manually When you receive a test call the audio alarm sounds The icon appears in the tab area and the pop up message RECEIVED A DSC MESSAGE TEST appears 1 To silence the audio alarm click CLICK 2 Click OPTION choose one of the operations Hold Quit or Accept ...

Страница 74: ...ip 4 3 6 1 Automatic reply When a polling request message is received with AUTO setting on POLLING of the ACK SETTING menu an acknowledgement is sent automatically 4 3 6 2 Manual reply When a polling call is received and the setting of POLLING on the ACK SETTING menu is MANUAL send the acknowledgement manually When you receive a polling request message the audio alarm sounds The icon appears in th...

Страница 75: ...LATION MANUAL NVR 3000 OM E 20210412 02 75 2 Click OPTION choose one of the operations Hold Quit or Accept If you click Accept the polling acknowledgement will be sent After the acknowledgement is finished click OPTION to select Quit ...

Страница 76: ...please refer to below suggestions The shorter the cable the less the loss The low loss cable is recommended if the cable is longer than 10m Watertight treatment is required for outdoor connecting The RF cable should be kept at least 10cm from the power cable The cable cross should be avoided 5 2 Transceiver Four screws are supplied to mount the transceiver The transceiver can be installed either o...

Страница 77: ...4800bps in factory 5 3 4 CONNECT TO S VDR Please refer to the attached drawings for the connection and wiring 5 3 5 CONNECT TO INS BAM Please refer to the attached drawings for the connection and wiring 5 4 MMSI ATIS ID Setting When the VHF radio is powered on for the first time typically during installation the vessel s MMSI number can be entered Hereafter the MMSI number is briefly displayed aft...

Страница 78: ... And MMSI ATIS ID will be locked afterwards For example ATIS LOCK The ATIS LOCK appears after clicking ATIS LOCK again NOTE Without a programmed MMSI the DISTRESS button will not work The DSC MSG cannot be opened either if the MMSI has not been programmed during installation To change or reprogram a new MMSI please contact NSR or local agent ...

Страница 79: ...Unit If not within the range check power source Low or over voltage may cause operation abnormal 6 2 Simple Troubleshooting The table below provides possible problems and the means with which to restore normal operation If normal operation cannot be restored do not attempt to check inside the equipment Any servicing should be referred to a qualified technician Problem Probable cause Remedy Power c...

Страница 80: ...E DSC ATIS F2B G2B Antenna Impedance 50 Ω unbalanced Tx Rx Switching Interval 300 ms or less LCD display 7 inch color LCD touch screen operation Interface IEC61162 1 Ed 5 2016 08 IEC61162 2 Ed 1 1998 09 600 Ω balanced VDR 600 Ω unbalanced Ext SP Performance Criteria IMO A 803 19 A 694 17 MSC 68 68 MSC Circ 862 IEC 60945 Ed 4 2002 08 Power Supply Voltage 24 VDC 21 6 VDC 31 2 VDC Current Consumption...

Страница 81: ...termodulation Rejection 65dB Harmonic Distortion 10 Max Audio Output 3W DSC Function Signal Format and Protocol Comply with the ITU R M 493 15 and M 541 10 Emission Type G2B Modulation Frequency MARK signal Y 1 300Hz 10Hz SPACE signal B 2 100Hz 10Hz Transmission Speed 1 200bps 30 x 10 6 Dedicated DSC Receiver WKR Receive frequency 156 525MHz channel 70 Sensitivity Error rate 1 when receiving signa...

Страница 82: ... DSC OFF ON PRINT TX MESSAGE MANUAL AUTO RX MESSAGE MANUAL AUTO SELFTEST INFO MANUAL AUTO PRINTER TYPE PRINTER PORT 4800 9600 19200 38400 115200 AUDIO KEY ON OFF ALARM OFF ON OFF HOOK SPK ON OFF SQL SQL LEVEL DISPLAY LCD DIMMER 1 10 DISPLAY MODE DAY NIGHT CHANNEL SIZE DATE TIME MODE LMT UTC DATE UTC TIME UTC ZONE POSITION SOURCE MANUAL EPFS POS TIME TIMEOUT MENU BACK OFF 10MIN TELEPHONE 30S 10MIN ...

Страница 83: ... 550 1019 156 950 156 950 2019 161 550 Transmission prohibited 20 157 000 161 600 1020 157 000 157 000 2020 161 600 Transmission prohibited 1027 157 350 157 350 1028 157 400 157 400 60 156 025 160 625 61 156 075 160 675 62 156 125 160 725 63 156 175 160 775 64 156 225 160 825 65 156 275 160 875 66 156 325 160 925 67 156 375 156 375 68 156 425 156 425 69 156 475 156 475 70 156 525 156 525 For DSC o...

Страница 84: ...0 156 900 1019 156 950 156 950 20 157 000 161 600 1020 157 000 157 000 1022 157 100 157 100 24 157 200 161 800 25 157 250 161 850 26 157 300 161 900 27 157 350 161 950 28 157 400 162 000 1063 156 175 156 175 1065 156 275 156 275 1066 156 325 156 325 67 156 375 156 375 1w default 68 156 425 156 425 69 156 475 156 475 70 156 525 156 525 For DSC operation only 71 156 575 156 575 1w default 72 156 625...

Страница 85: ...istress Safety and Calling 17 156 850 156 850 Fixed at 1W 18 156 900 161 500 1018 156 900 156 900 19 156 950 161 550 2019 161 550 Transmission prohibited 20 157 000 161 600 Fixed at 1W 1020 157 000 157 000 2020 161 600 Transmission prohibited 21 157 050 161 650 22 157 100 161 700 23 157 150 161 750 1023 161 750 Transmission prohibited 24 157 200 161 800 25 157 250 161 850 26 157 300 161 900 2026 1...

Страница 86: ...5 156 825 Fixed at 1W 77 156 875 156 875 Fixed at 1W 78 156 925 161 525 1078 156 925 156 925 2078 161 525 Transmission prohibited 79 156 975 161 575 1079 156 975 156 975 2079 161 575 Transmission prohibited 80 157 025 161 625 1080 157 025 157 025 81 157 075 161 675 82 157 125 161 725 83 157 175 161 775 84 157 225 161 825 85 157 275 161 875 86 157 325 161 925 2086 161 925 Transmission prohibited 87...

Страница 87: ...950 161 550 1019 156 950 156 950 2019 161 550 Transmission prohibited 20 157 000 161 600 1020 157 000 157 000 2020 161 600 Transmission prohibited 1027 157 350 157 350 1028 157 400 157 400 60 156 025 160 625 61 156 075 160 675 62 156 125 160 725 63 156 175 160 775 64 156 225 160 825 65 156 275 160 875 66 156 325 160 925 67 156 375 156 375 68 156 425 156 425 69 156 475 156 475 70 156 525 156 525 Fo...

Страница 88: ...ANADA CMB Service WX3 162 475 NOAA Weather Channel CANADA CMB Service WX4 162 425 NOAA Weather Channel WX5 162 450 NOAA Weather Channel WX6 162 500 NOAA Weather Channel WX7 162 525 NOAA Weather Channel WX8 161 650 CANADA CMB Service WX9 161 775 CANADA CMB Service WX10 163 275 NOAA Weather Channel Assigned only Private Channels For fishing or specially assigned channels CH TYPE FREQUENCY MHz 001 20...

Страница 89: ... within a single alert source The alert identifier is a variable length integer field of maximum 7 digit integer It identifies the type of the alert e g a lost target alert Standardized alerts use unique alert identifiers described in equipment standards Number range 10000 9999999 is reserved for proprietary alerts Alert Identifier examples 001 2456789 245 NOTE 4 The alert instance identifies the ...

Страница 90: ...tors in headings 1 through 8 are considered valid The heading 0 is the only invalid indicator The GPS quality indicator field should not be a null field 0 fix not available or invalid 1 GPS SPS mode 2 differential GPS SPS mode 3 GPS PPS mode 4 Real Time Kinematic Satellite system used in RTK mode with fixed integers 5 Float RTK Satellite system used in RTK mode with floating solution 6 Estimated d...

Страница 91: ...acter indicates the use of GPS satellites the second character indicates the use of GLONASS satellites and the third indicate the use of Galileo satellites If another satellite system is added to the standard the mode indicator will be extended to four characters new satellite systems should always be added on the right so the order of characters in the mode indicator is GPS GLONASS Galileo other ...

Страница 92: ...cent corrections for the satellites used Null field when Differential GPS is not used For GLONASS Differential Data This value is the average age of the most recent differential corrections in use When only RTCM SC104 Type 31 corrections are used the age is that of the most recent Type 31 correction When RTCM SC104 Type 34 corrections are used solely or in combination with Type 31 corrections the ...

Страница 93: ... Real time kinematic Satellite system used in RTK mode with fixed integers S Simulator mode NOTE 3 The positioning system mode indicator field supplements the positioning system status field The status field should be set to V Invalid for all values of the mode indicator except for A Autonomous D Differential F Float RTK P Precise and R Real time kinematic The positioning system mode indicator and...

Страница 94: ... message has changed For example changing the alert text by in decrementing a contained counter or count down should cause a revision of alert message and a new time Time is an optional field The time field is additional information about when this happened and not used for decision making There is no mandatory requirement for time synchronization between the equipment It should by either a null f...

Страница 95: ...que for each instance of alert Revision counter starts with 1 and the step for increment is 1 The count resets to 1 after 99 is used Revision counter increments on each change of content of any field of the alert NOTE 11 The escalation counter is presenting the number of alert escalations after time expiration during the state active unacknowledged The escalation counter starts with 0 and the step...

Страница 96: ...es transported within this sentence NOTE 4 Alert entry 0 n Each alert entry consists of four fields Manufacturer Identifier see ALF Manufacturer Identifier Alert Identifier see ALF Alert Identifier Alert instance see ALF Alert instance Revision Counter see ALF Revision Counter Each entry identifies a certain alert with a certain state It is not allowed that an alert entry is split between two ALC ...

Страница 97: ...nteger field of maximum a 7 digit integer It identifies the type of the alert e g a lost target alert Standardized alerts use unique alert identifiers described in equipment standards Number range 10000 9999999 is reserved for proprietary alerts Alert Identifier examples 001 2456789 245 NOTE 4 The alert instance identifies the current instance of an alert to distinguish alerts of the same type Ale...

Страница 98: ...NVR 3000 OPERATION MANUAL INSTALLATION MANUAL NVR 3000 OM E 20210412 02 98 APPENDIX 5 INSTALLATION DRAWINGS ...

Страница 99: ......

Страница 100: ......

Страница 101: ......

Страница 102: ......

Страница 103: ......

Страница 104: ......

Страница 105: ......

Отзывы: