3
5. USING THE ROLLATOR
5.1 Brake Operation
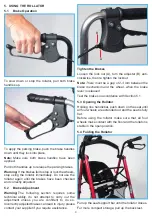
To slow down or stop the rollator, pull both brake
handles up.
To apply the parking brake, push the brake handles
down until they lock into place.
Note:
Make sure both brake handles have been
applied.
Pull both handles up to release the parking brakes.
Warning:
If the brakes fail to stop or lock the wheels,
stop using the rollator immediately. Do not use the
rollator again until the brakes have been checked
and correctly adjusted.
5.2 Brake Adjustment
Warning:
The following section requires some
technical ability, do not attempt to carry out the
adjustment unless you are con
fi
dent to do so.
Incorrectly adjusted brakes can lead to injury, please
contact your supplier if you require assistance.
A
B
Tighten the Brakes
Loosen the lock nut (A), turn the adjuster (B) anti-
clockwise, then re tighten the locknut.
Note:
There must be a gap of 2-3 mm between the
brake mechanism and the wheel, when the brake
lever is released.
Test the brakes in accordance with Section 5.1.
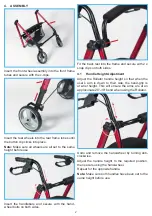
5.3 Opening the Rollator
Holding one handlebar, push down on the seat until
all four wheels are extended out and the seat is fully
fl
at.
Before using the rollator make sure that all four
wheels make contact with the
fl
oor and the rollator is
stable in the open position.
5.4 Folding the Rollator
Pull up the seat support bar until the rollator closes.
For more compact storage, pull up the backrest.


