background image

17

NL

2


Installatie mogelijkheid 1:


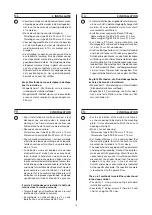
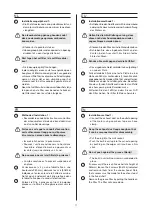
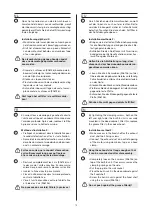
•  Sluit het afvoerkanaal aan op de uitblaastuit van 

de motor met behulp van aluminium tape of een 
slangklem.


De afvoerbuis lang genoeg houden zodat 
deze na demontage opnieuw verbonden 
kan worden.


• Stekker in stopcontact steken.


•  Inbouwgroep bij de randen opwaarts in opening 

drukken tot u een stevige klik hoort.


Niet tegen het vetfilter / de vetfilters druk-
ken!


• De inbouwgroep blijft nu hangen.

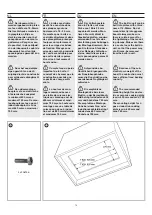
3


Indien nodig (als er een vaste tussenplank op een 
hoogte van 280mm aanwezig is) de 4 aangeduide 
schroeven (906136) los draaien en uit de afzuigkap 
nemen. Let op, dat er een uitsparing voor het 
afvoerkanaal in het tussenplank gemaakt moet 
worden.

4


Neem het vetfilter uit de inbouwunit door het slotje 
te openen en de filter naar beneden te trekken. 
Het filter komt dan los uit de afzuigkap.

DU

2


Installationsmethode 1:


•  Schließen Sie den Abluftkanal mit Aluminiumband 

oder einer Schlauchschelle an einer Auslassöffnung 
des Motors an.


Halten Sie die Abluftleitung so lang, dass 
diese nach dem Auseinanderbau wieder 
angeschlossen werden kann.


•  Stecken Sie den Stecker in die Wandsteckdose.


•  Schieben Sie das eingebaute Gerät an den 

Kanten in den Ausschnitt, bis Sie ein festes 
Einrasten hören.


Drücken Sie nicht gegen den/die Fettfilter!


•  Das eingebaute Gerät verbleibt nun aufgehängt 

an seinem Platz.

3


Falls erforderlich (falls eine feste Platte in einer 
Höhe von 280 mm vorhanden ist), lösen Sie die 4 
angegebenen Schrauben (906136) und entfernen 
Sie diese von der Dunstabzugshaube. Beachten 
Sie, dass für den Abluftkanal in der festen Platte 
eine Aussparung erstellt werden muss.

4


Entfernen Sie den Fettfilter, indem Sie am Griff 
des Filter ziehen. Der Filter fällt dann herunter.

FR

2


Méthode d'installation 1 :


•  Raccordez le conduit d'extraction sur un orifice 

de sortie du moteur à l'aide de ruban d'aluminium 
ou d'un collier de serrage.


Faites en sorte que le conduit d'évacuation 
soit suffisamment long pour qu'il puisse 
être remis en place après le démontage.


• Insérez la fiche dans la prise murale.


•  Poussez l'unité encastrée vers le haut dans 

l'ouverture d'encastrement, en poussant sur 
les côtés jusqu'à entendre un clic net.


Ne poussez pas sur le(s) filtre(s) à graisses !


•  L'unité encastrée est à présent suspendue et 

en place.

3


Si nécessaire (s'il y a une tablette fixe à une 
hauteur de 280 mm), dévissez les 4 vis (906136) 
indiquées et enlevez-les de la hotte de cuisine. 
Notez qu'un évidement doit être pratiqué dans 
la tablette fixe pour le conduit d'extraction.

4


Enlevez le filtre à graisses en tirant la poignée 
placée sur le filtre. Le filtre glissera alors vers le 
bas.

EN

2


Installation method 1:


•  Connect the exhaust duct on the outlet opening 

of the motor using aluminium tape or a hose 
clamp.


Keep the exhaust duct long enough so that 
it can be reconnected after disassembly.


• Put the plug into the wall socket.


•  Push the built-in unit up into the cut-out opening 

by pushing on the edges until you hear a firm 
click.


Do not push against the grease filter(s)!


•  The built-in unit will now remain suspended in 

place.

3


If necessary (if there is an fixed shelf at a height of 
280mm) loosen the 4 screws (906136) indicated 
and remove them from the cooker hood. Note 
that a recess must be made for the exhaust duct 
in the fixed shelf.

4


Remove the grease filter by pulling the handle on 
the filter. The filter will come down.

Содержание 828

Страница 1: ...NL Montage instructie 2 FR Instructions d installation 5 DE Montageanleitung 8 EN Installation Instructions 11 828 110140 MA1 Novy Essence 828 829 ...

Страница 2: ...e van dit toestel Hierin vind u belangrijke informatie voor de montage en gebruik van het toestel Metalen onderdelen kunnen scherpe kantjes hebben en u kunt zich eraan verwonden Draag daarom bij het monteren handschoenen die u daartegen beschermen Montage voorschriften van het toestel Zorg dat de constructie waar het toestel aan of in wordt gemonteerd over voldoende draagkracht beschikt Defecte of...

Страница 3: ...afvoerinstallatie naar buiten worden gevoerd Het toestel zuigt lucht aan uit de keuken en aangren zende vertrekken Als de luchttoevoer niet voldoende is ontstaat er onderdruk De giftige gassen worden uit de schoorsteen of afvoerkanaal terug de ruimte in gezogen Bij gelijktijdig gebruik van het toestel en verbrandingstoe stellen in dezelfde ruimte mag de onderdruk in de ruimte niet groter zijn dan ...

Страница 4: ...20 Terugslagklep Ø150 mm 906 432 Accessoires plat afvoerkanaal Flexible afvoerkanaal lengte 750 mm 906 408 Plat afvoerkanaal lengte 1000 mm afm 89x222x1000 mm 906 401 Verbindingstuk afm 94x227x80 mm 906 402 Horizontale bocht afm 94x227x290 mm 906 403 Verticale bocht afm 94x175x227 mm 906 404 Bocht 15 afm 94x227x138 mm 906 418 Hoekadapter afm 94x227x205 mm 906 405 Overgangsstuk naar Ø150 mm afm 94x...

Страница 5: ...areil Les pièces métalliques peuvent présenter des arêtes vives et peuvent occasionner des blessures Dès lors portez des gants qui vous en préservent lors de l as semblage Prescriptions de montage de l appareil Veillez à ce que la structure sur ou dans laquelle l appareil doit être monté ait une capacité de charge suffisante Les pièces défectueuses ou endommagées ne peuvent être remplacées que par...

Страница 6: ... air de combustion Il en résulte des gaz de combustion qui sont transportés à l extérieur par une installation d évacuation L appareil aspire l air de la cuisine et des pièces adjacentes Si l arrivée d air n est pas suffisante une dépression se crée Les gaz toxiques sont alors réinjectés dans l espace par la cheminée ou le conduit de fumée Lors de l utilisation simultanée de l appareil et d appa r...

Страница 7: ...ermique 906 420 Clapet antiretour Ø150 mm 906 432 Accessoires pour conduit d évacuation plat Conduit d évacuation flexible longueur 750 mm 906 408 Conduit d évacuation plat longueur 1000 mm dim 89x222x1000 mm 906 401 Raccord dim 94x227x80 mm 906 402 Coude horizontal dim 94x227x290 mm 906 403 Coude vertical dim 94x175x227 mm 906 404 Coude 15 dim 94x227x138 mm 906 418 Raccord d angle dim 94x227x205 ...

Страница 8: ...en Lesen Sie die Gebrauchsanweisung und Montageanlei tung sorgfältig durch bevor Sie dieses Gerät installieren und in Betrieb nehmen Darin sind wichtige Informa tionen in Bezug auf die Installation und Verwendung des Geräts enthalten Metallteile können scharfe Kanten haben an denen Sie sich verletzen können Tragen Sie bei der Montage Handschuhe die Sie vor Verletzungen schützen Montagevorschriften...

Страница 9: ...el Gaskochfelder und Gasöfen können Verbrennungsgase zurückgesaugt werden und zu Vergiftungen führen Ein Verbrennungssystem nutzt Luft in einem Raum als Verbrennungsluft Dadurch entstehen Verbrennungsgase die durch eine Abzugsanlage nach außen geleitet werden Das Gerät saugt Luft aus der Küche und angrenzenden Räumen an Wenn die Luftzufuhr nicht ausreicht entsteht ein Unterdruck Die giftigen Gase ...

Страница 10: ...altesystem 906 420 Rückschlagventil Ø150 mm 906 432 Zubehör flacher Abluftkanal Flexibler Abluftkanal Länge 750 mm 906 408 Abluftkanal Länge 1000 mm 89x222x1000 mm 906 401 Verbindungsstück 94x227x80 mm 906 402 Horizontaler Bogen 94x227x290 mm 906 403 Vertikaler Bogen 94x175x227 mm 906 404 Bogen 15 94x227x138 mm 906 418 Winkeladapter 94x227x205 mm 906 405 Übergangsstück auf Ø150 mm 94x227x190 mm 90...

Страница 11: ...stallation Installation instructions for the appliance Ensure that the structure on or in which the appliance is to be installed can bear its weight Faulty or damaged parts may only be replaced by original Novy parts The greater the distance between the appliance and the hob the less easily the cooking vapours can be taken up by the appliance For this reason pay heed to the stated recommended inst...

Страница 12: ...e chimney or extraction duct into the room With simultaneous use of the appliance and combustion appliances in the same room the negative pressure may not exceed 4 Pa 0 04 mBar Negative pressure can be prevented by allowing sufficient air into the room through openings that cannot be closed for example through windows or doors in combination with a ventilation cabinet in the wall Have an expert as...

Страница 13: ...xhaust duct Flexible exhaust tube length 750 mm 906 408 Flat exhaust channel duct1000 mm dimensions 89x222x1000 mm 906 401 Connection piece dimensions 94x227x80 mm 906 402 Horizontal curve dimensions 94x227x290 mm 906 403 Vertical curve dimensions 94x175x227 mm 906 404 Curve 15 dimensions 94x227x138 mm 906 418 Corner adapter dimensions 94x227x205 mm 906 405 Transition piece to Ø150 mm dimensions 9...

Страница 14: ...nem Gas oder Induktionskochfeld beträgt mindestens 650 mm und höchstens 750 mm FR L unité encastrable peut être encastrée dans des plaques ayant une épaisseur de 18 35 mm Ne montez pas l unité en castrable directement dans des placoplâtres prévoyez toujours un renforcement pour le serrage des brides de fixation Prévoyez une prise de courant à proximité de l unité encastrable pour que cette dernièr...

Страница 15: ...este Platte in einer Höhe von 280 mm vorhanden ist FR 3 INSTALLATION 1 Pour l installation de l unité encastrée il faut découper une ouverture dans la plaque de montage Il est recommandé de réaliser une finition étanche de l ouverture de la découpe Découpez une ouverture Dimensions pour type 828 525 mm x 275 mm Dimensions pour type 829 825 mm x 275 mm Pour un meilleur rendement il est recommandé d...

Страница 16: ...16 3 4 2 ...

Страница 17: ...arung erstellt werden muss 4 Entfernen Sie den Fettfilter indem Sie am Griff des Filter ziehen Der Filter fällt dann herunter FR 2 Méthode d installation 1 Raccordez le conduit d extraction sur un orifice de sortie du moteur à l aide de ruban d aluminium ou d un collier de serrage Faites en sorte que le conduit d évacuation soit suffisamment long pour qu il puisse être remis en place après le démo...

Страница 18: ...18 6 7 5 ...

Страница 19: ...ät im tiefen Schrank gegen die feste Platte Schrauben Sie das Einbaugerät gegen die feste Platte 906136 Drücken Sie nicht gegen den die Fettfilter EN 5 By tightening the clamping screws both on the left and right side the built in unit is securely mounted in the deep cabinet After this replace the grease filter in the cooker hood Installation method 2 6 Make a recess in the fixed shelf for the exh...

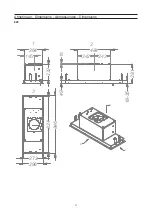
Страница 20: ...20 232 264 281 484 49 18 35 296 272 546 524 2 1 3 145 242 242 16 1 2 3 Afmetingen Dimensions Abmessungen Dimensions 828 ...

Страница 21: ...21 264 232 484 281 18 35 49 296 846 824 272 2 1 3 145 1 2 3 242 242 16 Afmetingen Dimensions Abmessungen Dimensions 829 ...

Страница 22: ......

Страница 23: ......

Страница 24: ...Zeit und ohne Vorbehalt die Konstruktion und die Preise ihrer Produkte zu ändern NOVY nv reserves the right at any time and without reservation to change the structure and the prices of its products NOVY nv Noordlaan 6 B 8520 KUURNE Tel 056 36 51 00 Fax 056 35 32 51 E mail novy novy be http www novy be France Tél 0320 940662 Deutschland und Österreich Tel 49 0 511 54 20 771 Nederland Tel 31 0 88 0...

Отзывы: