background image

8

NL

5


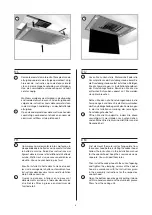
Demonteer eerst de motorunit of flensplaat van de 
afzuigkap voordat u de afzuigkap monteert. Volg 
hiervoor de  instructies op zoals deze vermeld 
staan in de montage handleiding van afzuigkap. 
Hou de 4 verwijderde schroeven apart. Je hebt 
ze later nodig.


Monteer vervolgens de afzuigkap in de uitsparing 
en draai de klemschroeven van de afzuigkap aan 
volgens de instructies zoals deze vermeld staan 
in de montage handleiding van desbetreffende 
afzuigkap.

6


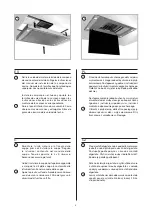
Open de onderplaat door deze met twee handen 
voorzichtig naar beneden te trekken en neem de 
aluminium vetfilters uit de plafondunit.

DU

5


Lösen Sie zunächst die Motoreinheit oder die 
Flanschplatte von der Dunstabzugshaube, bevor Sie 
die Dunstabzugshaube selbst installieren. Befolgen 
Sie die Anweisungen im Installationshandbuch 
der Dunstabzugshaube. Bewahren Sie die vier 
entfernten Schrauben separat auf. Sie werden 
sie später brauchen.


Setzen Sie dann die Dunstabzugshaube in die 
Aussparung ein und ziehen Sie die Klemmschrauben 
der Dunstabzugshaube gemäß den Anweisungen 
in der Installationsanleitung der jeweiligen 
Dunstabzugshaube fest.

6


Öffnen Sie die Grundplatte, indem Sie diese 
vorsichtig mit zwei Händen nach unten ziehen, 
und entfernen Sie die Aluminiumfettfilter von der 
Deckeneinheit.

FR

5


Commencez par démonter le bloc moteur ou la 
plaque bridee de la hotte de cuisine avant d’installer 
la hotte de cuisine. Suivez les instructions qui 
figurent dans le manuel d’installation de la hotte de 
cuisine. Mettez les 4 vis que vous venez d’enlever 
de côté. Vous en aurez besoin plus tard.


Ensuite, installez la hotte dans la niche et serrez 
les vis de serrage de la hotte conformément aux 
instructions données dans le manuel d’installation 
de la hotte concernée.

6


Ouvrez le panneau inférieur en le poussant 
délicatement vers le bas à l’aide des deux mains 
et retirez les filtres à graisse en aluminium de 
l’unité de toit.

EN

5


First dismount the motor unit or flange plate from 
the cooker hood before installing the cooker hood. 
Follow the instructions in the installation manual 
for the cooker hood. Keep the 4 removed screws 
separate. You will need them later.


Then install the cooker hood in the cut-out opening 
and tighten the clamping screws of the cooker 
hood in accordance with the instructions given 
in the assembly instructions for the respective 
cooker hood.

6


Open the bottom panel by gently pulling it down 
with two hands and remove the aluminium grease 
filters from the ceiling unit.

5

6

Содержание 6830053

Страница 1: ...anleitung S 3 EN User manual p 3 ES Manual de empleo p 4 IT Istruzione d uso p 4 PL Instrukcja obsługi str 5 CZ Návod k obsluze str 5 6830053 110130 MAB1 Novy 6830053 Pureline Cubic 6830 6831 6833 6834 6835 6836 6838 6839 6840 6841 6843 6844 6845 6846 6848 6849 ...

Страница 2: ...en u kunt zich eraan verwonden Draag daarom bij het monteren handschoenen die u daartegen beschermen FR 1 PRESCRIPTIONS DE SÉCURITÉ ET D INSTALLATION Vous trouverez plus d informations sur les produits acces soires et services Novy sur Internet www novy fr Ceci est la notice de montage de l appareil identifié en première page Cette notice de montage utilise un certain nombre de symboles Vous trouv...

Страница 3: ...VORSCHRIFTEN Weitere Informationen zu den Produkten dem Zubehör und den Dienstleistungen von Novy finden Sie im Internet unter www novy dunsthauben de Diese Broschüre enthält die Montageanleitung für das Gerät wie auf der Vorderseite angegeben In dieser Montageanleitung werden einige Symbole ver wendet Nachfolgend finden Sie eine Erklärung dieser Symbole Symbol Bedeutung Aktion Anzeige Erläuterung...

Страница 4: ... informazioni sui prodotti gli accessori e i servizi di Novy sono disponibili su internet www novy it Le presenti istruzioni per l uso sono riferite all apparecchio Novy indicato sul frontespizio In questo manuale sono stati utilizzati alcuni simboli Di seguito è indicato il significato di questi simboli Simbolo Significato Azione Indicatore Spiegazione di un indicazione sull apparec chio Avverten...

Страница 5: ...leży przebudowywać ani zmieniać urządzenia Części metalowe mogą mieć ostre brzegi którymi można się skaleczyć Dlatego podczas montażu należy nosić rękawice ochronne CZ 1 BEZPEČNOSTNÍ A MONTÁŽNÍ PŘEDPISY Více informací o výrobcích příslušenství a službách spo lečnosti Novy najdete na internetu www novy odsavace cz Toto je návod k montáži pro zařízení které je uvedené na přední straně V těchto pokyn...

Страница 6: ...ling unit before installing and putting it into operation Always mount this adapter in combination with the remote motor kit 6830 6831 6833 6834 6840 6841 6843 6844 ES General Estas son las instrucciones de instalación del adaptador para una altura de instalación limitada Debe instalarse directamente en la unidad de techo con un con ducto plano Lea atentamente las instrucciones de instalación del ...

Страница 7: ...lluminio fornito 906262 per un collegamento a tenuta stagna 4 Posizionamento dell adattatore all incirca a metà dell apertura sagomata sul soffitto DU 1 Nehmen Sie den Adapter aus der Verpackung Kleben Sie den Isolationsstreifen 801006 um die Anschlusstülle herum 2 Achten Sie darauf dass der flache Abluftkanal über der Deckenaussparung für die Dunstabzugshaube mündet Schließen Sie an diesen flache...

Страница 8: ...indem Sie diese vorsichtig mit zwei Händen nach unten ziehen und entfernen Sie die Aluminiumfettfilter von der Deckeneinheit FR 5 Commencez par démonter le bloc moteur ou la plaque bridee de la hotte de cuisine avant d installer la hotte de cuisine Suivez les instructions qui figurent dans le manuel d installation de la hotte de cuisine Mettez les 4 vis que vous venez d enlever de côté Vous en aur...

Страница 9: ...ji montażu odpowiedniego okapu kuchennego 6 Otworzyć płytę dolną delikatnie pociągając ją dwoma rękami w dół i wyjąć aluminiowe filtry tłuszczowe z urządzenia sufitowego IT 5 Smontare l unita motore o la flangia dalla cappa prima di installare la cappa Seguire le istruzioni contenute nel manuale della cappa Tenere separate le 4 viti rimosse Saranno necessarie più tardi Quindi installare la cappa n...

Страница 10: ...ettfilter und falls erforderlich den Umluftfilter in die Dunstabzugshaube ein und schließen Sie die Bodenplatte FR 7 Selon le modèle et la version de la hotte utilisez le dessin 7a ou 7b pour vous guider 7a Pureline V18 7b Pureline V15 V18 Derrière la grille de sécurité vous pouvez voir l adaptateur Positionnez l adaptateur de manière à ce que les trous de fixation de l adaptateur correspondent au...

Страница 11: ...j filtr tłuszczowy oraz jeśli to konieczne filtr recyrkulacyjny w okapie kuchennym i zamknij płytę podstawy IT 7 A seconda del modello e della versione della cappa utilizzare il disegno 7a o 7b come riferimento 7a Pureline V18 7b Pureline V15 V18 Dietro la griglia di sicurezza è visibile l adattatore Posizionare l adattatore affinché i fori di montaggio dell adattatore corrispondano ai 4 fori sull...

Страница 12: ...car en cualquier momento y sin condiciones la construcción y los precios de sus productos NOVY nv si riserva il diritto di modificare in qualsiasi momento senza preavviso la struttura e i prezzi dei suoi prodotti NOVY nv zastrzega sobie prawo do zmiany struktury i cen swoich produktów w dowolnym czasie i bez ostrzeżeń Společnost NOVY nv si vyhrazuje právo kdykoli a bez výhrad změnit konstrukci a c...

Отзывы: