background image

NVR

-

6408

-

H1/F  User

s manual (Short)  version 1.2


All rights reserved © AAT SYSTEMY BEZPIECZEŃSTWA sp. z o.o.


14


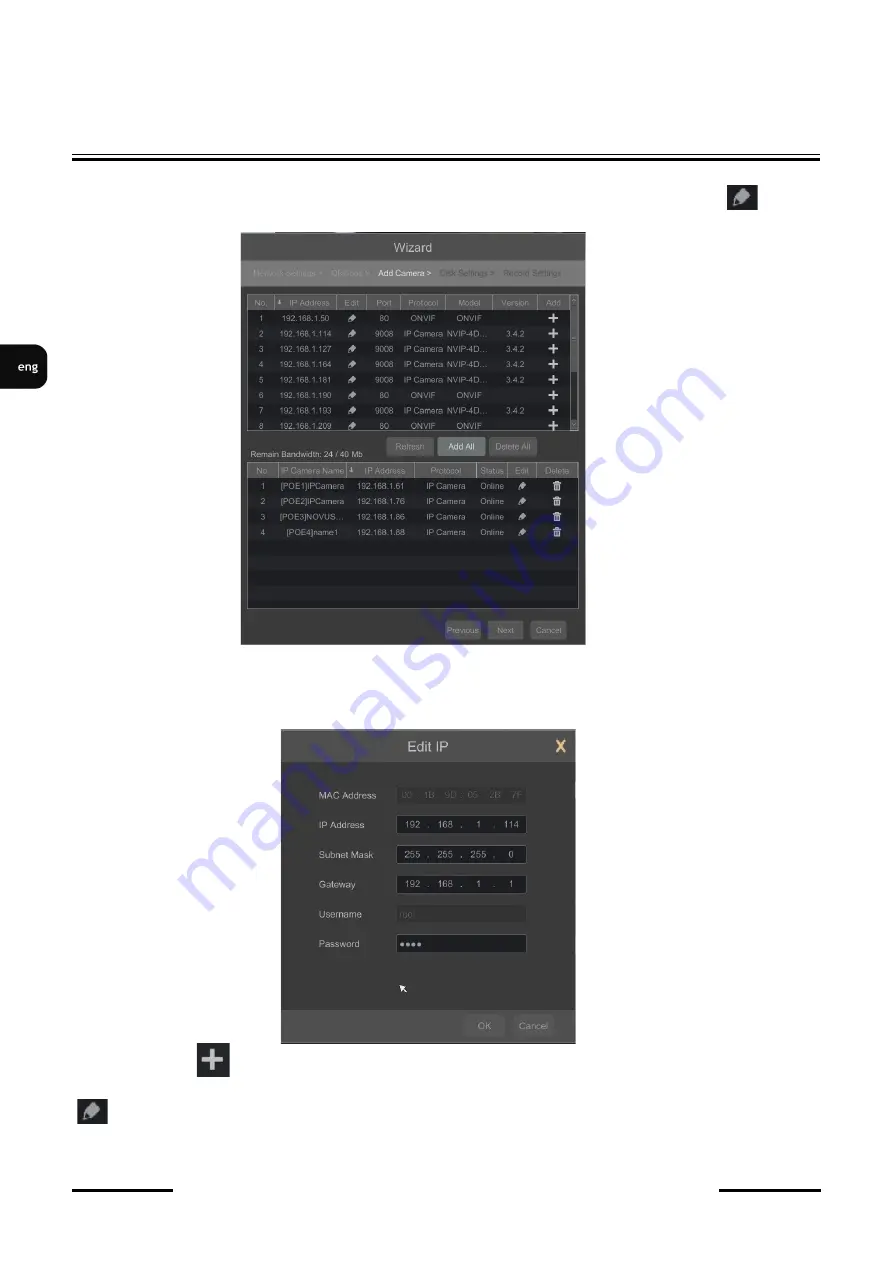
II.  Add  Camera:  Allows  you  to  configure  the  camera  and  add  them  to  the  recorder.  Upper  window 

displays a sophisticated camera by the NVR. To change the addressable cameras, click on         the icon 

in the column EDIT (This works with cameras NOVUS IP 3000 series).


Enter the address in the IP ADDRESS and set the masks in the SUBNET MASK then press the OK 

button to save the settings.


Press the button          to add a camera to the system.


Added camera will be displayed on the bottom of the menu list. To edit the connection settings of the 

camera, press the EDIT column.


NVR OPERATING


Содержание NVR-6408-H1/F

Страница 1: ...User s manual short NVR 6408 H1 F ...

Страница 2: ...self as a consequence 9 Mounting the device on unstable surface or using not recommended mounts is forbidden Improperly mounted device may cause a fatal accident or may be seriously damaged itself The device must be mounted by qualified personnel with proper authorization in accordance with this user s manual 10 Device should be supplied only from a power sources whose parameters are in accordance...

Страница 3: ...Alarm Input Output supports camera s alarm input output Motion Detection supports camera s motion detection System Reaction to Alarm Events buzzer alarm output activation recording activation PTZ e mail with atatchment INTELLIGENT IMAGE ANALYSIS Supported functions Exception Scene Change Video Blurred Video Color Cast Tripwire Zone entrance Abandoned Object Object Disappearance Face Detection NETW...

Страница 4: ...ome functions which can make them work improperly or not in accordance with expectation AAT SYSTEMY BBEZPIECZEŃSTWA SP Z O O company is not responsible for incompatibility problems resulting from cameras of other brands than NOVUS which are using ONVIF protocol If you are using ONVIF protocol cameras other than NOVUS brand it is recommended to test each time whether required functions work correct...

Страница 5: ...utput alarm terminal 2 AUDIO IN Audio mono inputs to connect microphones 3 VGA Main monitor connectors use the D SUB VGA cable to connect monitor 4 HDMI Main monitor connectors use the HDMI cable to connect monitor 5 USB USB port for external Flash memory and other USB devices 6 LAN RJ 45 connector port to connect to the local network and internet 7 POWER SOCKET To plug in the 12V power cord 8 AUD...

Страница 6: ... HDDs contains all the HDDs that can be used with a given DVR including HDDs designed for office use so called desktop disks However due to the fact that reliability of the recording process and data safety are paramount factors of any CCTV system we strongly advise to use HDDs designed for continuous 24 7 operation You need to format disks if they were used in a different device All data saved on...

Страница 7: ...ressing any buttons is prohibited To shut down the device please use the menu CAUTION Make connection when the power is not applied and the power switch is turned off Do not place the power cord under the carpet or rug The power cord is usually earth grounded However even if it s not earth grounded never modify it on your own for earth grounding Make sure that power adapter is placed near of NVR a...

Страница 8: ... We recommend that you configure the camera before connecting to a recorder as described the manual camera Please note that cameras have addressed the unique IP address supported by the recorder Connecting cameras and network recorders NVR 6408 H1 F 2 6 Connecting external devices Connecting audio ports Audio output signal normally are above 200mV 1kΩ You can connect to it the audio amplifier with...

Страница 9: ...BEZPIECZEŃSTWA sp z o o 9 Connecting alarms ports NVR 6408 H1 F has local alarm input and output To connect alarm input please refer image below An example of connecting the sensor to the alarm input 1 STARTING THE DEVICE NO COM ALARM Power source ALARM IN1 IN2 IN3 IN4 GND SENSOR ...

Страница 10: ...lick on any camera in split screen display mode switches the display to full screen mode Subsequent double click returns to previous display mode Move cursor to the top or click the right key of mouse to bring up MAIN MENU and select START icon Certain positions allow to select them via mouse scroll Depending on NVR operating mode pressing RMB displays a corresponding function menu 3 3 System oper...

Страница 11: ...MY BEZPIECZEŃSTWA sp z o o 11 To unlock the DVR menu press the button at the bottom left of the screen After clicking on button click on LOGIN Then login in entering password in PASSWORD field default password for user root is pass and then click in login button NVR OPERATING ...

Страница 12: ...a setting please refer to the Cameras Capability Table available on the www novuscctv com website If you set wrong values some problems may appear the NVR cannot search the IP camera the stream cannot be connected the image is not fluent the image quality is bad and so on In case of first NVR start WIZARD SETUP menu window will occur if function wasn t disabled earlier To configure NVR please foll...

Страница 13: ...168 1 100 netmask 255 255 255 0 Configure the following parameters Gateway Primary and Secondary DNS You can also enable DHCP mode allows you to download an IP address from a DHCP server required if running a DHCP server It is possible to change the default HTTP port designed to display panel Web device and RTSP ports and port server data After changing parameter pres NEXT button NVR OPERATING ...

Страница 14: ...the NVR To change the addressable cameras click on the icon in the column EDIT This works with cameras NOVUS IP 3000 series Enter the address in the IP ADDRESS and set the masks in the SUBNET MASK then press the OK button to save the settings Press the button to add a camera to the system Added camera will be displayed on the bottom of the menu list To edit the connection settings of the camera pr...

Страница 15: ...the settings If the NVR connected to the camera will be on STATUS will be displayed Connected To remove a camera from the list press the in DELETE column III Disk Settings In this tab displays information about the hard disk detected by the DVR Before starting work you need to format the hard disk by selecting it in the list of drives and then pressing FORMAT Formatting may take a few moments Afte...

Страница 16: ...ORD SENSOR RECORD starts recording after motion detecion alarm and after alarm from alarm inputs ALWAYS 24x RECORD MOTION RECORD constant recording and recoring after receiving motion detection information from the camera ALWAYS 24x RECORD SENSOR RECORD constant recording and recording alarm generated on alarm input ALWAYS 24x RECORD MOTION RECORD SENSOR RECORD constant recording and recording ala...

Страница 17: ...plus application or enter a device code to autonat com site The service allows you to connect to a device connected to the Internet network is behind a router equipped with NAT Check the NAT checkbox to enable P2P service NOTE AAT SYSTEMY BEZPIECZEŃSTWA SP Z O O is not responsible for the operation of the service autonat com which is provided by third parties NVR OPERATING ...

Страница 18: ...its initialization process it will enter the real time monitoring image Displaying all cameras simultaneously is the default mode On the bottom of screen STATUS BAR is displayed To start access to the NVR click on the button to launch the start menu After clicking log on to the system the default password for the root user is a pass STATUS BAR description NVR MENU Item Icon Description Search Laun...

Страница 19: ...ackup menu Item Icon Description Settings Click to open start menu Full screen Switches video view to full screen Single view Start displaying camera in single view Quad view Start displaying 4 cameras in video view 9 cam View Start displaying 9 cameras in video view Other divisions Opening video subdivisions Other divisions Open 1 main 5 or 7 additional views Dwell Starts displaying images in seq...

Страница 20: ...Record Turn on off manually recording channels Manual Alarm Allow to trigger the alarm manually Recording Status Displays information about the recording Alarm Status Displays the status of alarm devices Disc Status Information about disc status Network status View information about network usage Device Information Displays information about the state of operation of the basic components of record...

Страница 21: ...en Manual data saved by manual recording Blue Schedule continuous data recording Yellow Motion motion event data recording Red Alarm alarm event data recording To play the searched data simply double click a desired point on or press PLAY button To control playback you can use the following buttons from the playback options Stop stops replaying Rewind Starts playback backward using key frames Paus...

Страница 22: ...input activation registered for the selected channel Backup start menu archiving recordings Backup status displays the current status of archival recordings Back close the replay menu 4 3 Changing the menu language If after NVR booting up the currently selected menu language is different than expected to change it please follow the steps below Click on bottom left on start menu button Then select ...

Страница 23: ...ights reserved AAT SYSTEMY BEZPIECZEŃSTWA sp z o o 23 In the displayed menu select the English language in the third from the top of the box and click the button on the bottom menu After saving settings the language will be switched to English NVR MENU ...

Страница 24: ...2020 07 20 MB MK TF V1 2 AAT SYSTEMY BEZPIECZEŃSTWA sp z o o 431 Pulawska St 02 801 Warsaw Poland tel 4822 546 07 00 fax 4822 546 07 59 www novuscctv com ...

Страница 25: ...instrukcja obsługi skrócona NVR 6408 H1 F ...

Страница 26: ...ze źródeł o parametrach zgodnych ze wskazanymi przez producenta w danych technicznych kamery Dlatego też zabrania się zasilania rejestratora ze źródeł o nieznanych niestabilnych lub niezgodnych z wymaganiami określonymi przez producenta parametrach 11 Nie wolno dopuścić aby jakiekolwiek metalowe elementy dostały się do wnętrza urządzenia może to spowodować uszkodzenie urządzenia W przypadku dostan...

Страница 27: ...RMY Wejścia wyjścia alarmowe w kamerach wsparcie wejść wyjść dostępnych w kamerach Detekcja ruchu wsparcie detekcji ruchu dostępnej w kamerach Reakcja na zdarzenia alarmowe sygnał dźwiękowy aktywacja wyjścia alarmowego aktywacja nagrywania PTZ e mail z załącznikiem INTELIGENTNA ANALIZA OBRAZU Obsługiwane funkcje sabotaż zmiana sceny utrata ostrości zmiana kolorystyki przekroczenie linii wkroczenie...

Страница 28: ...cje mogą działać niepoprawnie lub niezgodnie z oczekiwaniem Firma AAT SYSTEMY BEZPIECZEŃSTWA SP Z O O nie ponosi odpowiedzialności za problemy wynikłe z niekompatybilności kamer innych marek niż NOVUS podłączanych przy wykorzystaniu protokołu ONVIF W wypadku korzystania z protokołu ONVIF w kamerze marki innej niż NOVUS zaleca się każdorazowo przeprowadzić test na poprawność obsługi w rejestratorze...

Страница 29: ...AUDIO IN Wejście audio do podłączenia mikrofonu 3 VGA Złącze monitora należy użyć przewodu VGA D SUB 4 HDMI Złącze monitora w standardzie HDMI 5 USB Port do podłączenia pamięci typu Flash i innych kompatybilnych urządzeń 6 LAN Złącze RJ 45 do podłączenia dodatkowych kamer sieci lokalnej i Internetu 7 DC12V Załącza zasilania 12 V DC 8 AUDIO OUT Wyjście audio do podłączenia lokalnego głośnika ze wzm...

Страница 30: ...awnie współpracujące z danym rejestratorem w tym także przeznaczone do pracy biurowej tzw desktopowe Jednak ze względu na to że w systemach CCTV priorytetem jest niezawodność procesu rejestracji i zarządzania danymi zaleca się stosowanie dysków przeznaczonych do pracy ciągłej tzw 24x7 Jeżeli użyty dysk był stosowany w innym urządzeniu konieczne jest jego formatowanie Należy mieć to na uwadze ze wz...

Страница 31: ...na tylnym panelu rejestratora Uruchamianie urządzenia trwa około 60 sekund W tym czasie nie należy uruchamiać żadnych funkcji urządzenia i naciskać żadnych przycisków Wyłączenie urządzenia odbywa się z poziomu menu UWAGA Nie należy modyfikować podłączenia zasilaczy i ich uziemienia W celu zapewnienia nieprzerwanej pracy urządzenia należy upewnić się ze wszystkie połączenia wykonano w sposób właści...

Страница 32: ...pisem znajdującym się instrukcji obsługi kamery Należy pamiętać aby kamery zostały zaadresowane unikalnym adresem IP obsługiwanym przez rejestrator Rejestratory z wbudowanym przełącznikiem PoE używają innej adresacji dla kamer podłączonych przez wbudowany przełącznik a innej do łączenia się z urządzenia podłączonymi przez port LAN Podłączenie kamer i urządzeń sieciowych w rejestratorach 2 6 Połącz...

Страница 33: ...ejść i wyjść alarmowych Rejestrator sieciowy NVR 6408 H1 F posiada wejścia i wyjście alarmowe Przykład podłączenie wyjścia alarmowego należy wykonać zgodnie z rysunkiem przedstawionym poniżej Przykład podłączenia czujnika do wejścia alarmowego nr 1 OBSŁUGA REJESTRATORA NO COM ALARM Źródło zasilania ALARM IN1 IN2 IN3 IN4 GND CZUJNIK ...

Страница 34: ...powoduje wyświetlenie jej pełnoekranowo Ponowne podwójne kliknięcie wskaźnikiem myszy powoduje powrót do poprzedniego formatu wyświetlania W czasie konfiguracji wyboru poszczególnych pozycji dokonuje się przy użyciu lewego przycisku myszy W wybranych pozycjach zmiany wartości danego pola można dokonać przy użyciu rolki myszy Zależnie od aktualnie wybranego menu wciśnięcie prawego przycisku myszy w...

Страница 35: ... uruchomić menu rejestratora należy nacisnąć przycisk w lewej dolnej części ekranu Po kliknięciu w wyświetlonym menu należy wybrać pozycję LOGOWANIE Następnie w oknie logowania należy wpisać hasło w polu HASŁO Domyślne hasło dla użytkownika root to pass a następnie nacisnąć przycisk logowania LOGOWANIE OBSŁUGA REJESTRATORA ...

Страница 36: ...amerach znajdują się w Tabeli kompatybilności kamer dostępnej na stronie www novuscctv com W przypadku ustawienia niewłaściwych wartości mogą wystąpić problemy z wyszukaniem podłączeniem kamer lub uzyskaniem płynnego obrazu bez zniekształceń Przed przystąpieniem do pracy z rejestratorem sieciowym należy przeprowadzić wstępną konfigurację urządzenia Należy kliknąć na przycisku KREATOR USTAWIEŃ aby ...

Страница 37: ...dku gdy konieczne jest połączenie NVRa z Internetem do zdalnego dostępu wysyłania emaili itp należy skonfigurować następujące parametry Brama Podstawowy i Pomocniczy DNS Można również włączyć tryb pracy DHCP pozwalający na pobranie adresu IP z serwera DHCP wymagany jest wówczas działający serwer DHCP Istniej możliwość zmiany domyślnego portu HTTP przeznaczonego do wyświetlania panelu WWW urządzeni...

Страница 38: ...ator Aby zmienić adresację kamer należy kliknąć na ikonie w kolumnie EDYTUJ Funkcja działa z kamerami NOVUS IP serii 3000 Wprowadź adres w polu ADRES IP i ustawiania maski w polu MASK POD następnie naciśnij przycisk OK w celu zapisania ustawień Naciśnij przycisk aby dodać kamerę do systemu Dodane kamery zostaną wyświetlone na dolnej liście menu Aby edytować ustawienia połączenia z kamerą naciśnij ...

Страница 39: ...zał połączenie z kamerą zostanie w kolumnie STATUS zostanie wyświetlony napis POŁĄCZONY Aby usunąć kamerę z listy należy nacisnąć przycisk z kolumny USUŃ III Ustawienia dysku W tej zakładce wyświetlany są informacje o dysku twardym wykrytym przez rejestrator Przed przystąpieniem do pracy należy sformatować dysk twardy zaznaczając go na liście dysków a następnie naciskając przycisk FORMATUJ Operacj...

Страница 40: ...w NAGRYWNANIE WG DETEKCJI uruchamia nagrywanie po otrzymaniu informacji z kamery o detekcji ruchu NAGRYWANIE WG ZDARZEŃ nagrywa kanały po alarmie wygenerowanych z po zdarzeniu wygenerowanym na wejściu alarmowym NAGRYWANIE WG DETEKCJI WG CZUJNIKA nagrywanie po zdarzeniu detekcji ruchu i po zdarzeniu wygenerowanym z wejścia alarmowego ZAWSZE 7x24 DETEKCJA RUCHU nagrywanie ciągłe i dodatkowe nagrywan...

Страница 41: ...ządzenia do witryny autonat com w celu polaczenia się z urządzeniem Usługa pozwala na łączenie się z urządzeniem podłączonym do sieci Internetu znajdującym się za routerem wyposażonym w funkcje NAT Aby uruchomić usługę należy zaznaczyć pole NAT UWAGA Firma AAT SYSTEMY BEZPIECZEŃSTWA SP Z O O nie ponosi odpowiedzialności za działanie usługi autonat com która jest dostarczona przez firmy trzecie OBS...

Страница 42: ... języków angielski polski i inne Po zakończeniu procesu inicjalizacji na ekranie monitora wyświetlane są obrazy z kamer na żywo U dołu ekrany wyświetlany jest pasek stanu urządzenia W celu uruchomienia menu w rejestratorze należy kliknąć na przycisk aby uruchomić menu start Po kliknięciu należy zalogować się do systemu domyślne hasło dla użytkownika root to pass Menu start MENU REJESTRATORA PASEK ...

Страница 43: ...azwa Ikona Opis Start Uruchamia menu Start Pełny ekran Przełącza obraz wideo na cały ekran Pojedynczy obraz Przełącza do pojedynczego widoku wideo Poczwórny obraz Przełącza obraz do poczwórnego obrazu wideo Podział na 9 Przełącza obraz do podziału na 9 ekranów Otwiera inne podziały Otwarcie okna dodatkowych podziałów Dodatkowe podziały Podział 1 główny 5 lub 7 dodatkowych Uruchamia sekwencję Uruch...

Страница 44: ...ietlane informacji OSD Odtwarzanie Uruchamia odtwarzanie wyświetlanych kamer Nagrywanie ręczne Włącz wyłączna ręczne nagrywanie kanałów Alarm ręczny Uruchamianie alarmu ręcznego Status nagrywania Wyświetla informację o nagrywaniu Stan alarmów Wyświetla stan alarmów z urządzeń Stan dysku Informacje o stanie dysków do rejestracji nagrań Informację o sieci Wyświetlanie informacji o wykorzystaniu siec...

Страница 45: ...i zapis ciągły sterowany z harmonogramu Żółty zapis wywołany detekcją ruchu Czerwony zapis wywołany alarmem zewnętrznym Uruchomienie odtwarzania następuje dwukrotnym kliknięciu wybranego punktu na grafie Aby sterować odtwarzaniem można użyć następujących przycisków z opcji odtwarzania Zatrzymaj wyłącza odtwarzanie z wybranych kanałów Przewiń uruchamia odtwarzanie nagrań do tyłu wyświetlając klatki...

Страница 46: ...amia menu archiwizacji nagrań Status kopii zapasowej wyświetla aktualny stan archiwizacji nagrań Powrót wyłącza menu odtwarzania rejestratora 4 3 Zmiana języka menu W przypadku gdy po uruchomieniu rejestratora aktualnie wybrany język menu jest inny niż oczekiwany w celu jego zmiany należy postępować zgodnie z poniższą procedurą Należy wybrać przycisk otwierania MENU a następnie wybrać opcję otwier...

Страница 47: ...a 1 2 Wszelkie prawa zastrzeżone AAT SYSTEMY BEZPIECZEŃSTWA sp z o o 23 W wyświetlanym menu należy wybrać język Polski w trzecim od góry polu i kliknąć przycisk na dole menu Po zapisie ustawień język zostanie przełączony na Polski MENU REJESTRATORA ...

Страница 48: ...2020 07 20 MB MK TF v1 2 AAT SYSTEMY BEZPIECZEŃSTWA sp z o o ul Puławska 431 02 801 Warszawa tel 22 546 0 700 fax 22 546 0 719 www novuscctv com ...

Страница 49: ...Benutzerhandbuch Kurzfassung NVR 6408 H1 F ...

Страница 50: ...ist nicht erlaubt Ein unsachgemäß montiertes Gerät kann schwere Unfälle verursachen oder dieses stark beschädigen Das Gerät ist gemäß Anweisungen im Benutzerhandbuch von qualifiziertem entsprechend autorisiertem Personal zu montieren 10 Das Gerät sollte nur mit Stromquellen betrieben werden deren Parameter mit denen übereinstimmen die vom Hersteller in dessen technischem Datenblatt aufgeführt wurd...

Страница 51: ...amt 8 TB ALARM Kamera Alarm Input Output unterstützt Kamera Alarm Input Output Bewegungserkennung unterstützt Kamera Bewegungserkennung Reaktion des Systems auf Alarm Ereignisse Buzzer Alarm Output und Aufnahme Aktivierung PTZ E Mail mit Anhang INTELLIGENTE BILDANALYSE Unterstützte Funktionen Ausnahme Szenenwechsel Bild unscharf Video Color Cast Tripwire Eintritt in eine Zone Abandoned Object Dete...

Страница 52: ...t und erwartungsgemäß funktionieren Die AAT SYSTEMY BEZPIECZEŃSTWA SP Z O O haftet nicht für Kompatibilitätsprobleme die sich aus der Verwendung von Kameras ergeben die nicht von NOVUS sind aber ein ONVIF Protokoll verwenden Verwenden Sie Kameras mit ONVIF Protokoll die aber nicht von NOVUS hergestellt wurden empfiehlt sich bei jedem Einsatz ein Test bei dem festgestellt wird ob die empfohlenen Fu...

Страница 53: ...ingänge zum Anschluss von Mikrofonen 3 VGA Als Hauptanschlüsse für den Monitor verwenden Sie das D SUB VGA Kabel zum Anschließen des Monitors 4 HDMI Als Hauptanschlüsse für den Monitor verwenden Sie das HDMI Kabel zum Anschließen des Monitors 5 USB USB Port für externes Flash Memory und andere USB Geräte 6 LAN RJ 45 Anschlussport zum Anschluss des lokalen Netzwerkes und an das Internet 7 STECKDOSE...

Страница 54: ...önnten einschließlich HDDs für Bürozwecke die so genannten Desktop Disks Aufgrund der Tatsache dass die Zuverlässigkeit des Aufnahmeprozesses und Datensicherheit in jedem CCTV System von eminenter Wichtigkeit sind raten wir allerdings sehr dazu Festplatten einzusetzen die für einen Dauerbetrieb 24 7 ausgelegt sind In anderen Geräten verwendete Disks müssen Sie zunächst einmal formatieren Alle vor ...

Страница 55: ...verwendet oder Tasten gedrückt werden Benutzen Sie bitte das Menü um das Gerät herunterzufahren VORSICHT Stellen Sie die Verbindung her wenn kein Strom angeschlossen und der Schalter nicht aktiv ist Verlegen Sie das Stromkabel nicht unter Teppichen oder Läufern Das Stromkabel ist in der Regel geerdet Sollte dies nicht der Fall sein sollten Sie es aber keinesfalls eigenmächtig erden Stellen Sie sic...

Страница 56: ... Beschreibung Wir empfehlen Ihnen die Kamera vor dem Anschließen an den Rekorder zuerst gemäß Betriebsanleitung der Kamera zu konfigurieren Beachten Sie bitte dass Kameras eine einzigartige IP Adresse verwenden die vom Rekorder unterstützt werden Anschließen von Kameras und Netzwerk Rekordern NVR 6408 H1 F NOVUS NVR NETZWERK SWITCH 2 6 Anschluss externer Geräte Anschluss von Audio Ports INTERNET P...

Страница 57: ...ŃSTWA sp z o o GERÄT STARTEN Anschluss von Alarm Ports NVR 6408 H1 F hat einen lokalen Alarm Ein und Ausgang Schließen Sie den Alarm Eingang bitte wie im untenstehenden Bild an Beispiel für das Anschließen des Sensors an Alarm Eingang 1 ALARM IN1 IN4 IN2 IN3 GND SENSOR NO COM Strom quelle ALARM ...

Страница 58: ... auf Vollbildmodus um Durch anschließendes Doppelklicken gelangt man zurück in den vorherigen Display Modus Cursor nach oben bewegen und mit rechter Maustaste das MAIN MENU aufrufen Dann Icon START wählen Bestimmte Positionen können durch Scrollen mit der Maus angewählt werden Je nach Betriebsmodus des NVR wird durch Drücken der rechten Maustaste ein entsprechendes Funktionsmenü angezeigt 3 3 Syst...

Страница 59: ... o o NVR BETRIEB Zum Öffnen des DVR Menüs klicken Sie auf den Button unten links auf dem Bildschirm Klicken Sie nach Anklicken des Buttons auf LOGIN Loggen Sie sich danach durch Eingabe des Passwortes im Feld PASSWORD ein Standard Passwort für den User Root pass und klicken Sie dann auf den Log in Button ...

Страница 60: ...pability Table auf der Website www novuscctv com Wenn Sie falsche Werte eingestellt haben kann es zu diversen Problemen kommen der NVR kann die IP Kamera nicht finden der Stream lässt sich nicht verbinden das Bild wird nicht fließend dargestellt die Bildqualität ist schlecht usw Beim ersten NVR Start erscheint das Menüfenster WIZARD SETUP es sei denn die Funktion wurde zuvor deaktiviert Befolgen S...

Страница 61: ... 1 100 Netmask 255 255 255 0 Konfigurieren Sie folgende Parameter Gateway Primärer und Sekundärer DNS Bei aktiviertem DHCP Modus können Sie eine IP Adresse von einem DHCP Server herunterladen was beim Einsatz eines DHCP Servers erforderlich ist Der standardmäßig eingestellte HTTP Port zur Anzeige des Panel Web Geräts die RTSP Ports und Port Serverdaten können verändert werden Klicken Sie nach Ände...

Страница 62: ...die auswählbaren Kameras zu ändern klicken Sie auf das Icon in der Spalte EDIT bei Kameras der Serie NOVUS IP 3000 Geben Sie die Adresse im Feld IP ADDRESS ein stellen Sie die Masken unter SUBNET MASK ein und drücken Sie dann auf den OK Button um die Einstellungen zu speichern Drücken Sie den Button um dem System eine Kamera hinzuzufügen Die hinzugefügte Kamera erscheint dann unten auf der Menülis...

Страница 63: ...mera angeschlossen ist eingeschaltet ist wird der Status mit Connected angezeigt Um eine Kamera von der Liste zu entfernen drücken Sie in der Spalte DELETE III Festplatteneinstellungen Diese Reiterkarte enthält Informationen über die vom DVR erkannte Festplatte Bevor Sie mit der Arbeit beginnen müssen Sie die Festplatte formatieren indem Sie sie im Festplattenverzeichnis auswählen und dann auf FOR...

Страница 64: ...ein Alarm ausgelöst wurde MOTION RECORD SENSOR RECORD beginnt mit der Aufnahme nachdem durch Bewegungserkennung bzw durch Alarm Eingabe Alarm ausgelöst wurde ALWAYS 24x RECORD MOTION RECORD kontinuierliche Aufnahme und Aufnahme nach Empfang einer Bewegungserkennungsmeldung von der Kamera ALWAYS 24x RECORD SENSOR RECORD kontinuierliche Aufnahme und Aufnahme Alarm bei Alarm Input ALWAYS 24x RECORD M...

Страница 65: ...inscannen oder Sie geben den Geräte Code direkt auf der Website autonat com ein Dieser Service ermöglicht Ihnen die Verbindung mit Geräten die hinter einem mit NAT ausgestatteten Router an das Internet Netzwerk angeschlossen sind Haken Sie NAT an um P2P Service zu aktivieren HINWEIS Die AAT SYSTEMY BEZPIECZEŃSTWA SP Z O O haftet nicht für den Betrieb des von Dritten bereitgestellten Dienstes auton...

Страница 66: ...rgang abgeschlossen hat erscheint das Echtzeit Überwachungsbild Standardmäßig werden alle Kameras gleichzeitig gezeigt Am unteren Bildschirmrand wird der STATUS BAR angezeigt MENÜSTART VIDEOFENSTER Um auf NVR zuzugreifen klicken Sie auf den Button Das Startmenü fährt hoch Loggen Sie sich nach dem Anklicken des Buttons im System ein das Standard Passwort für den Root User lautet pass Beschreibung d...

Страница 67: ...NVR 6408 H1 F Benutzerhandbuch Kurzf Vers 1 2 19 Alle Rechte vorbehalten AAT SYSTEMY BEZPIECZEŃSTWA sp z o o Backup Ruft das Backup Menü auf ...

Страница 68: ...instellungen Zum Öffnen des Start Menüs klicken Vollbildschirm Schaltet in den Vollbildmodus um Single View Start der Kameraanzeige im Modus Single View Quad Ansicht Start der Anzeige von 4 Kameras im Modus Video View 9 Cam Ansicht Start der Anzeige von 9 Kameras im Modus Video View Andere Unterteilungen Öffnen Video Unterteilungen Andere Unterteilungen Öffnen Sie 1 Haupt 5 oder 7 zusätzliche Ansi...

Страница 69: ...es Gerätes finden Sie in der Vollversion des Benutzerhandbuches unter www novuscctv com Item Icon Beschreibung OSD ON OSD OFF OSD Informationen aktivieren deaktivieren Playback Funktion Startet das Playback für angezeigte Kameras Manuelle Aufnahmefunktion Aufnahmekanäle manuell ein ausschalten Manueller Alarm Ermöglicht eine manuelle Auslösung des Alarms Aufnahme Status Zeigt Aufnahmeinformationen...

Страница 70: ...Sie an der in der Leiste dargestellten Farbe Grün Manual Daten werden durch manuelle Aufnahmefunktion gespeichert Blau Schedule kontinuierliche Datenaufnahme Gelb Motion Datenaufnahme bei Bewegungsmeldung Rot Alarm Datenaufnahme bei Alarmereignis Zur Wiedergabe der gesuchten Daten einfach an einer gewünschten Stelle klicken oder den PLAY Button betätigen Zum Kontrollieren des Playbacks können Sie ...

Страница 71: ...gewählten Kanal an Bewegungserkennung Alarm Eingabe Aktivierung Backup Startmenü zur Archivierung von Aufnahmen Backup Status zeigt den aktuellen Status archivierter Aufnahmen an Back Schließen des Wiedergabemenüs 4 3 Menüsprache ändern Weicht nach dem Booten des NVR die aktuell gewählte Menüsprache von Ihren Wünschen ab können Sie sie ändern folgen Sie dazu nachfolgende Schritte Unten links auf d...

Страница 72: ... Rechte vorbehalten AAT SYSTEMY BEZPIECZEŃSTWA sp z o o NVR MENÜ Wählen Sie im dargestellten Menü Englisch als Sprachen 3 von oben und klicken Sie dann unten auf das Menü Nach dem Speichern der Einstellungen schaltet die Spracheinstellung auf Englisch um ...

Страница 73: ...AAT SYSTEMY BEZPIECZEŃSTWA sp z o o 431 Pulawska St 02 801 Warschau Polen tel 4822 546 07 00 fax 4822 546 07 59 www novuscctv com 2020 07 20 MB MK TF V1 2 ...

Отзывы: