background image

NVR OPERATING 

All rights reserved © AAT HOLDING S.A.


31 

NVR-6332-H2,NVR-6316-H1,NVR-6308P8-H1,NVR-6304P4-H1, NVR-6332-H8, NVR-6332P16-H4


user’s manual ver.1.1 

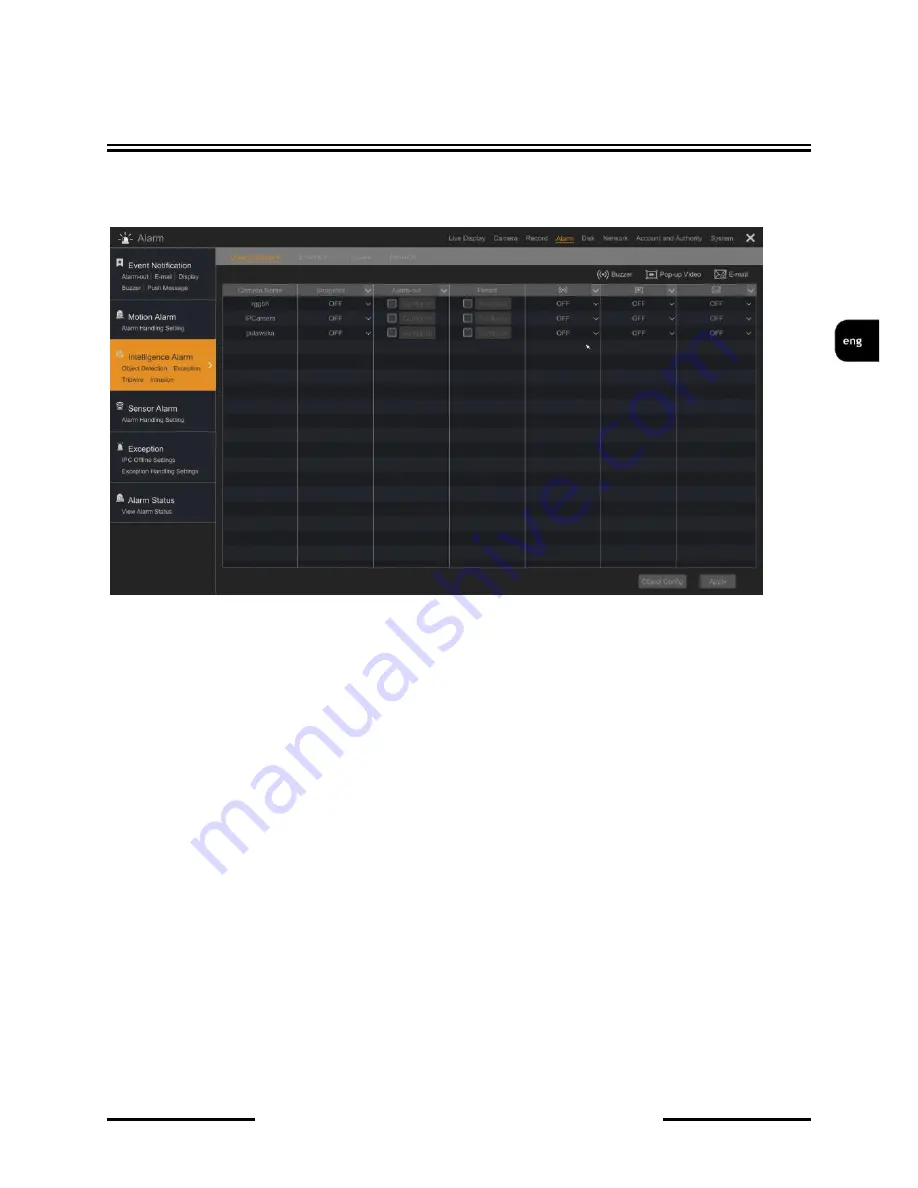
BUZZER – enables NVR buzzer activation after alarm event  
POP-UP VIDEO - enables pop-up video on NVR menu  
E-MAIL - sends e-mail message with information of video intelligence event  


To enable reaction click in column and switch OFF to ON settings. Check the ALARM-OUT box an 
chose alarm PRESET box and select desired alarm output. For preset selection click on check box in 
PRESET and choose desired preset for activating after video analysis event.  
To save settings press APPLY button in bottom.  
 

Содержание NVR-6304P4-H1

Страница 1: ...user s manual NVR 6332 H2 NVR 6316 H1 NVR 6308P8 H1 NVR 6304P4 H1 NVR 6332P16 H4 NVR 6332 H8 ...

Страница 2: ...ion point for the waste electrical and electronic equipment for recycling purpose For more information about recycling of this product please contact your local authorities your household waste disposal service or the shop where you purchased the product RoHS Directive RoHS 2011 65 EU Concerning for human health protection and friendly environment we assure that our products falling under RoHS Dir...

Страница 3: ...recommended since it may lead to heat build up and damaging the device itself as a consequence 9 Mounting the device on unstable surface or using not recommended mounts is forbidden Improperly mounted device may cause a fatal accident or may be seriously damaged itself The device must be mounted by qualified personnel with proper authorization in accordance with this user s manual 10 Device should...

Страница 4: ...2 1 3 Information 22 2 1 3 1 Basic 22 2 1 3 2 Camera Status 22 2 1 3 3 Alarm Status 23 2 1 3 4 Record Status 23 2 1 3 5 Network Status 23 2 1 3 6 Disk 24 2 2 Camera 25 2 2 1 Manage Camera 25 2 2 1 1 Add Camera 26 2 2 1 2 Add Manually 27 2 2 1 3 Add Group 27 2 2 2 Image 28 2 2 2 1 OSD Settings 28 2 2 2 2 Image Settings 28 2 2 2 3 Mask Settings 28 2 2 3 Motion Settings 29 2 2 4 Intelligence Analysis...

Страница 5: ... 5 3 Disk 46 2 5 4 S M A R T Information 47 2 6 Network 46 2 6 1 TCP IPv4 47 2 6 2 Port 48 2 6 3 DDNS 49 2 6 4 E mail 47 2 6 5 UPnP 48 2 6 6 NAT 48 2 6 7 Telnet 48 2 7 Account and Authority 48 2 7 1 Add User 48 2 7 2 Edit User 49 2 7 3 Edit Group 50 2 7 4 Security 41 2 7 4 1 Black and white list 51 3 NETWORK AND OPERATION UTILIZING WEB BROWSER 52 3 1 Recommended PC specification for web browser co...

Страница 6: ...urrently selected menu language is different than expected to change it please follow the steps below Click on bottom left on start menu button Then select menu options to open third from the bottom In the NVR menu select the tab SYSTEM In the displayed menu select the English language in the third from the top of the box and click the button on the bottom menu After saving settings the language w...

Страница 7: ...4P4 H1 NVR 6332 H8 NVR 6332P16 H4 user s manual ver 1 1 1 2 Menu operating To operate the menu press the button at the bottom left of the screen Then click on LOGIN position Then in login window please provide password for user root default password for root user is pass and then press LOGIN button ...

Страница 8: ... For suggested values for IP camera setting please refer to the Cameras Capability Table available on the www novuscctv com website If you set wrong values some problems may appear the NVR cannot search the IP camera the stream cannot be connected the image is not fluent the image quality is bad and so on In case of first NVR start WIZARD SETUP menu window will occur if function wasn t disabled ea...

Страница 9: ...or switch in INTERNAL ETHERNET PORT SECTION Please note that IP subnet for the ETHERNET PORT 1 and INTERNAL ETHERNET PORT were different In cases where it is necessary to NVRa connection to the Internet for remote access email sending etc Configure the following parameters Gateway Primary and Secondary DNS You can also enable DHCP mode allows you to download an IP address from a DHCP server requir...

Страница 10: ...he service allows you to connect to a device connected to the Internet network is behind a router equipped with NAT NOTE AAT Holding S A is not responsible for the operation of the service autonat com which is provided by third parties III Add Camera Allows you to configure the camera and add them to the recorder Upper window displays a sophisticated camera by the NVR To change the addressable cam...

Страница 11: ...to add a camera to the system Added camera will be displayed on the bottom of the menu list To edit the connection settings of the camera press the EDIT column If you are having problems connecting to the camera you must enter the correct user name in the USER NAME and password in the PASSWORD field and then press the OK button to save the settings If the NVR connected to the camera will be on STA...

Страница 12: ...ed by the DVR Before starting work you need to format the hard disk by selecting it in the list of drives and then pressing FORMAT Formatting may take a few moments After properly formatted STATUS field should have a value of RW Read Write V Record Settings You can set one of the modes MANUAL RECORD SETTINGS You can set the recording time from the moment you select the manual recording from 1 minu...

Страница 13: ...after alarm generated on alarm input MOTION RECORD SENSOR RECORD starts recording after motion detecion alarm and after alarm from alarm inputs ALWAYS 24x RECORD MOTION RECORD constant recording and recoring after receiving motion detection information from the camera ALWAYS 24x RECORD SENSOR RECORD constant recording and recording alarm generated on alarm input ALWAYS 24x RECORD MOTION RECORD SEN...

Страница 14: ... as the NVR completes its initialization process it will enter the real time monitoring image Displaying all cameras simultaneously is the default mode On the bottom of screen STATUS BAR is displayed To start access to the NVR click on the button to launch the start menu After clicking log on to the system the default password for the root user is a pass STATUS BAR description MENU BAR VIDEO WINDO...

Страница 15: ...nu Shutdown Starts backup menu Item Icon Description Settings Click to open start menu Full screen Switches video view to full screen Single view Start displaying camera in single view Quad view Start displaying 4 cameras in video view 9 cam View Start displaying 9 cameras in video view Other divisions Opening video subdivisions Other divisions Open 1 main 5 or 7 additional views Dwell Starts disp...

Страница 16: ...splayed cameras Manual Record Turn on off manually recording channels Manual Alarm Allow to trigger the alarm manually Recording Status Displays information about the recording Alarm Status Displays the status of alarm devices Disc Status Information about disc status Network status View information about network usage Device Information Displays information about the state of operation of the bas...

Страница 17: ...data by the color in the bar Green Manual data saved by manual recording Blue Schedule continuous data recording Yellow Motion motion event data recording Red Alarm alarm event data recording To play the searched data simply double click a desired point on or press PLAY button To control playback you can use the following buttons from the playback options Stop stops replaying Rewind Starts playbac...

Страница 18: ...t activation registered for the selected channel Backup start menu archiving recordings Backup status displays the current status of archival recordings Back close the replay menu 2 NVR MENU 2 1 Menu system In order to change the system settings click on button from left bottom of the menu and then click on the SETTINGS The SYSTEM menu have the menu sections 2 1 1 Basic 2 1 1 1 General Settings Yo...

Страница 19: ... of the system after the time given in WAIT TIME To save the settings press APPLY button 2 1 1 2 Date and Time After clicking in DATE AND TIME menu the following menu appears For DATE and TIME settings following settings are available SYSTEM TIME sets the date and time in NVR DATE FORMAT selects for date format from DD MM RRRR RRRR MM DD MM DD RRRR DD MM YYYY For network time synchronization the f...

Страница 20: ...ision to display To add new division clik on button In active windows it s possible to choose division and then select cameras from left side list Functions for following buttons delete all cameras from the view save the selected camera list to view After the camera selection press the the APPLY button to save the settings To enable the dwell in live view press the button Camera selection Add new ...

Страница 21: ...ge for event searching These filter settings are available ALL displays all type of information ALARM only alarm events will be displayed OPERATION displays the actions performed by users of the system SETTINGS displays information for changing NVR settings EXCEPTIONS displays information about exceptions system failures disconnected from the network etc Pressing the SEARCH button starts searching...

Страница 22: ...ading the NVR contact the manufacturer for detailed upgrade procedure Power outage turn off the unit or remove the USB memory during the update procedure results in DVR damage and necessity of repair is not subject to warranty The manufacturer is not liable for loss of data arising as a result of a software update 2 1 2 4 Backup and Restore This menu allows to backup and restore NVR settings to fr...

Страница 23: ...work etc For detailed information about event click on button Additional information will be displayed as the source of an alarm the time of an alarm or reaction after an alarm If there is the possibility of linking alarm recording you can click on the icon to play the associated recording 2 1 3 4 Record Status This tab displays information about actual recording status The following information a...

Страница 24: ...or RTSP data streams default value 554 TOTAL BANDWIDTH displays the total possible bandwidth that the DVR is able to record from the cameras REMAIN BANDWIDTH displays remain bandwidth for getting video streams form the cameras TOTAL SEND BANDWIDTH displays information for total possible bandwidth for streams send from NVR to network clients REMAIN SEND BANDWDTH displays information for remaining b...

Страница 25: ...tton on the column DELETE To add a new camera select the ADD CAMERA NOTE The recorders are equipped with PoE port configuration start by connecting camera to PoE ports Cameras NOVUS Series 3000 will automatically be detected and added to the system Cameras other series camera address must be set in accordance with addressing set for the internal Ethernet port by default 10 151 151 1 Then enter a u...

Страница 26: ...ser s manual ver 1 1 2 2 1 1 Add Camera To change the camera s IP address click on the icon in the column EDIT NOTE Changing the IP address from that menu works only with NOVUS 3000 series cameras In EDIT IP window you can modify in IP ADDRESS SUBNET MASK and GATEWAY fields Press OK button to modify IP address for the selected camera ...

Страница 27: ...6332P16 H4 user s manual ver 1 1 The DEFAULT PASSWORD button allows to set default passwords for NOVUS 3000 IP cameras and for cameras connected with ONVIF protocol 2 2 1 2 Add Manually This menu allows you to manually create a camera in the system by entering the IP address of the camera data port user name and password ...

Страница 28: ...Settings OSD settings allow you to set the following parameters in the image display of the cameras CAMERA NAME NAME OSD TIME OSD DATE FORMAT TIME FORMAT To change the position of the OSD information to be clicking and holding the left mouse button on the red frame to adjust the position of the subtitles To save the settings press the APPLY button 2 2 2 2 Image Settings n this menu you can set the...

Страница 29: ...etection cameras connected to the NVR To set the grid detection select the camera from the list and then use the left mouse button on the image To select the entire area press onlines to sleep the entire selection press CLEAR REVERSE reverses the selection SENSITIVITY bar allows you to set the level of detection sensitivity and field LENGTH specifies the duration of the alarm To save your changes ...

Страница 30: ... IP 3000 series cameras required camera firmware for at least 4 1 1 The DVR can record video from the camera at the time of the video analysis event Recording settings are available in RECORD MODE SETTINGS menu Clik on INTELLIGENCE RECORD button to open menu allowing to choose recording mode after video analytics event It s possible to combine recoding after video analytic events with other types ...

Страница 31: ...DEO enables pop up video on NVR menu E MAIL sends e mail message with information of video intelligence event To enable reaction click in column and switch OFF to ON settings Check the ALARM OUT box an chose alarm PRESET box and select desired alarm output For preset selection click on check box in PRESET and choose desired preset for activating after video analysis event To save settings press AP...

Страница 32: ...is displayed on right side of menu Click on the desired camera to display settings on the list The following settings are available CAMERA NAME displays name and allow to select camera to configure OBJECT DETECTION The ON OFF settings are to determine if video intelligence is active or not Switch the filed to ON and click on APPLY button to activate detection DURATION sets time intelligence alarm ...

Страница 33: ...you monitor the disappearance of an object it is important that you trace the object shape as closely as possible Pressing the APPLY button will activate selected intelligent analysis If the TRIPWIRE or INTRUSION were enabled will be deactivated The use of zones allows you to define up to 4 areas simultaneously To configure reaction to intelligent events with alarm actions press PROCESSING MODE bu...

Страница 34: ...nd press the APPLY button Enabling tripwire detection will disable object detection or intrusion detection for the selected camera The DURATION filed specifies the length of time the camera remains in the alarm state after the analysis event occurs The next alarm from the analysis event will be triggered after the duration alarm specified by this parameter LINE selects one of four available virtua...

Страница 35: ...place the zone in the center of the image to make it easier for the camera to detect the object You can monitor up to 4 zones To edit them use the AREA field to switch to another zone edition To ENABLE analytics detection set the INTRUSION field to ON and press the APPLY button If the tripwire or object detection were enabled will be deactivated by activating intrusion analysis on selected channel...

Страница 36: ... 6332 H8 NVR 6332P16 H4 user s manual ver 1 1 2 2 5 PTZ 2 2 5 1 Preset This menu allows you to add a point of observation presets for the PTZ camera Using the control keys select the position of the camera and press the ADD button In the CAMERA you can change the point name and then press OK to add the point ...

Страница 37: ...u can create a route consisting of presets defined in the menu PRESET To add a point to the route press ADD PRESET and select preset from PRESET NAME Then select time for holding in chosen preset from TIME field and press OK to save the preset Add few presets to create a cruise and then press floppy disk button to save the settings In order to crate cruise press the button in the list from right s...

Страница 38: ...L allows manual control of recording time In automatic mode the following settings are available MOTION RECORD starts recording after receiving information from the camera for motion detection SENSOR RECORD starts recording after receiving information from alarm inputs MOTION RECORD SENSOR RECORD starts recording after receiving information from the camera for motion detection or after receiving i...

Страница 39: ...ions may occur in the displayed image The following stream settings are available ENCODE RESOLUTION FPS BITRATE AUDIO 2 3 2 Advanced settings Checking the CYCLE RECORD starts overwriting the record In CAMAREA S RECORD PARAMTERS TABLE it s possible to set following parameters PRE ALARM RECORD TIME sets pre alarm recording time in 0 3 5 second time range POST ALARM TIME RANGE sets the alarm record t...

Страница 40: ...cord Settings This tab displays information about current state of the recorded channels is given CHANNEL NAME STSTUS FPS BITRATE RESOLUTION TYPE OF RECORD 2 4 Alarm In this menu it s possible to set the alarm parameters 2 4 1 Event Notification 2 4 1 1 Alarm out In this menu we can set up time alarm for alarm output supported by the recorder in a field DELAY Available runtimes from 5 seconds to 2...

Страница 41: ...2 E mail Click on ADD button allows to add recipients for alarm notifications EDIT SENDER button allows to configure sender e mail account 2 4 1 3 Display In POP UP VIDEO section in DURATION field it possible to set the time for full screen video display after alarm event In POP UP MESSAGE BOX section it possible to set DURATION for displaying POP UP MESSAGE in NVR front screen 2 4 1 4 Buzzer In t...

Страница 42: ...2 4 2 Motion Alarm In this menu it s possible to set reaction for motion detection event There are following handling available SNAPSHOT performs still image capture from video ALARM OUT triggers alarm output activation PRESET select preset for PTZ BUZZER activates audio buzzer POP UP VIDEO displays pop up video E MAIL sends e mail with alarm information ...

Страница 43: ...ity after camera disconnection This reactions are available SNAPSHOT performs still image capture from video ALARM OUT triggers alarm output activation BUZZER activates audio buzzer POP UP VIDEO displays pop up video E MAIL sends e mail with alarm information 2 4 4 2 Exception Handling Settings In this menu it s possible to define settings for actions after system errors IP ADDRESS CONFLICT genera...

Страница 44: ...ment Displays information about the hard drives connected to the NVR You have the following information DISC displays the name of the hard disk CAPACITY GB indicates the size of the hard drive FREE SPACE GB displays information about actual free space on disk DISK SERIAL NO displays the serial number of the hard disk DISK MODEL display information about disk model STATUS displays information for h...

Страница 45: ...n DISC line to add a disk to the group Then in the camera add a camera that will be assigned to the selected group 2 5 3 Disk In this menu we can read information about state of hard drives connected to the NVR You have the following information DISC displays the name of the hard disk CAPACITY GB indicates the size of the hard drive FREE SPACE GB displays information about actual free space on dis...

Страница 46: ...arameters to be entered in this menu Network settings in part PORT NETWORK NO 1 allow you to configure the network settings of TCP IP for the primary network interface The recorders are equipped with ports PoE network settings for PoE ports are set in the section INTERNAL PORT ETHERNET NOTE IP subnets set for both interfaces must be different Checking the IP address from DHCP enables downloading a...

Страница 47: ...to configure DDNS service allowing asigning domian to dynamic IP Check ENABLE to enable service settings and select service provider from list Then enter the appropriate parameters as ADDRESS SERVER services user NAME and PASSWORD and press the APPLY button to start the service NOTE AAT Holding S A is not responsible for the operation of DDNS services that are provided by third parties 2 6 4 E mai...

Страница 48: ...The field TYPE MAPS position AUTO sets the default port mapping Manual mode allows you to change the port number mapping the external device NOTE www autonat com service is provided by third parties and the company AAT HOLDING SA is not responsible for the operation of the service 2 6 7 Telnet Turn on the check box in the menu starts the connection to the server is available in the P2P site www au...

Страница 49: ...orization groups in the GROUP In the BIND MAC you can specify the MAC address from which the user can connect In the E MAIL You can save the web address to the user To save user data press ADD 2 7 2 Edit User In this menu we have the ability to edit account settings Uncheck ENABLE field to disable the account USERNAME field display the user name CLOSE PERMISSION CONTROL closes the panel with infor...

Страница 50: ...S A 50 NVR 6332 H2 NVR 6316 H1 NVR 6308P8 H1 NVR 6304P4 H1 NVR 6332 H8 NVR 6332P16 H4 user s manual ver 1 1 2 7 3 Edit Group In the window on the right displays a list of groups with permissions Clicking on the field EDIT starts editing permissions ...

Страница 51: ...ss to the camera management system from the web interface DISK MANAGMENT provides disk management panel ALARM MANAGMENT enable access to alarm management settings SCHEDULE MANAGMENT enable access to schedule panel LOCAL SYSTEM SETTINGS enable access to local system settings At the bottom of the menu options are available for permission for the cameras menu LOCAL and REMOTE They allow enabling disa...

Страница 52: ...920x1080 resolution and 25 fps speed 3 2 Establishing connection To establish connection open the web browser and enter IP address of the NVR by default IP address is 192 168 1 100 Press RUN to download and run WebClient_9000 exe addition At the bar displayed press the button to start ALLOW MSXML Then press allow for the addition npWebClient_9000 dll Operating System Windows 7 Windows 8 Windows 10...

Страница 53: ...332 H8 NVR 6332P16 H4 user s manual ver 1 1 3 3 Live view panel Menu bar Video window Login bar Camera selection Operation window Toolbar Screen division select OSD Display ON OFF Full screen view Main Sub stream switching Control of alarm outputs Erase all cameras from view Record of active channels on client NVR output audio activation ...

Страница 54: ...VR 6332 H2 NVR 6316 H1 NVR 6308P8 H1 NVR 6304P4 H1 NVR 6332 H8 NVR 6332P16 H4 user s manual ver 1 1 Operation panel Records the current camera view to jpg file Digital zoom in 3D Zoom Enables audio Main Sub stream Starts the recording Digital zoom out Erase active cameras from view ...

Страница 55: ... rights reserved AAT HOLDING S A 55 NVR 6332 H2 NVR 6316 H1 NVR 6308P8 H1 NVR 6304P4 H1 NVR 6332 H8 NVR 6332P16 H4 user s manual ver 1 1 PTZ Panel PTZ camera direction control PTZ speed control Zoom control Focus control Iris controls Preset list ...

Страница 56: ...ft and select the day of the recording in the calendar Then select the SEARCH button to display the avaiable ranges on the bar recordings Double cliking on the desired location on the toolbar recording starts playback For playback control and backup use playback buttons Channel List Calendar Record Bar Video window Playback control Stop Rewind Play Pause Deceleration Acceleration Frame forward bac...

Страница 57: ...nd copy for recordings by time and event In BY TIME mode select desired camera and select time range in START TIME and END TIME then press COPY button In display window select desired path and press OK In BY EVENT mode select the time range to be copied recordings and the type of event and press COPY A list of events to copy the recordings should check boxes in the cells on the left side of the li...

Страница 58: ...set the parameters according to your Router For more information please to contact your Internet provider Gateway the gateway address to access the Internet typically a router address For more information please to contact your Internet service provider The first and second DNS use the DNS provided by your ISP or use public DNS servers for example 208 67 222 222 In the router menu set mapping forw...

Страница 59: ...NETWORK OPERATIONS UTILIZING WEB BROSWER All rights reserved AAT HOLDING S A 59 NVR 6332 H2 NVR 6316 H1 NVR 6308P8 H1 NVR 6304P4 H1 NVR 6332 H8 NVR 6332P16 H4 user s manual ver 1 1 ...

Страница 60: ...2017 09 01 AN MK AAT Holding sp z o o 431 Pulawska St 02 801 Warsaw Poland tel 4822 546 07 00 fax 4822 546 07 59 www novuscctv com ...

Страница 61: ...instrukcja obsługi NVR 6332 H2 NVR 6316 H1 NVR 6308P8 H1 NVR 6304P4 H1 NVR 6332P16 H4 NVR 6332 H8 ...

Страница 62: ...wać się z przedstawicielem władz lokalnych dostawcą usług utylizacji odpadów lub sklepem gdzie nabyto produkt Dyrektywa RoHS 2011 65 UE Informacja dla użytkowników dotycząca ograniczenia użycia substancji niebezpiecznych w sprzęcie elektrycznym i elektronicznym W trosce o ochronę zdrowia ludzi oraz przyjazne środowisko zapewniamy że nasze produkty podlegające przepisom dyrektywy RoHS dotyczącej uż...

Страница 63: ...eń podanych w niniejszej instrukcji 10 Urządzenie może być zasilane jedynie ze źródeł o parametrach zgodnych ze wskazanymi przez producenta w danych technicznych kamery Dlatego też zabrania się zasilania rejestratora ze źródeł o nieznanych niestabilnych lub niezgodnych z wymaganiami określonymi przez producenta parametrach 11 Nie wolno dopuścić aby jakiekolwiek metalowe elementy dostały się do wnę...

Страница 64: ... zapasowa 22 2 1 3 Informacje 22 2 1 3 1 Główne 22 2 1 3 2 Status 22 2 1 3 3 Stan alarmu 23 2 1 3 4 Status nagrywania 23 2 1 3 5 Status sieci 23 2 1 3 6 Dysk 24 2 2 Kamera 25 2 2 1 Zarządzaj kamerę 25 2 2 1 1 Dodaj kamerę 26 2 2 1 2 Dodaj ręcznie 26 2 2 1 3 Dodaj grupę 28 2 2 2 Ustawienia obrazu 28 2 2 2 1 Ustawienia OSD 28 2 2 2 2 Ustawienia obrazu 28 2 2 2 3 Ustawienia stref prywatność 28 2 2 3 ...

Страница 65: ...sk 45 2 5 4 Informacje S M A R T 46 2 6 Sieć 46 2 6 1 TCP IPv4 46 2 6 2 Port 47 2 6 3 DDNS 47 2 6 4 E mail 47 2 6 5 UPnP 48 2 6 6 NAT 48 2 6 7 Telnet 48 2 7 Konta i dostęp 48 2 7 1 Utwórz konto 48 2 7 2 Edytuj konto 49 2 7 3 Edytuj grupę 50 2 7 4 Bezpieczeństwo 51 2 7 4 1 Czarna i biała lista 51 3 OBSŁUGA REJESTRATORA ZA POMOCĄ PRZEGLĄDARKI 52 3 1 Zalecana konfiguracja komputera PC do połączeń prz...

Страница 66: ...rany język menu jest inny niż oczekiwany w celu jego zmiany należy postępować zgodnie z poniższą procedurą Należy wybrać przycisk otwierania MENU a następnie wybrać opcję otwierania menu ustawień systemowych trzecia opcja od dołu W menu rejestratora należy wybrać zakładkę SYSTEM W wyświetlanym menu należy wybrać język Polski w trzecim od góry polu i kliknąć przycisk na dole menu Po zapisie ustawie...

Страница 67: ...uga menu Aby uruchomić menu rejestratora należy nacisnąć przycisk w lewej dolnej części ekranu Po kliknięciu w wyświetlonym menu należy wybrać pozycję LOGOWANIE Następnie w oknie logowania należy wybrać użytkownika root i wpisać hasło w polu HASŁO Domyślne hasło dla użytkownika root to pass a następnie nacisnąć przycisk logowania LOGOWANIE OBSŁUGA REJESTRATORA ...

Страница 68: ...ości ustawień w kamerach znajdują się w Tabeli kompatybilności kamer dostępnej na stronie www novuscctv com W przypadku ustawienia niewłaściwych wartości mogą wystąpić problemy z wyszukaniem podłączeniem kamer lub uzyskaniem płynnego obrazu bez zniekształceń Przed przystąpieniem do pracy z rejestratorem sieciowym należy przeprowadzić wstępną konfigurację urządzenia Należy kliknąć na przycisku KREA...

Страница 69: ...ełącznika w sekcji Internal Ethernet Port Należy pamiętać aby podsieci IP dla Portu sieciowego nr1 i Internal Ethernet Port były inne W przypadku gdy konieczne jest połączenie NVRa z Internetem do zdalnego dostępu wysyłania emaili itp należy skonfigurować następujące parametry Brama Preferowany i Pomocniczy DNS Można również włączyć tryb pracy DHCP pozwalający na pobranie adresu IP z serwera DHCP ...

Страница 70: ...do sieci Internetu znajdującym się za routerem wyposażonym w funkcje NAT UWAGA Firma AAT Holding S A nie ponosi odpowiedzialności za działanie usługi autonat com która jest dostarczona przez firmy trzecie III Dodaj kamery Umożliwia konfigurację kamer i dodanie ich do rejestratora Górne okno wyświetla kamery wyszukane przez rejestrator Aby zmienić adresację kamer należy kliknąć na ikonie w kolumnie...

Страница 71: ...emu Dodane kamery zostaną wyświetlone na dolnej liście menu Aby edytować ustawienia połączenia z kamerą naciśnij przycisk w kolumnie EDYTUJ Jeżeli występują problemy z połączeniem z kamerą należy wprowadzić poprawna nazwę użytkownika w polu NAZWA UŻYT i hasło w polu HASŁO a następnie nacisnąć przycisk OK w celu zapisania ustawień Jeśli rejestrator nawiązał połączenie z kamerą w kolumnie STATUS zos...

Страница 72: ...dy zaznaczając go na liście dysków a następnie naciskając przycisk FORMATUJ Operacja formatowania może potrwać kilka chwil Po poprawnym sformatowaniu pole STATUS powinno mieć wartość ODCZYT I ZAPIS V Ustawienia nagrywania Można ustawić jeden z trybów Tryb ręczny w tym trybie użytkownik musi ręcznie wywołać nagrywanie kanałów Ustawienia nagrywanie ręcznego umożliwia ustawienie czasu nagrywania od m...

Страница 73: ...rywanie po zdarzeniu detekcji ruchu i po zdarzeniu wygenerowanym z wejścia alarmowego ZAWSZE 7x24 DETEKCJA RUCHU nagrywanie ciągłe lub nagrywanie po zdarzeniach detekcji ruchu ZAWSZE 7x24 WG CZUJNIKÓW nagrywanie ciągłe 24 lub nagrywanie po zdarzeniach wygenerowanych z czujników alarmowych ZAWSZE 7x24 DETEKCJA RUCHU WG CZUJNIKÓW nagrywanie ciągłe nagrywanie z detekcji ruchu lub czujników alarmowych...

Страница 74: ...następujących języków angielski polski i inne Po zakończeniu procesu inicjalizacji na ekranie monitora wyświetlane są obrazy z kamer na żywo U dołu ekrany wyświetlany jest pasek stanu urządzenia W celu uruchomienia menu w rejestratorze należy kliknąć na przycisk w menu start Po kliknięciu należy zalogować się do systemu domyślne hasło dla użytkownika root to pass Menu start MENU REJESTRATORA PASEK...

Страница 75: ...ie rejestratora Nazwa Ikona Opis Start Uruchamia menu Start Pełny ekran Przełącza obraz wideo na cały ekran Pojedynczy obraz Przełącza do pojedynczego widoku wideo Poczwórny obraz Przełącza obraz do poczwórnego obrazu wideo Podział na 9 Przełącza obraz do podziału na 9 ekranów Otwiera inne podziały Otwarcie okna dodatkowych podziałów Dodatkowe podziały Podział 1 główny 5 lub 7 dodatkowych Uruchami...

Страница 76: ...mer Nagrywanie ręczne Włącz wyłączna ręczne nagrywanie kanałów Alarm ręczny Uruchamianie alarmu ręcznego Status nagrywania Wyświetla informację o nagrywaniu Stan alarmów Wyświetla stan alarmów z urządzeń Stan dysku Informacje o stanie dysków do rejestracji nagrań Informację o sieci Wyświetlanie informacji o wykorzystaniu sieci Info o urządzeniu Wyświetla podstawowe informację o stanie urza dzenia ...

Страница 77: ...ęcznym Niebieski zapis ciągły sterowany z harmonogramu Żółty zapis wywołany detekcją ruchu Czerwony zapis wywołany alarmem zewnętrznym Uruchomienie odtwarzania następuje po dwukrotnym kliknięciu wybranego punktu na grafie Aby sterować odtwarzaniem można użyć następujących przycisków z opcji odtwarzania Zatrzymaj wyłącza odtwarzanie z wybranych kanałów Przewiń uruchamia odtwarzanie nagrań do tyłu w...

Страница 78: ...wyświetla aktualny stan archiwizacji nagrań Powrót wyłącza menu odtwarzania rejestratora 2 Menu rejestratora 2 1 Menu system W celu uruchomienia ustawień systemowych należy wybrać pozycję wybrać przycisk z paska w lewej dolnej części ekranu a następnie wybrać USTAWIENIA Część menu SYSTEM posiada podgrupy ustawień 2 1 1 Główne 2 1 1 1 Ustawienia ogólne W tym menu można ustawić NAZWA URZĄDZENIA usta...

Страница 79: ... na przycisku USTAW 2 1 1 2 Data i czas Po wybraniu ustawień DATA I CZAS pojawi się następujące okno menu Dla ustawień daty i czasu dostępne są następujące ustawienia CZAS SYSTEMU ustawia datę i czas systemu rejestratora FORMAT DATY wybór formatu wyświetlania daty z pośród dostępnych formatów DD MM RRRR RRRR MM DD MM DD RRRR DD MM YYYY Dla synchronizacji czasu z siecią dostępne są następujące usta...

Страница 80: ...ki podziałów do wyświetlania Aby dodać nowy podział należy kliknąć na przycisk W aktywnym widoku można wybrać rodzaj podziału a następnie z listy kamer po prawej stronie wybrać kamery do widoku Przycisk kasuje wszystkie wybrane kamery z widoku zapisuje wybrane układ kamer do widoku Po dokonaniu wyboru z kamer należy nacisnąć przycisk USTAW aby zapisać ustawienia Uruchomienie sekwencji jest możliwe...

Страница 81: ...astępujące ustawienia filtrów zdarzeń WSZ wyświetla wszystkie zdarzenia ALARM wyświetla tylko zdarzenia alarmowe OPERACJE wyświetla działania wykonywane przez użytkowników systemu USTAWIENIA wyświetla informację o zmianach ustawień dokonywanych przez systemie WYJĄTEK wyświetla informację o wyjątkach awarie systemu braku połączenia z siecią itp Kliknięcie na przycisku SZUKAJ aby rozpocząć wyszukiwa...

Страница 82: ... aktualizacji oprogramowania należy skontaktować się z dystrybutorem sprzętu Zanik zasilania wyłączenie urządzenia lub usunięcie pamięci USB w trakcie procesu aktualizacji oprogramowania skutkuje uszkodzeniem rejestratora i koniecznością naprawy serwisowej nie podlegającej gwarancji Producent nie ponosi odpowiedzialności za utratę danych powstałą w skutek aktualizacji oprogramowania 2 1 2 4 Kopia ...

Страница 83: ...dło wystąpienia alarmu czas wystąpienia alarmu czy reakcję po wystąpieniu alarmu Jeżeli występuje możliwość powiązania alarmu z nagraniem można kliknąć na ikonie aby odtworzyć powiązane nagranie 2 1 3 4 Status nagrywania W tej zakładce wyświetlane są informacje o aktualnym stanie nagrywanych kanałów Podawana jest Nazwa kanału stan nagrywania ilość klatek na sekundę wielkość strumienia rozdzielczoś...

Страница 84: ...etla całkowitą możliwą przepustowość jaką rejestrator jest w stanie zarejestrować z kamer POZOSTAŁY TRANSFER wyświetla aktualną pozostałą przepustowość do wykorzystania przy podłączeniu kamer DOSTĘPNY TRANSFER PRZEKAZYWANIA wyświetla całkowite maksymalne pasmo możliwe do wykorzystania do wyświetlaniu strumieni wideo z rejestratora POZOSTAŁE PASMO PRZEKAZYWANIA wyświetla aktualną ilość dostępnego p...

Страница 85: ...odania nowej kamery należy wybrać przycisk DODAJ KAMERĘ UWAGA W rejestratorach wyposażonych w porty PoE konfigurację należy rozpocząć od podłączenia kamer do portów PoE Kamery NOVUS serii 3000 zostaną automatycznie wykryte i dodane do systemu Kamery innych serii wymagają ustawienia adresu kamery zgodnego z adresacją ustawioną dla wewnętrznego portu Ethernet domyślnie 10 151 151 1 Następnie należy ...

Страница 86: ...amerę Uruchomienie opcji dodawania kamery pokaże w oknie wyszukane kamery Aby zmienić adres IP kamery należy kliknąć na ikonę w kolumnie EDYTUJ UWAGA Zmiana adresów IP działa wyłączenie z kamerami NOVUS serii 3000 W wyświetlonym oknie można dokonać modyfikacji w polach ADRES IP MASKA POD BRAMA DOM Naciśnij przycisk OK aby zmodyfikować adres IP kamery MENU REJESTRATORA ...

Страница 87: ...wa zastrzeżone 27 Przycisk DOMYŚLNE HASŁO pozwala ustawić domyślne hasła dla kamer serii 3000 w protokole IP CAMERA oraz dla kamer wykrywanych dzięki protokołowi ONVIF 2 2 1 2 Dodaj ręcznie Menu to pozwala na ręczne utworzenie kamery w systemie poprzez podanie adresu IP kamery portu danych nazwy użytkownika oraz hasła MENU REJESTRATORA ...

Страница 88: ...alają na ustawienie następujących parametrów w obrazie wyświetlanym z kamer NAZWA KANAŁU CZAS OSD FORMAT DATY FORMAT CZASU Aby zmienić położenie informacji OSD należy klikając i przytrzymując lewy przycisk myszki na czerwonym obramowaniu dopasować położenie napisów Aby zapisać ustawienia należy nacisnąć przycisk ZASTOSUJ 2 2 2 2 Ustawienia obrazu W menu tym możemy ustawić następujące parametry JAS...

Страница 89: ... podłączonych do rejestratora Aby ustawić siatkę detekcji wybierz kamerę z listy a następnie użyj lewego przycisku myszki na obrazie Aby zaznaczyć cały obszar wciśnij przycisk WSZYTKIE aby usnąć całe zaznaczenie naciśnij przycisk WYCZYŚĆ ODWRÓĆ odwraca zaznaczenie Pasek CZUŁOŚĆ pozwala ustalić poziom czułości detekcji a w polu DŁUGOŚĆ określa się czas trwania alarmu Aby zapisać zmiany naciśnij prz...

Страница 90: ... co najmniej 4 1 1 Rejestrator może nagrywać obraz z kamery po wystąpieniu zdarzenia analizy obrazu Ustawienia nagrywania dostępne są w menu NAGRANIE USTAWIENIA TRYBU Naciśnięcie przycisku INTELLIGENCE RECORD uruchamia panel pozwalający na wybór trybu nagrywania po wystąpienia zdarzenia analizy obrazu Można ustawić nagrywanie po zdarzeniu analizy obrazu w połączeniu z nagrywaniem z innych trybów n...

Страница 91: ...wysyła wiadomość z informacją o zdarzeniu analizy Aby uruchomić reakcję należy kliknąć na wybrane pole w kolumnie i przełączyć pozycję WYŁ na pozycję WŁ W celu skonfigurowania wyjść alarmowych należy zaznaczyć pole wyboru w kolumnie WYJŚCIE ALARM i wybrać wyjście alarmowe z wyświetlonej listy Ustawienia wyboru presetu przez kamerę PTZ po zdarzeniu alarmowym dostępne są po zaznaczeniu pole wyboru w...

Страница 92: ...r obsługujących wybraną analizę obrazu Kliknięcie na wybranej kamerze wyświetli jej ustawienia analizy obrazu Na liście dostępne są następujące ustawienia NAZWA KANAŁU wyświetlanie nazwy i wybór ustawianej kamery WYKRYWANIE OBIEKTÓW WŁ WYŁ dostępne ustawiania określają czy analiza jest ustawiona jako aktywna nieaktywna Przełączenie z pozycji WYŁ na WŁ i naciśnięcie przycisku USTAW aktywuje wybrany...

Страница 93: ...STREFA NR i przełączyć sie do edycji strefy o innym numerze W przypadku monitorowania zniknięcia obiektu ważne jest aby jak najdokładniej obrysować monitorowany obiekt Naciśnięcie przycisku USTAW uruchamia wybraną analizę obrazu Jeśli wcześniej zostały uruchomione analizy PRZEKROCZENIA LINII lub NARUSZENIA STREFY obrazu zostaną one wyłączone dla wybranej kamery Użycie stref pozwala na zdefiniowani...

Страница 94: ...rmy analizy wykrywania obiektów czy naruszenia strefy Pole DŁUGOŚĆ określa czas w jakim kamera pozostanie w stanie alarmu po wystąpieniu zdarzenia analizy Następny alarm ze zdarzenia analizy zostanie wzbudzony po czasie trwania określonym tym parametrem POWIERZCHNIA ALARMU wybiera jedną z czterech dostępnych wirtualnych powierzchni na których można narysować linię do monitorowania Analiza zdarzeń ...

Страница 95: ...nalizy naruszenia strefy wyłącza analizę wykrywania obiektów i przekroczenia linii Przejście obiektu przez strefę wyzwoli alarm Kliknięcie przycisku PRZETWARZANIE uruchamia panel konfiguracji reakcji na zdarzenia alarmowe W polu KAMERA mamy możliwość wyboru kamery w której będziemy dokonywać modyfikacji ustawień Pole DŁUGOŚĆ określa czas w jakim kamera pozostanie w stanie alarmu po wystąpieniu zda...

Страница 96: ...szystkie prawa zastrzeżone 36 2 2 5 PTZ 2 2 5 1 Punkt Menu to umożliwia dodanie punktu obserwacji preset u dla kamery typu PTZ Przy pomocy klawiszy sterujących wybierz położenie kamery a następnie wciśnij przycisk DODAJ W polu NAZAWA PUNKTU można zmienić nazwę punktu a następnie naciśnij OK aby dodać punkt MENU REJESTRATORA ...

Страница 97: ...wanych w menu PUNKT Aby dodać punkt do trasy należy nacisnąć przycisk DODAJ PUNKT Wybierz punkt z listy NAZWA PUNKTU a następnie wybierz czas pozostawania w kamery w punkcie w polu CZAS następnie naciśnij przycisk OK aby dodać punkt Można dodać kilka punktów w celu utworzenia trasy Aby zapisać trasę należy nacisnąć przycisk dyskietki z prawej strony pola NAZWA TRASY W celu utworzenia nowej trasy n...

Страница 98: ...anie czasem zapisu W trybie automatycznym dostępne są następujące ustawienia AUTOMATYCZNY ustawia dla wszystkich kamer jeden z poniższych trybów NAGRYWNANIE WG DETEKCJI uruchamia nagrywanie po otrzymaniu informacji z kamery o detekcji ruchu NAGRYWANIE WG ZDARZEŃ nagrywa kanały po alarmach wygenerowanych z wejść alarmowym NAGRYWANIE WG DETEKCJI WG CZUJNIKA nagrywanie po zdarzeniu detekcji ruchu i p...

Страница 99: ...DOWANIE ROZDZIELCZOŚĆ KL S WIELKOŚC STRUMIENIA WŁ WYŁ DŻWIĘKU 2 3 2 Zaawansowane Zaznaczenie pola NADPISYWANIE NAGRAŃ włącza nadpisywanie nagrań na dysku W tabeli USTAWEINIA NAGRYWANIA można wybrać ustawienia dotyczące czasu nagrań przed alarmem w zakresie 0 3 5 sekund w polu NAGRYWANIE PRZED ALARMERM czas nagrywania po alarmie w zakresie od 5 sekund do 10 minut w polu OPÓŻNIONY CZAS NAGRAŃ W polu...

Страница 100: ...nagrywania W tej zakładce wyświetlane są informacje o aktualnym stanie nagrywanych kanałów Podawana jest Nazwa kanału stan nagrywania ilość klatek na sekundę wielkość strumienia rozdzielczość obrazu typ nagrywania 2 4 Alarm W menu tym mamy możliwość edycji ustawień alarmów 2 4 1 Powiadomienia 2 4 1 1 Wyjście alarmowe W menu tym mamy możliwość ustawienia czasu podtrzymania alarmu dla wyjść alarmowy...

Страница 101: ...sk EDYTUJ NADAWCĘ umożliwia skonfigurowanie ustawień konta nadawcy wiadomości 2 4 1 3 Wyświetlań W części menu Pop up Wideo w polu DŁUGOŚĆ istnieje możliwość ustawienia czasu na jaki obraz z kamery zostanie przełączony w tryb pełnoekranowy jeśli w powiązanych czynnościach alarmowych zostanie ustawiona Pop up Wideo W części menu KOMUNIKAT pole DŁUGOŚĆ ustawia czas w jakim zostanie wyświetlony na ek...

Страница 102: ...nia reakcji na wystąpienie alarmu detekcji Dostępne są następujące reakcje alarmowe ZDJĘCIE wykonanie zapisu obrazu WYJŚCIE ALARMOWE aktywacja wyjść alarmowego w kamerze lub rejestratorze PUNKT wybiera preset dla kamer PTZ BRZĘCZYK uruchomienie sygnału dźwiękowego WYSKAKUJĄCE OKNO WIDEO wyświetlenie obrazu z kamery pełnym ekranie E MAIL wysłanie wiadomości email z powiadomieniem o zdarzeniu MENU R...

Страница 103: ...amerą Dostępne są następujące reakcje alarmowe ZDJĘCIE wykonanie zapisu obrazu WYJŚCIE ALARMOWE aktywacja wyjść alarmowych w kamerze lub rejestratorze PUNTK wybiera preset dla kamer PTZ BRZĘCZYK uruchomienie sygnału dźwiękowego POP UP WIDEO wyświetlenie obrazu z wybranej kamery na pełnym ekranie WIADMOŚĆ wyświetla informacje o zdarzeniu w oknie powiadomienia E MAIL wysłanie wiadomości email z powi...

Страница 104: ...ce informacje DYSK wyświetla nazwę dysku twardego POJEMNOŚĆ GB informuje o rozmiarze dysku twardego FREE SPACE GB wyświetla informacje o aktualnie dostępnym wolnym miejscu na dysku NR SERYJNY wyświetla informację o numerze seryjnym dysku twardego STATUS informuje o trybie w jakim znajduje się dysk RECORD PERIOD Informacje o zakresie czasowym nagrań ŻRÓDŁO informacja o źródle sygnału GRUPA informac...

Страница 105: ...szu DYSK aby dodać dysk do grupy Następnie w polu kamera dodaj kamery które zostaną przypisane do wybranej grupy 2 5 3 Dysk W menu tym możemy odczytać informację o stanie zajętości dysków twardych podłączonych do rejestratora Dostępne są następujące informacje DYSK wyświetla nazwę dysku twardego POJEMNOŚĆ GB informuje o rozmiarze dysku twardego FREE SPACE GB wyświetla informacje o aktualnie dostęp...

Страница 106: ...etrów sieciowych które będą wprowadzone w tym menu Ustawienia sieci w części PORT SIECIOWY NR 1 pozwalają na skonfigurowanie ustawień sieci TCP IP dla głównego interfejsu sieciowego W rejestratorach wyposażonych w porty PoE ustawienia sieci dla portów PoE ustawiane są w części WEWNĘTRZNY PORT ETHERNET UWAGA Podsieci IP ustawione dla obu interfejsów musza być różne Zaznaczenie pola UZYSKAJ ADRES IP...

Страница 107: ...ść skonfigurowania parametrów dostępu do usługi DDNS Umożliwiającej zarejestrowanie nazwy domenowej dla zmieniających się adresów IP W polu WŁĄCZ uruchamiamy usługę a następnie z wybieramy usługodawcę z listy Następnie należy podać odpowiednie parametry jak ADRES SERWERA usługi NAZWĘ UŻYTKONIKA i HASŁO i nacisnąć przycisk ZASTOSUJ aby uruchomić usługę UWAGA Firma AAT Holding S A nie ponosi odpowie...

Страница 108: ...tów Tryb RĘCZNY umożliwia zmianę numeru portu mapowania na urządzeniu zewnętrznym 2 6 6 NAT Zaznaczenie pola WŁACZ w tym menu uruchamia podłączenie do serwera P2P dostępnego w witrynie www autonat com Umożliwia on dostęp do rejestratora przy pomocy połączeń typu P2P UWAGA Usługa www autonat com jest dostarczona przez firmy trzecie i firma AAT HOLDING S A nie ponosi odpowiedzialności za działanie s...

Страница 109: ...PRZYPISZ MAC można określić adres MAC z którego może podłączyć się użytkownik W polu E MAIL można zapisać adres internetowy do użytkownika Aby zapisać dane użytkownika naciśnij przycisk DODAJ 2 7 2 Edytuj konto W tym menu tym mamy możliwość edycji ustawień konta Odznaczenie pola WŁĄCZ powoduje wyłączenie konta Pole NAZWA UŻYT wyświetla nazwę użytkownika ZAMKNIJ PANEL UPRWNIEŃ zamyka panel z inform...

Страница 110: ... 6304P4 H1 NVR 6332 H8 Instrukcja obsługi wer 1 1 AAT Holding S A wszystkie prawa zastrzeżone 50 2 7 3 Edytuj grupę W oknie po prawej stronie wyświetlana jest lista grup z uprawnieniami Kliknięcie na w polu EDYCJA uruchamia edycję uprawnień MENU REJESTRATORA ...

Страница 111: ...ZARZĄDZANIE udostępnia panel zarządzania dyskiem ZARZĄDZANIE ALARMOWYCH udostępnia panel zarządzania alarmami ZARZĄDANIE HARMONOGRAMEM uruchamia dostęp do panelu zarządzania harmonogramami LOKALNE USTAWIENIA SYSTEMOWE uruchamia dostęp do lokalnych ustawień systemowych Na dole menu są dostępną opcje uprawnień dla kamer dla menu LOKALNEGO i ZDALNEGO Umożliwiają one włączenie wyłączenie podglądu odtw...

Страница 112: ... przeglądarki Aby nawiązać połączenie z rejestratorem należy uruchomić przeglądarkę i w pasku adresu przeglądarki należy wprowadzić adres IP rejestratora domyślnie 192 168 1 100 Na wyświetlonym pasku naciśnij przycisk ZEZWALAJ aby uruchomić dodatek MSXML Następnie naciśnij przycisk zezwalaj dla dodatku npWebClient_9000 dll OBSŁUGA REJESTRATORA ZA POMOCĄ PRZEGLĄDARKI System operacyjny Windows 7 Win...

Страница 113: ...EJESTRATORA ZA POMOCĄ PRZEGLĄDARKI Pasek Menu Okno wideo Pasek logowanie Wybór kamer Okna operacji Pasek narzędzi Wybór podziału widoków z kamer Wył Wyświetlanie OSD Rozszerzenie widoku z kamer na cały ekran Przełączenie wszystkich stru mieni główne pomocnicze Sterowanie wyjściami alarmowymi Usuwa wszystkie kamery z widoku Nagrywanie aktywnych kanałów na dysku PC Wysyłanie dźwięku z PC na wyjście ...

Страница 114: ...e prawa zastrzeżone 54 Panel operacje OBSŁUGA REJESTRATORA ZA POMOCĄ PRZEGLĄDARKI Wykonuje zapis aktualnego widoku z kamery do pliku jpg Cyfrowe zbliżenie obrazu Zoom 3D Uruchomienie audio i głośności Wybór rodzaju i parametrów strumienia Uruchamia nagrywanie wideo na dysku PC Cyfrowe oddalenie obrazu Usuwa aktywne kamery z widoku ...

Страница 115: ...H1 NVR 6332 H8 Instrukcja obsługi wer 1 1 AAT Holding S A wszystkie prawa zastrzeżone 55 Panel PTZ MENU REJESTRATORA Przyciski sterowania ruchem kamery Ustawia sterowanie prędkością poruszania Ustawienia zoomu Ustawienia ostrości Ustawienia przysłony Lista presetów ...

Страница 116: ...cisk WYSZUKAJ aby wyświetlić dostępne zakresy na pasku nagrań Szybkie dwukrotne kliknięcie w wybranym miejscu na pasku nagrań uruchamia odtwarzanie nagrań Do sterowania odtwarzaniem i kopiowaniem nagrań należy użyć przycisków odtwarzania MENU REJESTRATORA Lista kamer Kalendarz Pasek nagrań Okno wideo Przyciski odtwarzania Koniec odtwarzania Odtwarzanie do tyłu Pauza Odtwarzanie do przodu Szybciej ...

Страница 117: ...ależy określić interesujący zakres czasu w polach START i KONIEC dla kamer wybranych z listy i nacisnąć przycisk kopia Zostanie wyświetlone okno w którym należy podać ścieżkę do której zostaną skopiowane nagrania i nacisnąć przycisk OK W trybie kopiowania wg zdarzeń należy wybrać zakres czasowy kopiowanych nagrań i rodzaj zdarzeń a następnie nacisnąć przycisk KOPIA Zostanie wyświetlona lista zdarz...

Страница 118: ...tera W celu uzyskania szczegółowych informacji należy skontaktować sie dostawcą Internetu Brama adres bramy dostępowej do Internetu typowo adres routera W celu uzyskania szczegółowych informacji należy skontaktować sie dostawcą Internetu Pierwszy i Drugi DNS należy użyć wartości DNS dostarczone przez dostawcę Internetu lub użyć publicznych serwerów DNS np 208 67 222 222 W menu Routera należy ustaw...

Страница 119: ...NVR 6332P16 H4 NVR 6332 H2 NVR 6316 H1 NVR 6308P8 H1 NVR 6304P4 H1 NVR 6332 H8 Instrukcja obsługi wer 1 1 AAT Holding S A wszystkie prawa zastrzeżone 59 MENU REJESTRATORA ...

Страница 120: ...AAT Holding S A 431 Pulawska St 02 801 Warsaw Poland tel 4822 546 07 00 fax 4822 546 07 59 www novuscctv com 2017 09 01 MB MK ...

Отзывы: