Novation ZeRO SL MkII Скачать руководство пользователя страница 29

29

ADDItIonAL oPtIonS foR EnCoDERS onLy

REL1 (Relative 1):

 A message with value 65 is sent out for every clockwise step (increment) and a message with value 

63 is sent out for every anti-clockwise step (decrement). With this option the encoder functions as a true endless control 
rather than emulates an analogue pot as with the 0-127 and -64/+63 settings.

REL2 (Relative 2):

 This is similar to the ‘REL1’ setting however it includes encoder acceleration. A message with value 

64+n is sent out for every clockwise step (increment) and a message with value 64-n is sent out for every anti-clockwise 
step (decrement). The value n depends on how fast you rotate the encoder. It will be 1 when you rotate it slowly and  
get larger the faster you rotate it, meaning that you can scale the full range of a parameter with a small quick turn of  
an encoder.

0-16K (14-bit mode):

 MIDI data values are transmitted as a 7-bit binary number, allowing a maximum value range of 

0-127. The MIDI Specification allows for two MIDI control messages to be sent together where the data values form an 
MSB (most significant byte) and LSB (least significant byte) pair, making a 14-bit binary number and allowing a maximum 
value range of 0-16383. This is useful where fine control over a parameter is required, however the parameter you are 
controlling must be able to receive 14-bit MIDI values. If you want to send 14-bit values for fine control over a parameter 
then set DispType to ‘0-16K’. For CC controls, the MIDI Specification only allows for CC numbers 0 to 31 to be used in this 
way. Two CC messages are sent when the value of a parameter is changed – the first with the MSB value and the second 
with the LSB value. To enable the receiving device to distinguish between which CC message has the MSB value and which 
has the LSB value, the LSB value message is sent using a different CC number, calculated by adding 32 to the original CC 
number. Consequently CC numbers 32 to 63 are used for sending the LSB value in 0-16K (14-bit) mode. As an example, if 
a CC encoder has DispType set to ‘0-16K’ and CC Num set to 0 then, for each encoder step, two messages will be sent – 
a CC0 message with the MSB value and a CC32 message with the LSB value. The important point to note is that if  
an encoder has Control set to ‘CC’ and DispType set to ‘0-16K’ then CC Num should only be set from 0 through 31  
and not higher.

APOT:

 This is a variation of ‘REL2’ and is the same system that is used by some other existing popular control surfaces. 

A message with value 0+n is sent out for every clockwise step (increment) and a message with value 64+n is sent out for 
every anti-clockwise step (decrement). The value n will equal 1 when you rotate the encoder slowly and increases as you 
rotate the encoder faster.

Additional option for when Control is set to ‘NoContrl’: 

LABEL:

 If a control is not assigned to send a MIDI message then there will be a blank space above it on the display.  

You can however use that blank space to display up to 8 characters (on the top line of the display) by setting DispType  
to ‘LABEL’. If this is set, the control name will be displayed, even though the control is not assigned to anything. You can 
edit the control name by scrolling up to the second page of options in Edit mode (see below for further info on editing 
control names).

Value Range:

 These options allow you to set the upper and lower limits of the control value. By default the Low Value will 

be set to the lowest possible value and the High Value will be set to the highest possible value. In this case the control will 
affect a parameter throughout its whole range. Adjust these settings if you want the control on the ZeRO SL MkII to affect 
a parameter though only part of its range.

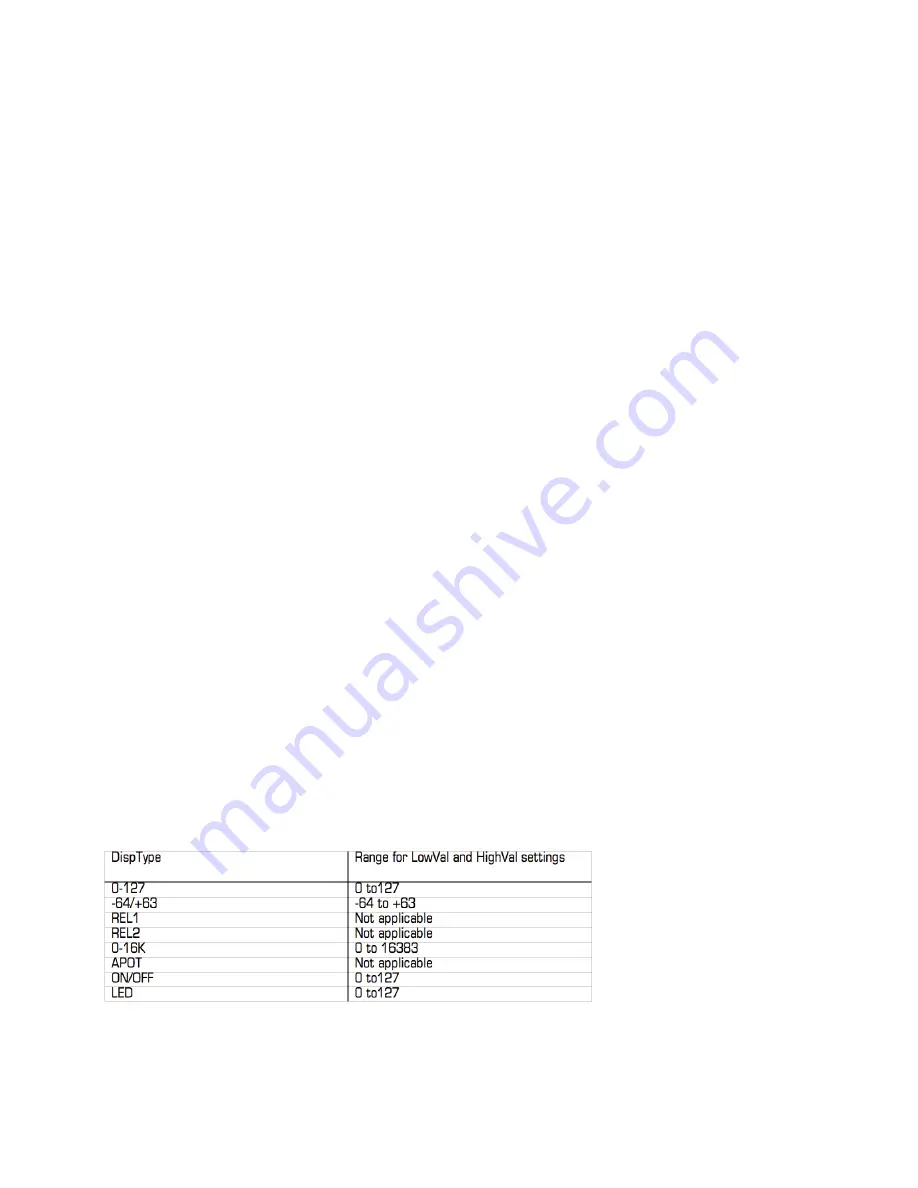
The range of values allowed for both of these settings will depend on the DispType setting as follows:

With an encoder or pot, the control value will scale from the Low Value to the High Value as you rotate it clockwise. 
Consequently if you want the control value to increase as you rotate the encoder clockwise, make sure the High Value is 
larger than the Low Value. If you want the control value to decrease as you rotate the encoder clockwise (inverted action), 
make the Low Value larger than the High Value. It is possible to invert the action of the sliders, joystick, X-Y touchpad and 
the expression pedal in this way.

Содержание ZeRO SL MkII

Страница 1: ...1 Rev 01 ZeRO SL MkII USER GUIDE Firmware Version 1 0...

Страница 2: ...orts 13 Software Set up Examples 14 AUTOMAP for hardware control 15 ADVANCED MODE 16 Selecting Templates 16 ADVANCED MODE Template Overview 17 Speed Dial 17 Hardware Control 18 Software Hardware Contr...

Страница 3: ...ock Settings 25 Program Change Input Channel Port 26 Send Receive Sub Menu 26 Template Dump 26 Send Globals 26 OS Receive Send 26 DrumPads Calibration 26 Writing Global Settings 27 Transport 27 Creati...

Страница 4: ...m 31 Control Edit Pot Pick Up Mode 31 Non Registered Parameter Number NRPN 31 Registered Parameter Number RPN 31 System Exclusive SYSEX 32 MIDI Machine Control MMC 32 note on off 33 Bank Change 33 Pro...

Страница 5: ...favourite music software applications It operates the same way for all Novation Automap hardware Products so if you are using the ZeRO SL MkII for Automap control of software then you should only nee...

Страница 6: ...ing the encoder quickly 2 8 touch sensitive pots These controls have fixed end points and offer 300 of movement 3 8 touch sensitive 60mm sliders 4 1 touch sensitive 45mm Horizontal Cross Fader All tou...

Страница 7: ...s Use these to scroll through pages of options when in a menu or through pages of additional control information when in an Advanced template These buttons have different specific functions when in ce...

Страница 8: ...ice using a 5pin DIN MIDI cable 7 MIDI port 1 Through socket Use to connect the ZeRO SL MkII to the MIDI input of an external device using a 5pin DIN MIDI cable MIDI Through is a copy of MIDI received...

Страница 9: ...ware ZeRO SL MkII as a MIDI Interface with Software and Hardware Control Using the ZeRO SL MkII with External Hardware AND a Host Computer You can also combine the two above set ups so that the ZeRO S...

Страница 10: ...ic software and plug ins AU VST RTAS and TDM Easy Switching between the two modes It is very quick and easy to switch between Advance mode and Automap Mode This way both modes can actually be used at...

Страница 11: ...ollowing link www novationmusic com support Selecting Automap Mode To use the SL Mk II in Automap Mode press the automap button so that it is lit Automap Mode System Buttons The Automap system buttons...

Страница 12: ...s own built in one Hold Preview and touch or press any assignable control to display that row s controls on the ZeRO SL MkII s LCD screen For example by holding the Preview button and touching the thi...

Страница 13: ...als Port 2 Is generally reserved for special templates in advanced mode but can be also used in more complex Advanced mode set ups Automap Port Hidden This is a hidden port i e your computer does not...

Страница 14: ...omap HUI and hosted plug ins directly Automap for all other software For software that responds to or learns MIDI CC messages e g DJ software stand alone synthesiser software certain plug ins with no...

Страница 15: ...used to hardware MIDI devices by routing MIDI CC data to the ZeRO SL MkII MIDI Ports or any other MIDI interface connected to your computer Please refer to the Automap User guide for more info Ableto...

Страница 16: ...for full information on advanced mode templates please check the Novation Answerbase www novationmusic com answerbase Selecting Templates To switch between the 32 Advanced mode templates press the sp...

Страница 17: ...lding the Preview button and touching the third vertical fader the parameter names and values assigned to all eight faders are displayed on the LCD Page Up Down buttons press up once to display the ty...

Страница 18: ...both of the MIDI output ports Software and Hardware Control Advanced mode templates can be used in complex systems so that controls are sent to hardware via the MIDI ports and to software via the USB...

Страница 19: ...ttons have fixed functionality in all the other standard templates The 2 Special templates are for controlling Reason and Ableton Ableton Users Note VST and AU plug ins can be controlled using the Abl...

Страница 20: ...MkII memory Selecting To select an option simply touch or press a knob encoder or button directly below the option s position on the LCD If a button is lit then this denotes that there are selectable...

Страница 21: ...l Tempo Displays the tempo value as set in TempoBPM on previous page Current Tempo Displays the tempo as received from the computer via USB or an external MIDI device via MIDI in See MClk In in the Gl...

Страница 22: ...a control does not match the value of the control stored with the template the control value will jump from the stored value to match the position of the control as soon as the control is operated Not...

Страница 23: ...eating and Editing Advanced Mode Templates from the ZeRO SL MkII Please note that we strongly advise you not to edit the Automap template To enter Control Edit Mode Press and HOLD the edit button Now...

Страница 24: ...active for Automap and all Advanced Templates Setting this to OFF means that touching a control no longer displays that control s row on the LCD screen Transport Transprt When the transport button is...

Страница 25: ...ports MIDI Clock Output MClck Out MIDI Clock output destination can be set to any or a combination of the following M1 M2 U1 U2 MIDI Clock Input MClk In MIDI Clock input source can be set to any of t...

Страница 26: ...All to send all templates Send Globals Press the button to dump the global settings in sysex format Ports This option sets where template and global sysex dumps are sent to MIDI O S Send Receive Press...

Страница 27: ...ing Global Settings To save all global settings press the WRITE button whilst in the Global menu Remember that global settings can be saved regardless of whether memory protect is set to ON or OFF Tra...

Страница 28: ...ontrol The available settings will depend on what Control is set to The following is a guide to each of settings available for the different Control options Follow through the section for Control Chan...

Страница 29: ...set to 0 then for each encoder step two messages will be sent a CC0 message with the MSB value and a CC32 message with the LSB value The important point to note is that if an encoder has Control set t...

Страница 30: ...l to be sent and the value will step up again on subsequent presses Note that the To Value is always sent before returning to the From Value even if it takes a jump less than the step size to reach th...

Страница 31: ...o ON or OFF The advantage presented by this option is that the response of some or all controls in multiple templates can be changed by editing a single parameter rather than editing the individual se...

Страница 32: ...two bytes cannot be separated by non variable bytes but the position of the pair of bytes in the message can be edited MSB LSB This is the same as LSB MSB except the MSB precedes the LSB in the sysex...

Страница 33: ...nstruments and then CC32 to select different sub categories e g acoustic piano Some synths however do not respond to CC0 messages and some do not respond to CC32 messages You should check the manual f...

Страница 34: ...u to set a note length in which case the ZeRO SL MkII will ignore the Auto Off setting Instead it uses MIDI clock as a timing reference and sends a note off message after the selected note length has...

Отзывы: